Jun 4, 2016
ZeroDarkSilver Lot of speculation/incorrect information floating around. I removed the front plate bracket today and it was fairly painless. Wanted to share what works and what doesn't.
THESE DO NOT WORK, DON'T WASTE YOUR MONEY...
- 11/32 socket
- Wrong shape, does not grip screw head
- e.g. http://www.amazon.com/TEKTON-14105-32-Inch-Shallow-6-Point/dp/B000NY79T8
- Male Torx drivers
- The screw head is also male, come on people...
- Plus, you won't find the correct head shape anyway
- e.g. http://www.amazon.com/Neiko%C2%AE-10048-Security-Vanadium-100-Piece/dp/B000O5XDOG
- Female Torx sockets
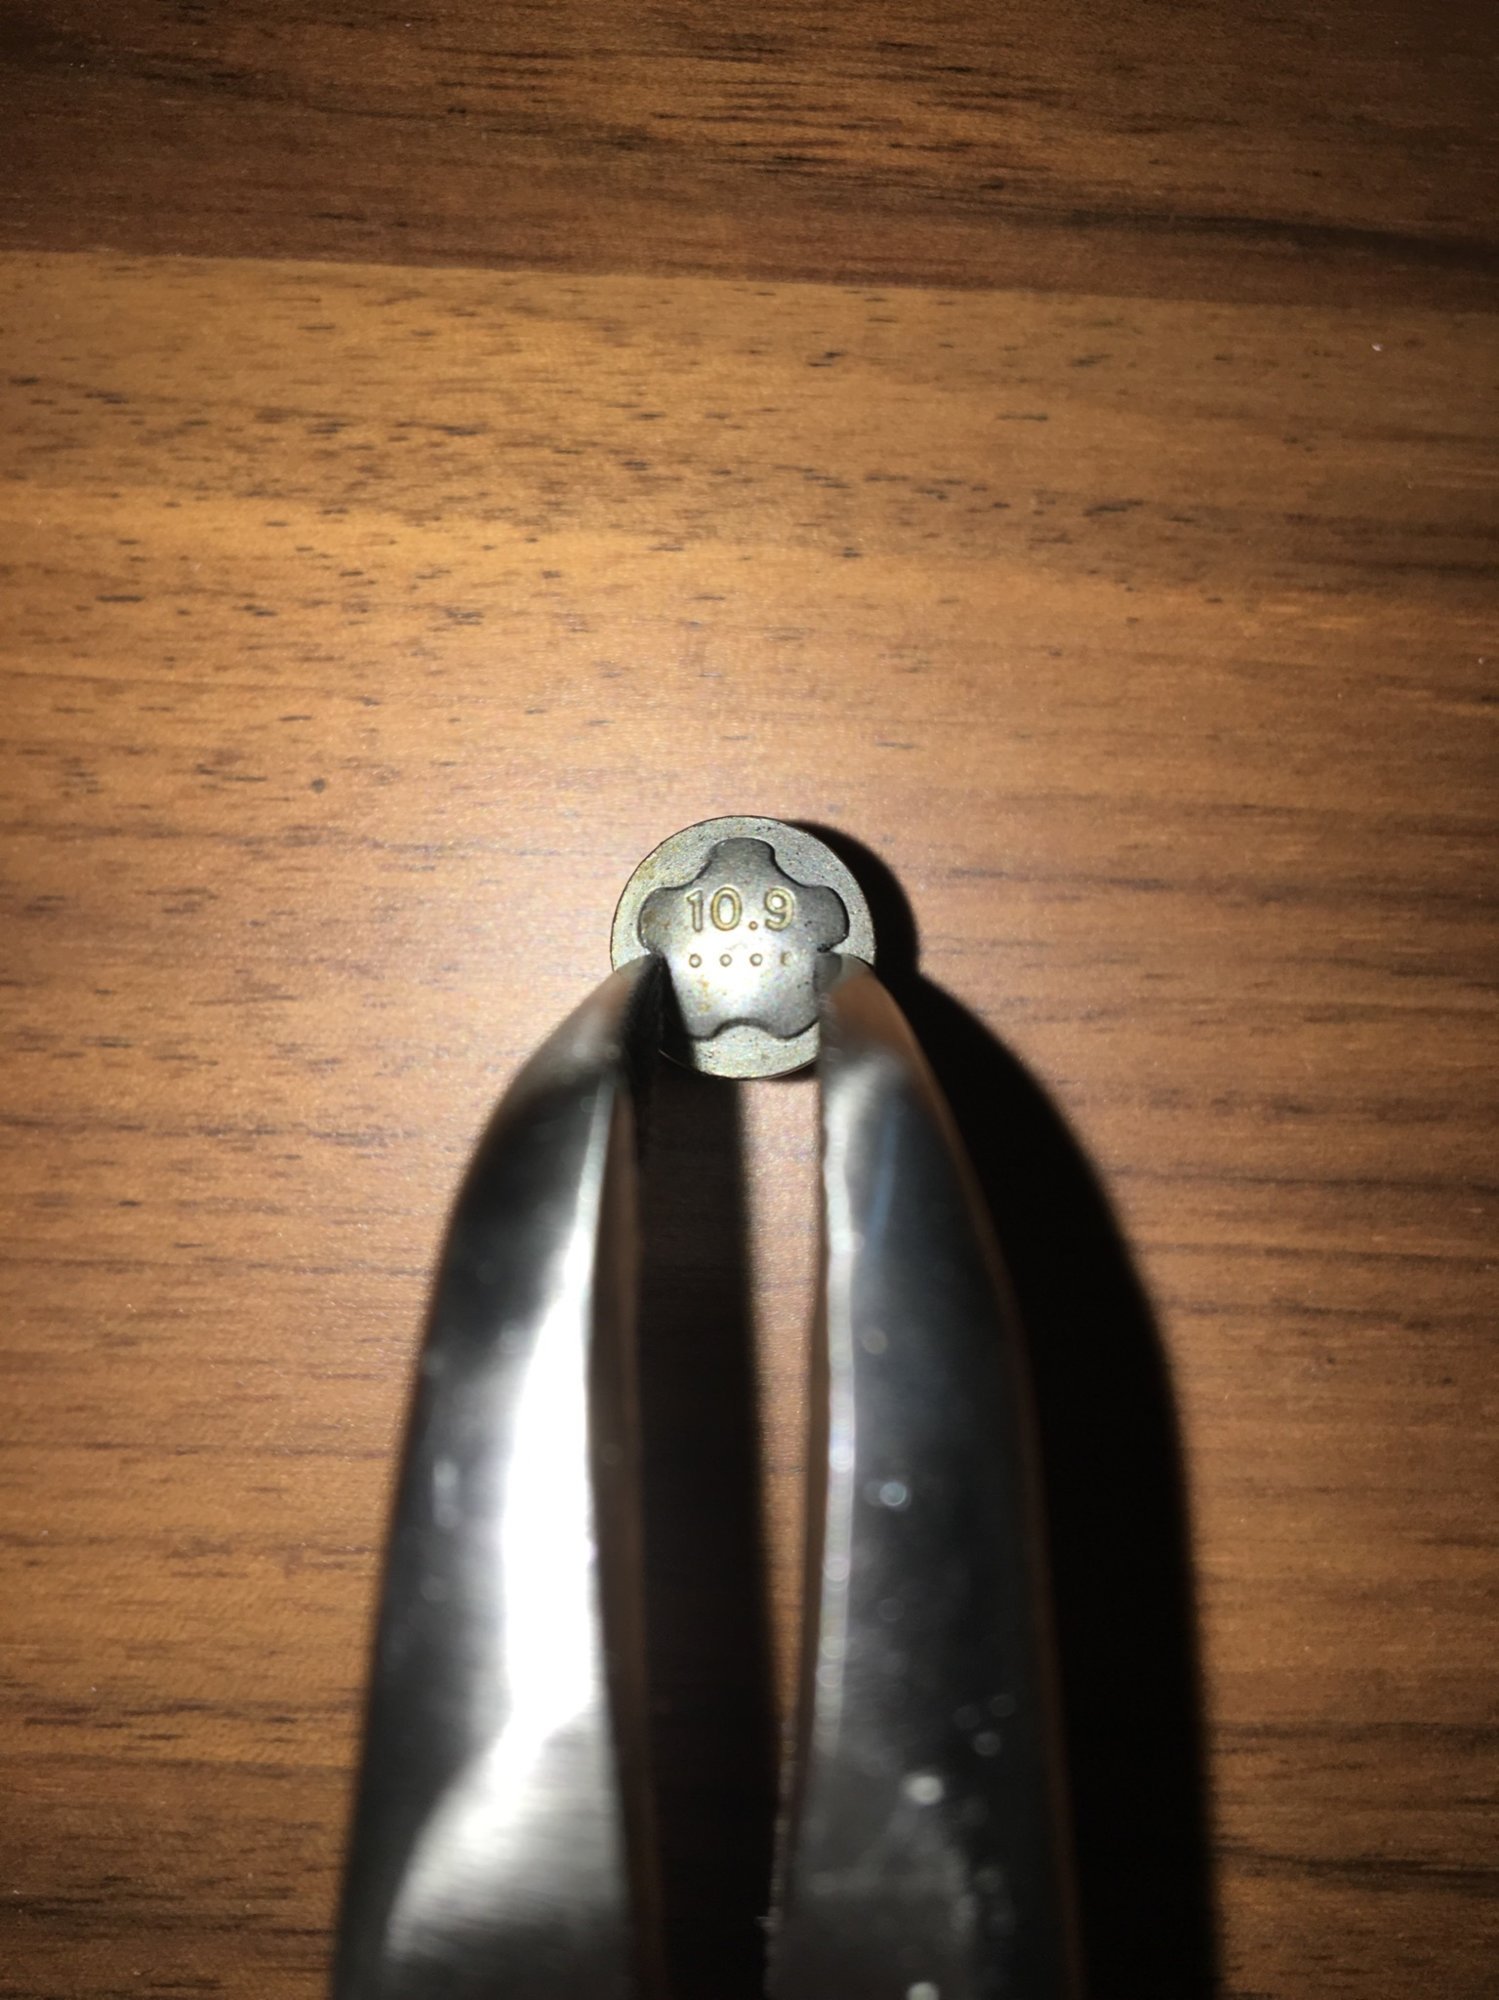
- You won't find the correct head shape, the sockets are all hexa-point, but the screw head is penta-point
- e.g. Neiko� 10070A Torx Bit and External Torx Socket Set, Tamper Proof, T8 - T60 | 35-Piece - - Amazon.com
- Gator grip sockets
- The diameter of the socket is WAY too large to even fit into the recess around the screw head, much less try and see if the depressible pins can actually grip it
- e.g. http://www.amazon.com/Lukher-Professional-Universal-Socket-Adapter/dp/B01DQBC53E
BUT, THE FOLLOWING DOES WORK, AND IT'S EASY!
- Cutting a groove into screw head for a flat blade driver
- See:
- Ok, I guess this works, but bringing a rotary blade anywhere near your paint job, ARE YOU CRAZY?
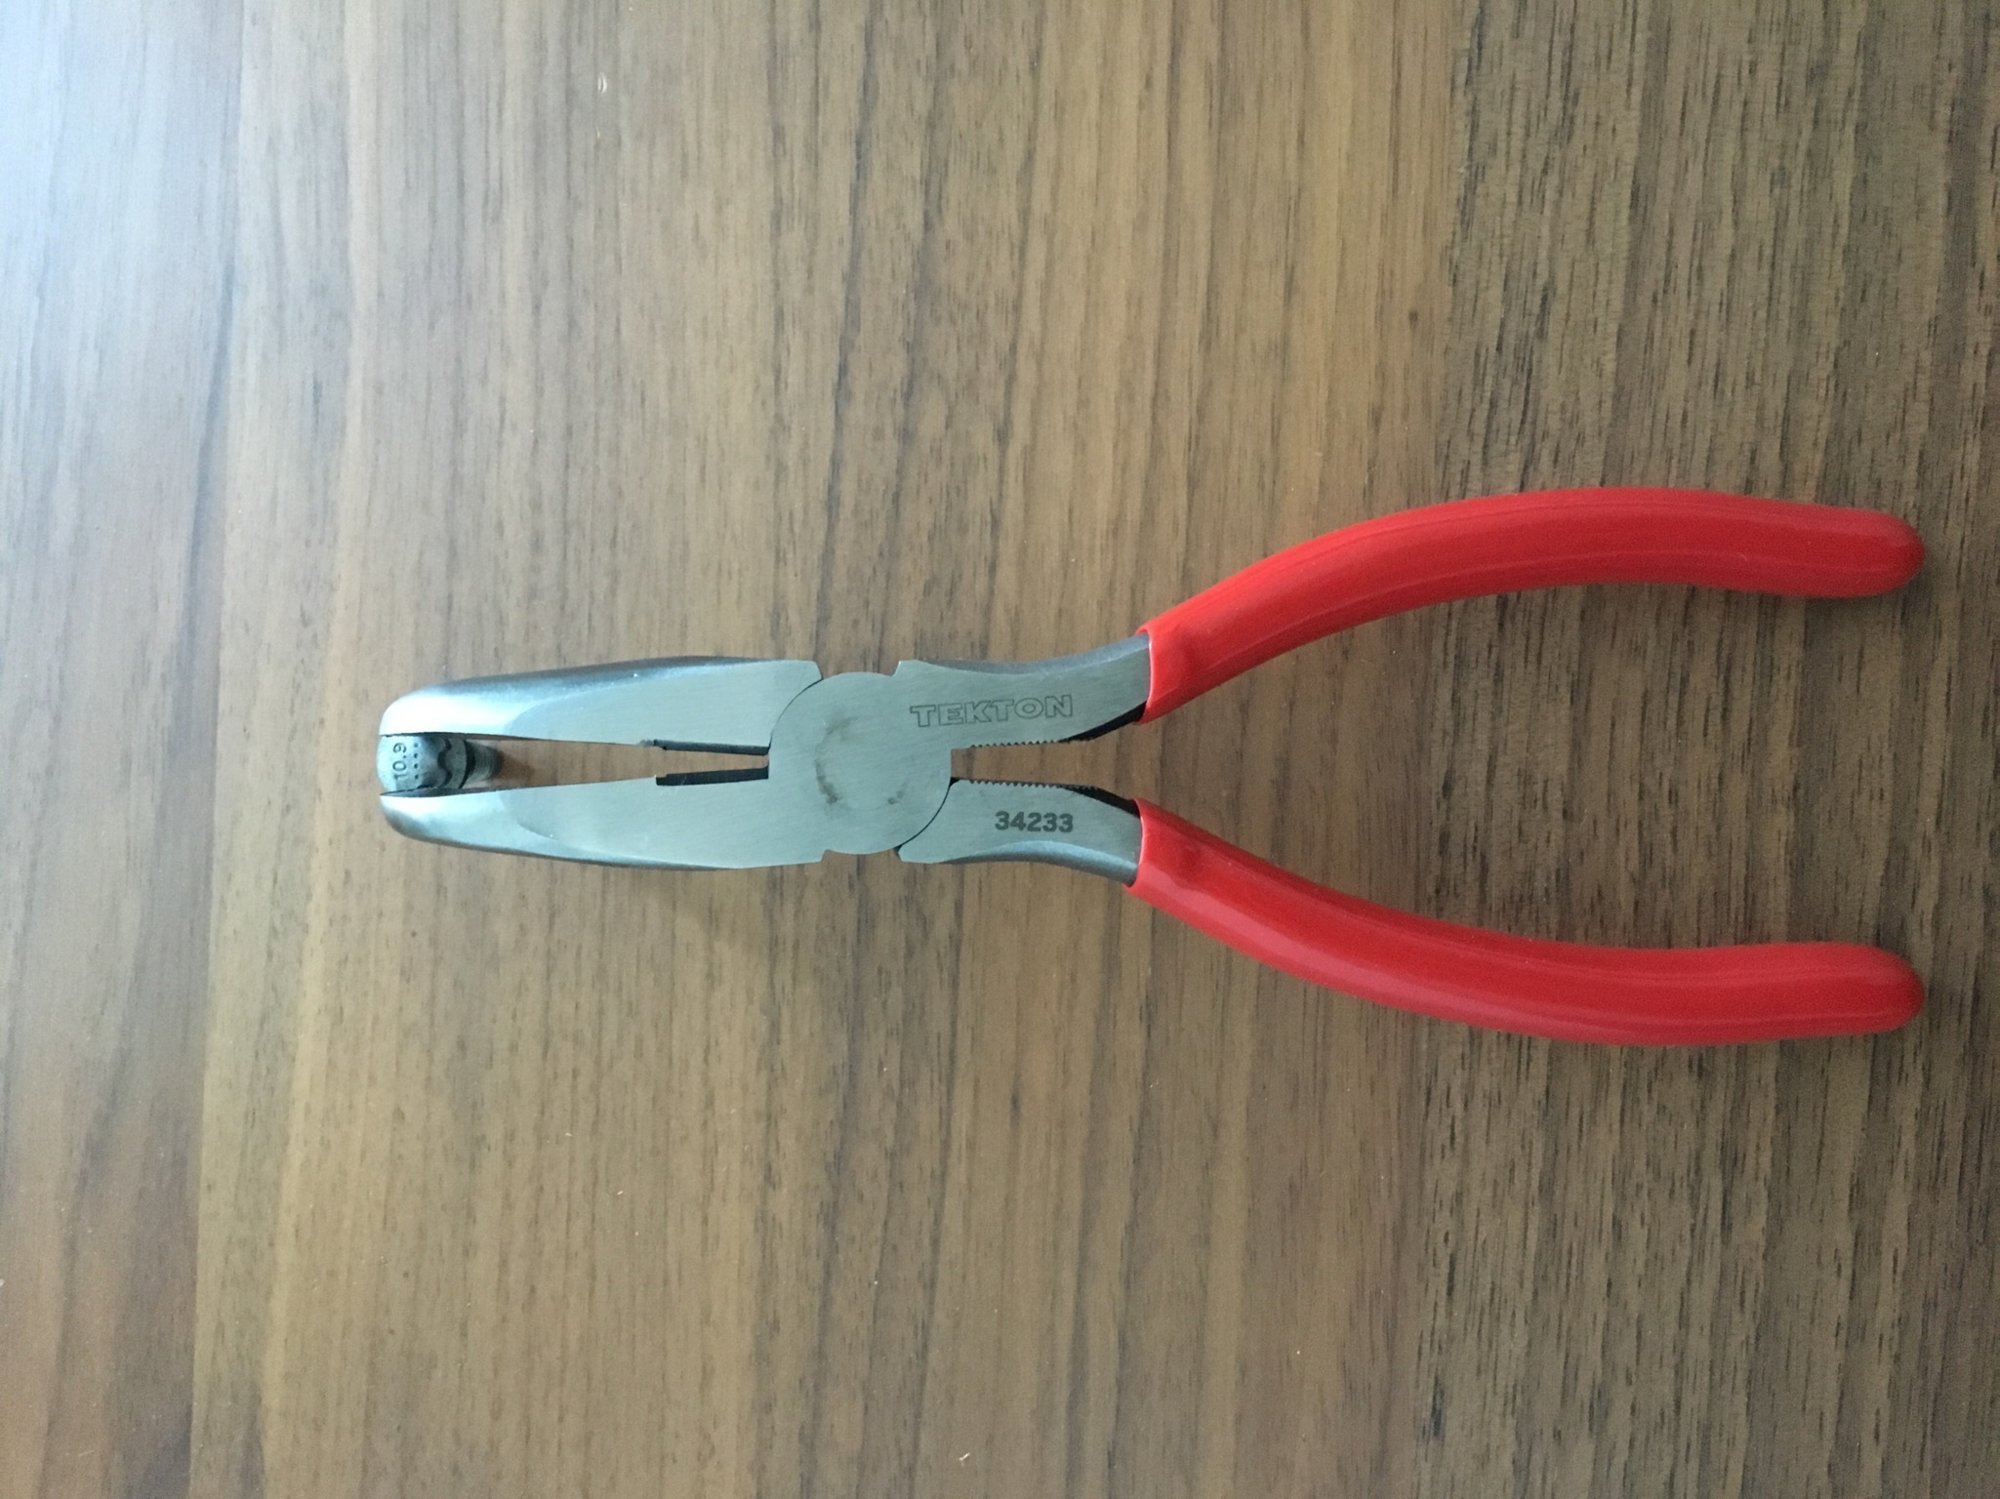
1. Buy yourself one of these: http://www.amazon.com/TEKTON-34233-7-Inch-90-Degree-Pliers/dp/B00YQ7RS1M
2. Make sure you can see the screw. This is key to getting a good grip. My garage is dark so I taped a small mirror to the back of my iPhone and used the rear-facing flash to illuminate the screw. I rested the iPhone face down on the lower lip of the front fascia so I could see what I was doing in the mirror.
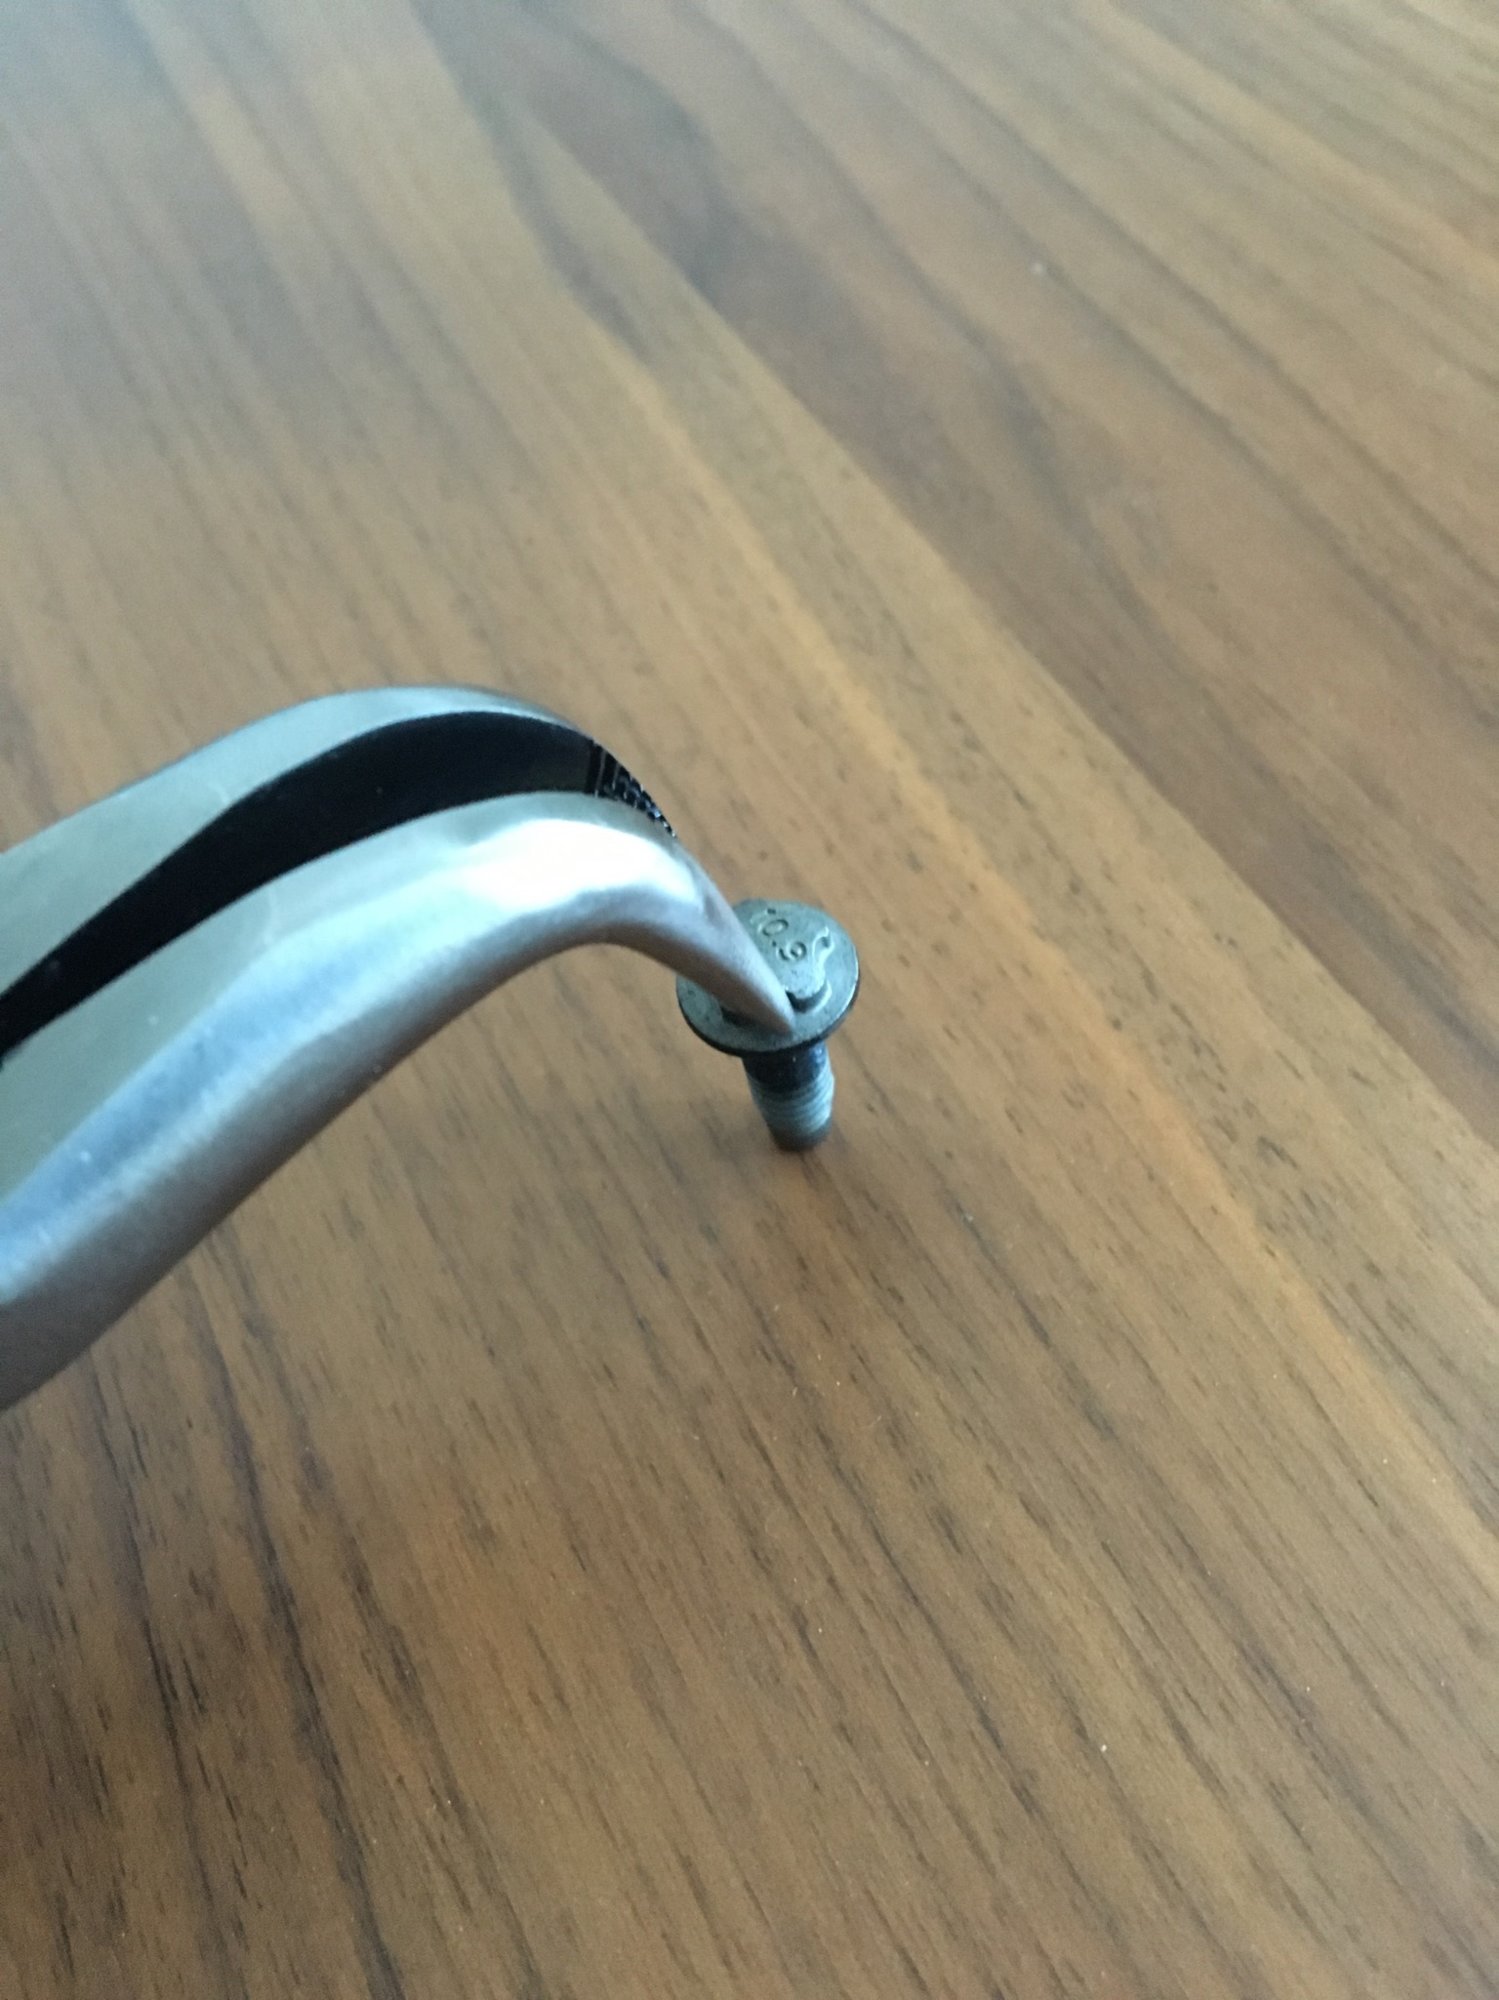
3. These 90-degree bent pliers let you grip the penta-point screw head at 4 and 8 o'clock to turn the screw. I found they were not torqued at the factory very tightly, so it was easy to loosen them. I did a few turns with the pliers, and then could unscrew the rest of the way with my fingers.
Attached are detailed pictures of how the pliers should grip the screw head.
Good luck!

 �
�
Jun 4, 2016
beantobe Thank you for putting an end to this.�
Jun 4, 2016
ZeroDarkSilver For great justice�
Jun 4, 2016
SDRick Great job putting this one to bed!
(Do I get partial credit for being the first to call out the tool)?�
Jun 4, 2016
ZeroDarkSilver I might have actually gotten the idea to order those pliers from your post, now that I think about it...
Go hard!�
Jun 5, 2016
Manny13z I'm going to bring it with me on delivery, stop the DS from starting their presentation and tell her she can proceed once I remove the front license plate bracket.") �
�
Jun 5, 2016
beantobe then have the detailers come back out and clean up the adhesive! genius.�
Jun 5, 2016
ZeroDarkSilver Ha ha! Actually the adhesive comes off very cleanly. Just roll it up into little sticky balls and pluck off, no residue. You'll find though that there's no wax/polish under the bracket, so getting some detailing done right there would be nice.�
Jun 6, 2016
valkeriefire This project is actually kicking my butt. Removing the bracket was easy. Tesla let me use the Torx wrench and remove the screws in the parking lot. Unfortunately my residue is horribly sticky. I've used a hair dryer but it's a lot of work to remove. I'm using the ball roll method which is what works best, but so far I've gotten 2 blisters and and lost skin off my index finger due to the friction of rolling the goo back and forth. I build my own computers and rebuild jetskis for fun but I'm over an hour into this and it is not fun. I expected it to be much easier.
Edit: wow. Took me about 2 hours to complete. The conceptual difficulty of this is like 1/10, the practical difficulty was 9/10. I've had easier times installing 5th wheel hitches.�
Jun 6, 2016
zambono Goo gone, or alcohol might help there�
Jun 6, 2016
James Anders http://www.amazon.com/3M-38987-Specialty-Adhesive-Remover/dp/B005RNCBQQ/r�
Jun 6, 2016
Wuggado? I got the bolts off using this method, but the glue has a death grip on the bumper. Normally I would use something to pry it, but am reluctant in this case for fear of scratching the paint. Has anyone else seen this?�
Jun 6, 2016
valkeriefire Use your hands, be gentle and forceful at the same time. Apply gradually increasing pressure until it gives. Don't yank on it, go slow and steady. I would under no circumstances use any sort of mechanical advantage as it may damage the bumper. Hands only. I even refused to wear gloves because I wanted to feel exactly where I was. I now have multiple blisters on my fingers to show my effort ; )
My finding was that the glue was exceptionally strong. I'm a firefighter, we break doors and walls down for a living, I'm not at all afraid of work, but this was different because it required a lot of force with a gentle touch to protect the bumper. I used my hands to pry off the backplate, but it wasn't easy or comfortable. I now realize my bad luck came from the glue sticking to the bumper rather than the plate. Everyone who's had an easy removal had their glue stick to plate. Mine left a perfect square of glue on my bumper. Perhaps this was due to heating the plate with hairdryer. It may have caused the glue to loosing from the plate but not the bumper. Aesthetically it was worth the effort, but I have no doubt someone with less patience in my situation will damage their bumper and be seriously upset.�
Jun 6, 2016
ZeroDarkSilver Here's what I did to make this easier:
First, I pried the plate mount away from the bumper from the bottom. There seems to be a bit more space to wedge your fingers in from the bottom than the top.
After pulling the mount away by about the thickness of my finger, I was able to get a plastic knife in there to start cutting at the stretched out adhesive. Going slow and being careful, I was able to cut through the adhesive from the bottom up until the mount finally gave way.
About 70% of the adhesive stayed stuck to the mount for me, leaving only maybe 30% on the bumper to roll up and peel away. It was a little rough on my fingers but overall not too bad.
I did not use any heat.�
Jun 6, 2016
SDRick Zero,
How long did it take you start to finish?�
Jun 6, 2016
ZeroDarkSilver Rick, if I'm counting from my first failed attempt with the wrong tool, a week.
But once I got the 90-degree bent pliers, it was a breeze. I blew about 5 minutes turning the screw the wrong way because it's oriented upside down. After smacking my forehead for that one, it took just a minute or two to unscrew the two screws.
When it came time to pull the adhesive-attached plate mount, i spent about 5 minutes trying to just pull it straight off. I probably could have done it, but it was starting to warp the bumper more than I was comfortable with. So then I went upstairs to get a plastic knife. With the knife cutting through the stretched adhesive, it only took a few minutes to get the plate mount off. I spent another 5-10 minutes rolling off the left-over adhesive.
If you know what you're doing up front, it's a 15 minute job.�
Jun 6, 2016
valkeriefire I pulled it from the top down. I wonder if that incouraged more glue to stay on the bumper. I'd recommend try his buttom up approach and not using heat. You don't want any more glue on the bumper than necessary. It's a pain.�
Jun 6, 2016
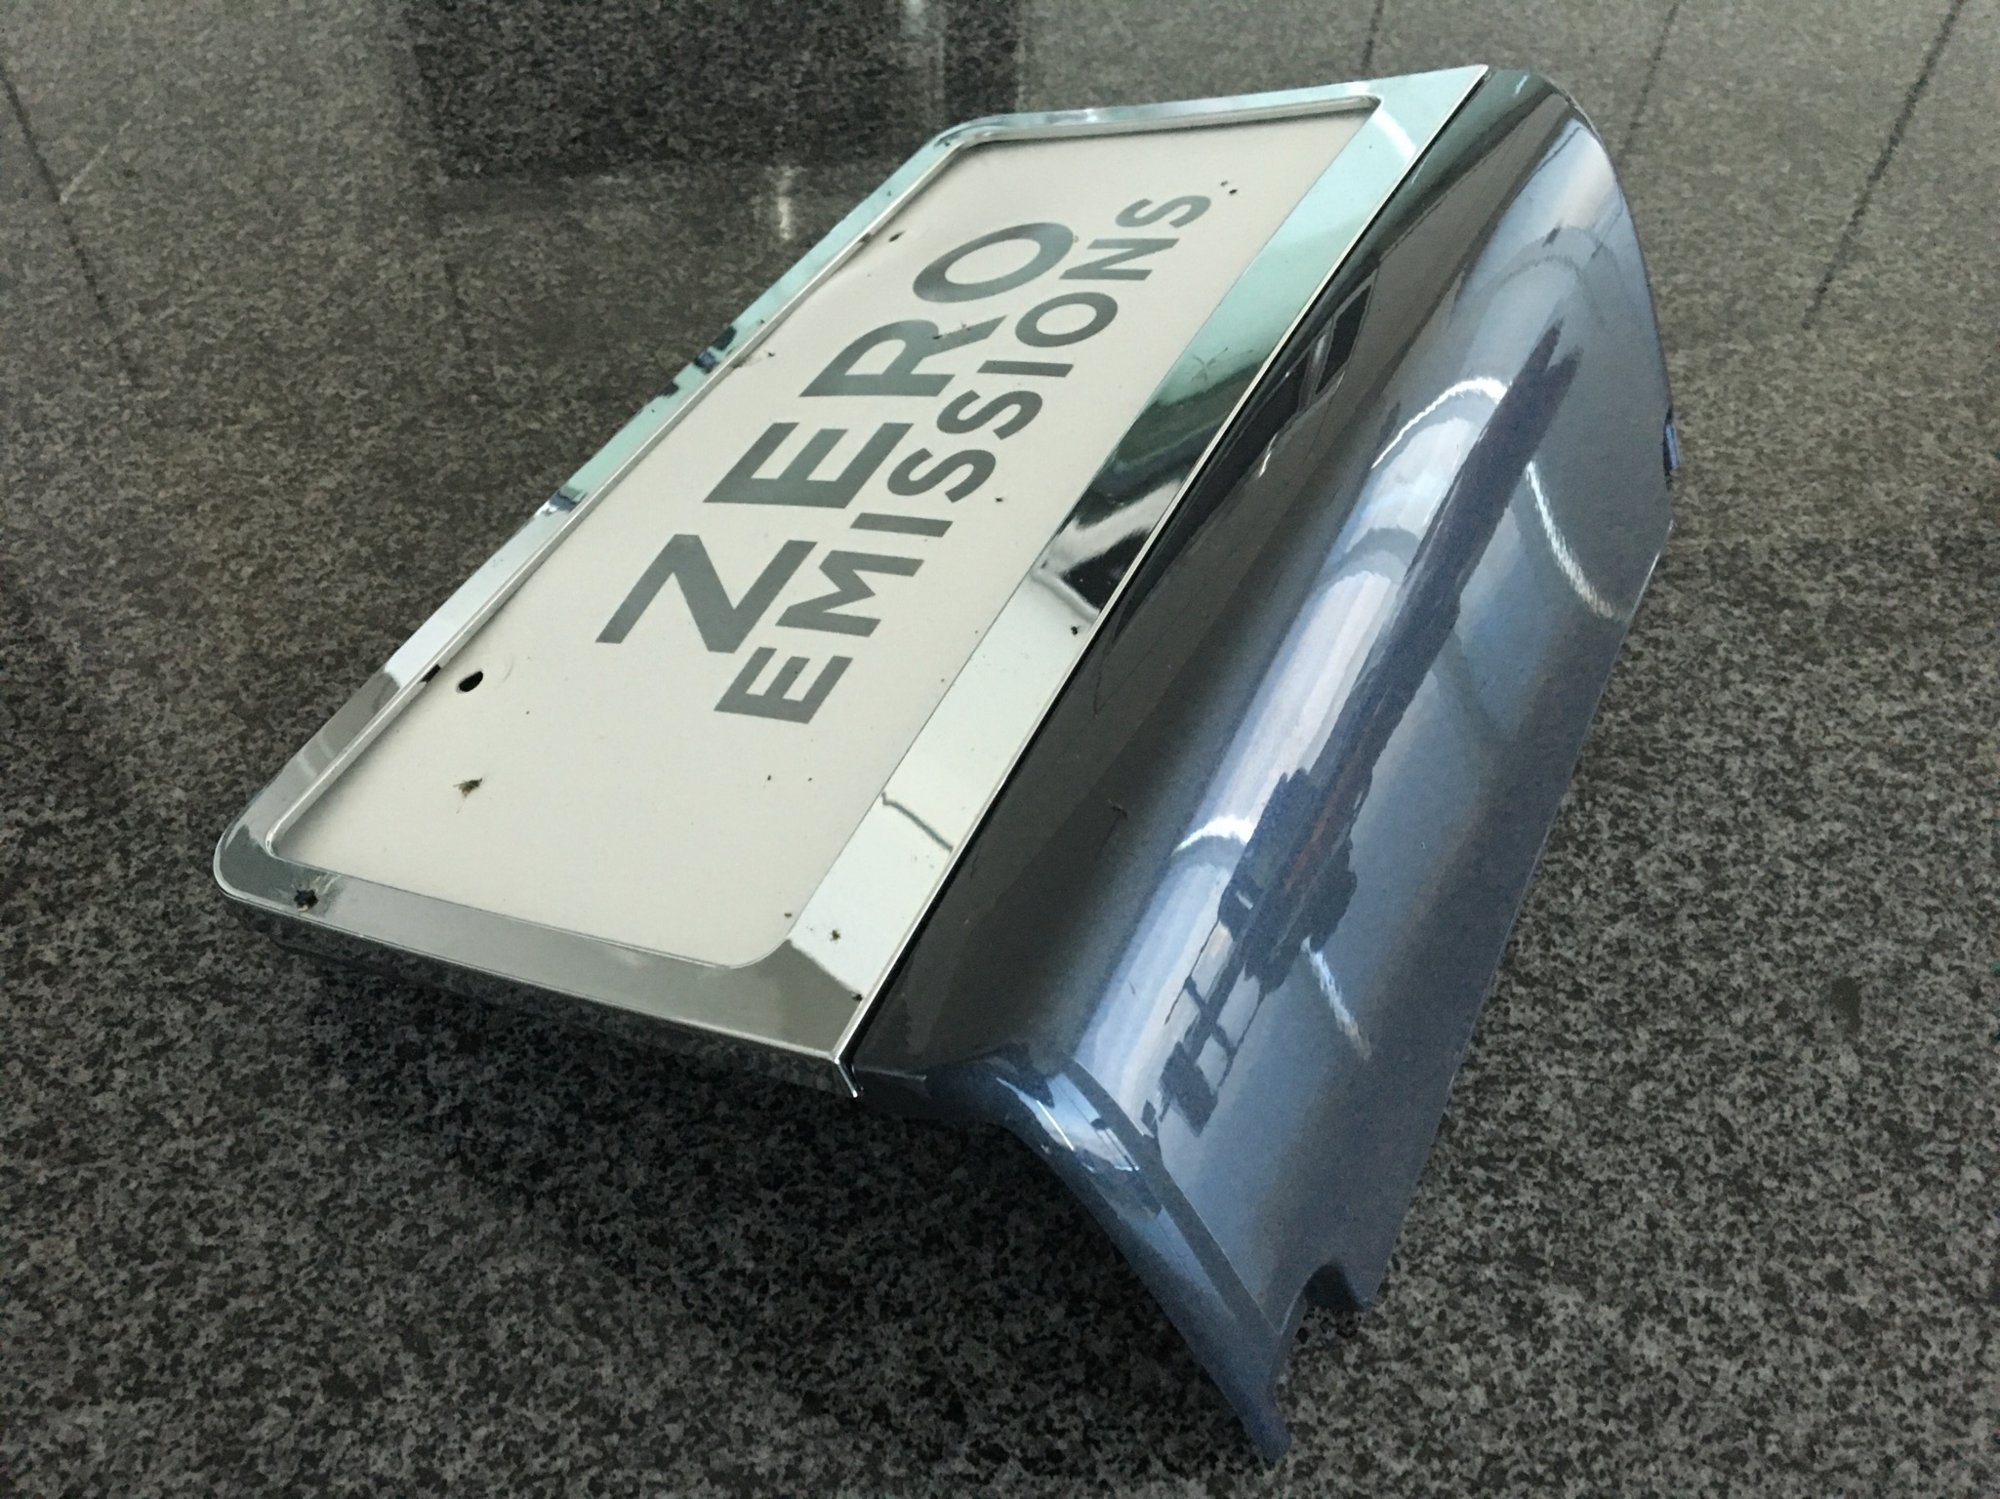
ZeroDarkSilver So worth it though. She's got a beautiful face underneath all that plastic garbage...�
Jun 7, 2016
valkeriefire
�
Jun 7, 2016
Chukarboy Why couldn't you just use dental floss or fishing line to cut through the tape? The same way you would take badging off.
I should be getting mine in the next few weeks, I don't like the idea of just pulling it off, I will try both.�
Jun 7, 2016
valkeriefire Getting the back plate off the car was easy (for me), getting the goo off was the problem. As long as your glue sticks to the mounting plate, you won't have half the trouble I did.�
Jun 7, 2016
CTShore Anyone try "Un-Du Adhesive Remover"? I use it to remove sticky labels. Might be worth a try- Amazon sells�
Jun 7, 2016
K_style Goo gone worked just fine with a single application.�
Jun 7, 2016
NikeWings Thanks for the link ZDS. I'm taking them to my delivery ceremony (whenever that is) and invoking the damsel in distress strategy.�
Jun 7, 2016
ZeroDarkSilver Beautiful. New front fascia looks incredible in white.
�
Jun 7, 2016
ZeroDarkSilver Dental floss probably isn't strong enough. Fishing line might work. The adhesive is really tough though, the fishing line might cut through your fingers before it cuts through the adhesive. Stretching it out by prying the plate out a little helps a lot. But if you're doing that you don't have another two hands free to "floss" the adhesive unless you get a helper. Still think a plastic knife is easiest, the teeth help saw through real quick.�
Jun 9, 2016
jf2go Excellent information Zero! Took me less than a half hour start to finish. Pulling the bracket off the painted surface was the creepiest part for me�
Jun 9, 2016
ZeroDarkSilver Glad it was helpful, congrats!�
Jun 14, 2016
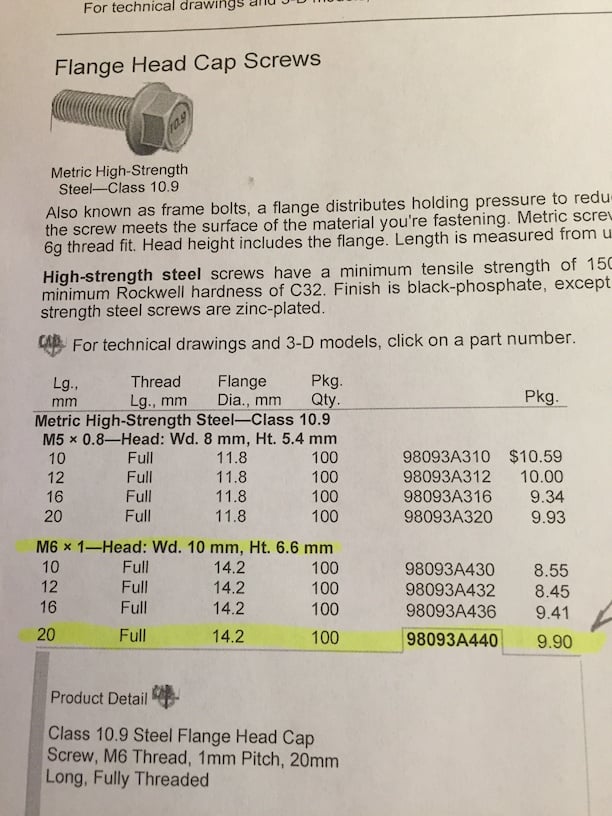
bursch For anyone having an urge to reattach the holder, this from McMaster-Carr...
 �
�
Jun 15, 2016
MDMGSO47 I finally removed mine yesterday without any tools other than a screwdriver and hair drier, and it was a piece of cake. I first removed the outer plate holder from the block on the front of the bumper by removing the screws attached to the block glued to the front of the bumper. After removing the horizontal screws, the mount droops down so that it is suspended by the two vertical safety screws under the bumper. The license plate mount is made from a flexible vinyl-like substance. I simultaneously pulled down on the mount both behind the safety screws and in front of the safety screws, and the mount popped right off . The screws pulled through the holes in the mount because the mount material is very flexible. The mount was totally undamaged, and could easily be reinstalled.
I then heated the block glued to the front of the bumper, and pulled it off by lifting the top right corner and pulling out and down. No prying mechanism is needed other than your fingers. Finally, using my thumb, I removed the residual glue on the bumper by starting at one end and rolling it up on itself.
All in all, it took less than five minutes and was easy peasy.�
Jun 15, 2016
Soundchasr Great to hear. I pick up my car today and this will be what I do as soon as I get home.�
Jun 15, 2016
rhumbliner I was able to remove the front plate bracket by removing the 2 screws at the gallery when I picked up my 90D -- they were happy to hand me the tool -- and when I got home I simply applied steady pressure, pulling from the top down. I was able to watch the double-sided tape slowly pull away from the facia and stay attached to the bracket. There were a few spots on the facia where the residue remained but I removed that with WD-40 and a soft cotton cloth. I did not use a heat gun or floss or fishing line. Just a slow, steady pressure was sufficient. Whole process took, maybe, 20 minutes.�
Jun 15, 2016
MDMGSO47 Congrats. You are in for a treat.�
Jun 16, 2016
Soundchasr Got this done in about 15 minutes. Taking off the bolts was really easy - it's almost as if they were only hand-tight. The challenge is removing the backing that is attached to the bumper.
First, I tried just pulling it off and it wouldn't budge. Then I tried fishing line but that didn't do it either (broke the line). Finally, I pulled out the heat gun and heated it up. I was then able to pull from the upper right corner, as recommended earlier, and slowly pull it from the bumper. Only a little bit of the adhesive remained and I was able to roll that off with my fingers. A little glue remained and I took that off with Goo-Gone.�
Jun 18, 2016
James Anders If anyone's interested in a tool to remove the security screws I'll post info in this thread...
Custom Socket Tool for Refresh Front Plate License Screws
I've designed a simple little socket adapter that fits onto a 1/4 inch drive, nut driver or Allen key.�
Jun 18, 2016
CHG-ON I can't believe how over engineered that bracket is! All that for somthing I would remove in the parking lot, as @valkeriefire did.�
Jun 19, 2016
rhumbliner Since I split my time between Nevada (where the front plate is not required) and Wyoming (where the front plate is required) I needed a simple way to reattach & remove the front plate bracket. I replaced the OEM torx bolts with standard M6 metric bolts so I can use a Phillips head screwdriver to reattach the front bracket. But the bolts aren't enough to stabilize the bracket. There's a reason Tesla glues the bracket to the front facia. So I picked up a set of 3M picture hanging strips and attached these to the top of the front bracket. These were sufficient to stabilize the bracket and prevent it from wobbling -- even at 70 mph -- and the adhesive from the strips is easy to remove from the facia. Now it's easy on / easy off. Problem solved.�
Jun 22, 2016
pete8314 I removed mine last night. The 11/32 socket didn't do much for me, but the 90" pliers did the job, albeit slowly. Once you're about half way, you can remove the screws by hand. I really don't know why Tesla oped to use such a funky fitting; I get they need to satisfy various State requirements, but do any of those requirements specify an anti-tamper screw? I used a broad plastic trim pry bar to work the VHB tape away from the bumper, all in, it took maybe 10 minutes. It came away easily, but it had been parked out side for a couple of hours in 100f+ heat, so that probably helped.�
Jun 24, 2016
appearancesolutions I had this tool produced specifically for removing the screw on the front license plate, so we could install clear bra on the front bumper. If anyone is interested, let me know. Pricing TBD until I have an idea on how many people are interested.
Thanks,
Mike
![[?IMG]](http://i299.photobucket.com/albums/mm285/mikej210/Tesla%20Model%20S%20license%20plate%20socket%20removal%20tool/DSC01519_zps3ctdnnhs.jpg) �
�
![[?IMG]](http://s299.photobucket.com/user/mikej210/media/Tesla%20Model%20S%20license%20plate%20socket%20removal%20tool/DSC01529_zps6oy7smzd.jpg.html)
![[?IMG]](http://s299.photobucket.com/user/mikej210/media/Tesla%20Model%20S%20license%20plate%20socket%20removal%20tool/DSC01520_zpsusggvev7.jpg.html)
![[?IMG]](http://i299.photobucket.com/albums/mm285/mikej210/Tesla%20Model%20S%20license%20plate%20socket%20removal%20tool/DSC01526_zpsbddwng3q.jpg)
![[?IMG]](http://s299.photobucket.com/user/mikej210/media/Tesla%20Model%20S%20license%20plate%20socket%20removal%20tool/DSC01519_zps3ctdnnhs.jpg.html)
Jun 24, 2016
DrManhattan If it's cheaper than the tool everyone else is using on Amazon I'm in. But you only have a couple weeks to decide because I'm not leaving the service center without that plate removed.�
Jun 25, 2016
James Anders I finally got the 3D printed version completed. It's available for sale on my Shapeways site...
Tesla License Plate Socket Adapter by SlippinJimmie on Shapeways
There's a stainless steel version and also a plastic version. Some people have reported that the screws are very loosely torqued and therefore the plastic version MAY work just fine. The stainless version should remove the tightly torqued screws.�
Jun 25, 2016
Larry Can I just go to any hardware store and buy these screws? I had my S Expeled and Opticoated and they pulled off the double sided tape, treated the area then reattached. However 1 week later the tape came off unknown to me on a 200 mile trip and the movement of the plate holder loosened one of the screws which fell out on the road leaving me with a holder that was cockeyed and hanging on by one screw. I removed the holder but when missing 1 screw the plastic trim seems a little loose so I need a replacement screw. Thanks�
Jun 25, 2016
James Anders I suspect these are metric threads but yeah, you should be able to go to a hardware store and find something that would work. Even if you would have to get a flat washer too in order to get coverage of the plastic. If you can remove the other screw take it with you so you can find out the exact thread size by screwing it into a nut. Home Depot has a reasonable selection of screws.
Double sticky tape doesn't still well to these coatings which are designed to keep things from sticking.
Oh, I would get stainless steel too.�
Jun 25, 2016
KZKZ Is there any way to special order the car without the front plate holder ?
Does Telsa not include the front holder for cars delivered to states without a requirement for a front plate?�
Jun 25, 2016
James Anders All cars ship with the bracket installed regardless of state.
Supposedly had something to do with crash testing being done with front bracket installed.�
Jun 25, 2016
pete8314 Yeah, that smells like a story the SC would tell. When I collected there were 3 cars ready, 2 without brackets, one with (mine). According to my SC, it just depends on whether whoever took it to get inspected got the bracket removed first. But if it was inspected with the bracket, they won't remove it, or let you 'borrow' the tools to do it. I still don't see why they used such a funky bolt, it just pisses owner off.�
Jun 25, 2016
Larry Thanks�
Jun 25, 2016
appearancesolutions Looks like the Shapeways by SlippinJimmie will be the most cost effective alternative. Wish I would have seen this tool before getting the one I needed made.
The screws aren't torqued too tight at all, but I would recommend still getting the stainless steal one just so you don't risk stripping the tool (0ver the plastic version).
�
Jun 25, 2016
ZeroDarkSilver So let me get this straight, you guys bought a $100,000 car, but you're worried about the "cost effectiveness" of a $4 3D-printed part vs a $9 set of pliers from Amazon.
ROFL�
Jun 25, 2016
James Anders He's talking about the machined one he had made up.�
Jun 26, 2016
Tanquen Comes off easily enough. Started one bolt with hooked needle nose pliers I already had. I then found a socket I had that fit well enough to remove the second.
But there are marks from where the outer body colored bracket rubbed.
Anyway to remove these without doing full on polishing? I don�t really want to sand it a polish it.�
Jun 26, 2016
Drivin Don't California cars require a front license plate?
That is more important than how pretty the car looks.�
Jun 26, 2016
ZeroDarkSilver You disliked this thread because of that?
OK�
Jun 26, 2016
XLR8OR CA does require a front plate, but enforcement is very lax. Many cars don't have one. I've been busted twice, once by a meter maid and the other by CHP. You get a $20 fix-it ticket. Put the plate back on via sticky tape and get the fix validated by your local police and mail the validated ticket back to the courthouse of record and you're done. Then remove the plate.
My present BMW 6 has the original German plate on the front and the CA plate over the German plate in the rear. Never a problem in 3 years.�
Jun 29, 2016
Cstreet I would just like to thank those that blazed a trail before me and made removing the front license plate an easy process. It took me 15 minutes.
I went with the following:
Amazon sourced 90 degree angle pliers, turning the screws the right way (righty loosy since you are dealing with upside down bolts), pulling from the bottom, and using a plastic disposable knife to cut away at the doubled sided tape.
I had minimal gunk to roll off with my fingers.�
Jun 29, 2016
ZeroDarkSilver HIGH FIVE
�
Jun 30, 2016
SDRick Yes, I would like to thank all those and the collaborative effort as well.
I went pretty much with the same program. I tried the plastic tools but found I did not need them. My 90� pliers worked well on the screws (which was the easy part). Then just slowly pull the bracket away as also mentioned up thread.
In your excitement with the new look, don't forget to replace the screws as I did. I ended up finding some black screws and washers on hand that happen to fit (five days later).�
Jun 30, 2016
Mr X Important how? My Volt doesn't have a front plate and i've been driving it around for 5 months.
Im not seeing the "importance" of it.
If you want to see my plate you can take a few steps back to the rear of my car.
No plates on the face.�
Jul 1, 2016
PCMc ZeroDarkSilver - Thank you for posting this. Had mine delivered yesterday to my home. Saw your post last night and removed mine this evening. I was able to purchase a 6" angled needle nose pliers for $4 at my local Menards (about a 45 deg bend). I'm sure a true 90 deg version would have made it slightly easier, but I had it done in 20 min, including getting adhesive balled off, going over it with Goo Off, washing with wet cloth, and then a quick polish.
Oh, and I like your taste in colors; mine 90D is also dark silver metallic.�
Jul 1, 2016
ZeroDarkSilver You're very welcome! Congrats on the new car, enjoy it and stay safe.�
Jul 2, 2016
Hookemhorns Removed mine today. Used a set of angled needle nose to loosen the bolt, then a metric socket fit it well and got them out. Pretty easy, really.
The hard part was getting started pulling it out from the tape. Couldn't get a good hold on the plate with enough force to pull it off. So, I grabbed the black plate with some pliers, pulled out the corner, while my wife cut the exposed tape with a hard plastic pallet knife. She got a few inches free, then I was able to get my fingers behind the plate and pull it off, slowly, with a lot of force at first. Gets really easy as it goes. Then just a couple of minutes to peel off the remaining tape. Came off easily and cleanly. Ball up the sticky tape and use that to dab off little specks of tape left when you peel it off.
15 minutes tops, and the result is beautiful.�
Jul 14, 2016
kngsylr thanks for the advice on this thread. got my amazon pliers today. after unscrewing the bottom screws pulling off the plastic from below worked well. minimal glue remained on the bumper and easily pulled off. total time using this method was around 20 minutes. looks 100% better now.
![[?IMG]](http://i.imgur.com/rDMOUGn.jpg) �
�
Jul 25, 2016
wilheldp I agree. Getting the screws out was definitely the easy part (although I did manage to drop one in the plastic cowl below the trunk...I might eventually take the cowl off to retrieve the screw). I was having to apply an uncomfortable amount of force to the bracket to loosen the tape, and when I pulled on it, it looked like there were screws back there. I freaked out, thinking that they had changed the design and now it wasn't removable without leaving screw holes in the fascia. I removed the Zero Emissions plate and chrome trim, then removed the painted plastic part of the license frame...just leaving the black plastic part taped to the fascia. I didn't see any screw heads poking through that pieces, so I just slowly rocked it back and forth until it came off. It took a bit of picking at the tape on the fascia to remove it all. I didn't want to use any solvents on the paint, so I just did it by hand.
I did use Goo Gone on the black plastic piece to remove all the tape residue. I'm thinking about rigging a mount for the front license holder to use as a cable organizer for my UMC in the garage, and perhaps a 24' HPWC when/if I get one.�
Jul 25, 2016
ZeroDarkSilver So freakin' hot.�
Jul 26, 2016
PlugNPlay85 Can anyone confirm that The Law front plate bracket works on a refreshed Model S?�
Aug 6, 2016
Mark K Many thanks to ZDS for organizing this thread, and to all the other helpful posters who chimed in with subtleties.
What prompted me to look was the apparent lack of knowledge about all this by the delivery specialists.
Your thread spared me lots of fruitless discussion.
Third Model S arrives in a couple weeks.
Despite the two S's already in the driveway, I again find myself inexplicably, irrationally excited.�
Aug 7, 2016
Cnasty So has anyone needed a quick fix to reapply the plate if needed?
Seems involved to try and put it back on which I hope I'd never have to do�
Aug 7, 2016
ZeroDarkSilver Glad to hear from another satisified customer.�
Aug 7, 2016
ZeroDarkSilver Easy. Buy some 3M automotive adhesive and stick the bracket back on the same way it came installed.�
Aug 12, 2016
jelloslug I don't know if this has been posted yet but if you pull the tape parallel to the bumper (think 3M Command strips) it comes off with no residue or effort at all.�
Aug 17, 2016
Xenius FYI, used the amazon 90 degree pliers posted here and with a little elbow grease and a hair dryer set to "hot" got the front plate off. No residue left. Looks sexy as hell.�
Aug 17, 2016
TSLATed The Orlando Tesla dealer refused to remove the ugly front plate when I took delivery of my new Model S a couple weeks ago, so I had to buy an angled needle nose pliers to remove the security screws and the rest of the mount myself. The entire process took me about 10-15 min and the result was perfect. If any Central-Florida Tesla owners need help removing the ugly front plate, feel free to contact me and I'd be glad to assist!�
Aug 17, 2016
akudrath Thanks for all the info. I removed my front plate yesterday using the 90 degree needle nose pliers, phillips screwdriver, and blow dryer. The blow dryer helped a lot to get the molding tape more malleable which allowed me to pull out a corner and stick my fingers behind the plate frame to start pushing and rolling the tape away from the car. I barely had any residue left on my bumper.
I doubt I'll use these these 90 degree needle nose pliers again anytime soon. If anyone wants them for their removal, just pay for shipping and I'll send them to you. The only caveat would be that you send it to someone else when you're done.�
Aug 20, 2016
glusc2002 I removed mine too but unfortunately after cleaning all the residue from the double sided tape, i found indented line from the top of the plate deep enough in the paint making it noticeable and it was the length of the plate too. If it was white or silver car it would be harder to notice. Oh well, still looks great with out the plate frame.�
Aug 21, 2016
miriel We took off the front plate holder this afternoon. Hard part was loosening the bolt, even with the amazon pliers. Once those were off, used a hairdryer in the hot setting and pried off the holder from the bumper. There were some glue residue left but I balled up piece of adhesive from the holder and used it to dab onto the remaining residue.
Love the front bumper with the holder!�
Aug 21, 2016
theslimshadyist I live in a state that doesn't issue front plates and I don't want a front bracket mounted to the car prior to taking delivery. Does Tesla mount them by default when building the car or can I simply request not to have a front bracket mounted prior to the build?�
Aug 21, 2016
James Anders These are mounted at the factory. They won't consider shipping cars without the holder and most service centers will not remove them.
It isn't too big of deal - but it is annoying.
You can use angled needle nose pliers or can order a little tool I had made up for removal. Just need a 1/4 inch hex key (allen wrench).
Tesla License Plate Socket Adapter by SlippinJimmie on Shapeways�
Aug 21, 2016
dehydratedH2O Tesla requires that the car be delivered with the bracket. You can request it be delivered without it, but they will politely refuse.�
Aug 21, 2016
theslimshadyist Thanks for the confirmation. Can I just get the SC to remove it before I pick up the vehicle?�
Aug 21, 2016
theslimshadyist Awesome and thank you.�
Aug 21, 2016
James Anders You can ask - but most likely they will refuse. Apparently it's some kind of regulatory thing.�
Aug 21, 2016
theslimshadyist No biggie, I just went ahead and ordered your bracket removal tool so either way I will get the damn thing off!�
Aug 21, 2016
James Anders Then the only other annoying thing to remove is the very sticky adhesive. Some have used Goo Gone. I had a spray can of 3M Automotive Adhesive remover which worked well. Just takes a bit of time to push and rub and kind of roll the gook off.
Thanks!�
Aug 21, 2016
jelloslug If you pull the tape parallel to the bumper it won't leave any residue behind.�
Aug 22, 2016
democappy I figured I would add my experience to this thread as well. This is copied and pasted from my comment on the waiting for delivery thread.
"It did end up being very easy to remove and took me less than 10 minutes. Just follow the instructions from the main thread on it. I got the special wrench to undo the weird screws, but I barely used it as I think I could have almost done the entire unscrewing of those by hand. I would still recommend spending the $10 to have it just in case.
The only thing that sucked was getting it started in pulling it away from the double sided tape. Once you get it started you just keep pulling until it is off, but you might be swearing up a storm as you try to get a grip on it and get it started"
I will add I pulled parallel to the bumper like jelloslug mentioned. I also had absolutely no issues getting the rest of the tape residue off. I simply rolled it using my fingers and it came right off.�
Aug 31, 2016
fallen888 TWSS!�
1/1/2015
guest Worked like a charm on my Tesla S. there was an extra step that required I use a hairdryer to heat the plastic plate to help remove the double sided tape holding it to the front. I had to pull pretty hard to remove it but it worked - but it was a bit nerve racking.�
1/1/2015
guest Thanks for all the tips. The 90 degrees pliers from Amazon worked brilliantly. If you have clumsy hands like me, watch out that you don't pinch your hand with the pliers if they slip off. Tried to remove sticky bracket without heat, but ultimately relented and applied some air from a hair dryer.�
1/1/2015
guest Yep, I ended up pinching my fingers with the pliers, squeezing the finger tips too hard when pulling the plastic piece off, and burnt my hands when heating the plastic with a hairdryer.
But I did it and it was totally worth it!�
1/1/2015
guest The physical pain we endure...�
1/1/2015
guest Strong work! Beauty is pain.... I already have the bent pliers and hair dryer ready�
Không có nhận xét nào:
Đăng nhận xét