Aug 28, 2014
rbergquist I've also got a Sig and have been held up on the cable routing behind the nose cone. If you have any more details or pics on how you did the cable routing and hole placement I would find that very useful. Thanks.�
Aug 29, 2014
artsci Yes, it would be great to have more specifics that can be shared with other signature owners.�
Aug 29, 2014
pilotSteve Unfortunately I did not take pics while working. We'd had a long day and needed to finish up and get on the road.
Here are some thoughts on what worked for the sig:
(a) remove the grill panel that accesses the 12V battery terminals and the frunk driver side panel.
(b) shine a bright light up thru the driver side front grill and have a friend look near the radiator from the top of the frunk.
(c) we could see a thin line where the front of the radiator met the edge of plastic grill.
(d) using a pry bar we opened up that line (basically scooted the plastic forward).
(e) we then snaked some electrical wire thru the opening and worked it along the front radiator (behind the grill) until it was in the grill middle.
(f) used a hemostat to grab the wire and bring it out the grill.
(g) make a u-shaped hole in the area you located in (d) to allow the video cable to not be pinched (we used an air drill and moved the bit around). Hole is the diameter of the cable, not the size of the video connector.
(h) cut away a small section of the front grill to allow the cable's connector to pass thru the grill.
(i) attach video cable to the electrical wire with tape, carefully pull thru grill. Use pry tool to hyper extend the plastic so the video connector goes thru then route cable into the u-shape hole and remove pry.
Came out quite nicely. Wish I had pictures. Good luck! Steve�
Aug 30, 2014
RodF I just placed my order for the kit from the OpenEV store. I contacted Tesla to order the camera. Does the kit include all necessary cables, or do I need to also order this cable? When I tried to follow the link above it goes to the website but not any specific product.�
Aug 30, 2014
swegman You need to order the cables from RF Supplier. My understanding is that they are redesigning the long cable to address problems I and some other people experienced. Alternatively, you can order the cables from Tesla, which also require gender changers. I don't know the Tesla part numbers. Artsci (Rick) knows the part numbers from Tesla, but is on vacation for about another week, though he appears to check in periodically.�
Aug 30, 2014
RodF Artsci, when you return, can you provide the part numbers for the cables that are required in addition to the kit? Thanks for the help and for providing this great product.�
Aug 30, 2014
RodF I'm sorry if this has already been addressed/asked; looking back on previous posts, it appears that if the license plate holder blocks the grill just below the nosecone, a bracket for the camera would be required. Has anyone installed the camera with a "The Law" license plate holder? Did you need to use a bracket, and if so, is one included with the kit?�
Aug 30, 2014
swegman I have the Tesla license plate holder and use the camera bracket that artsci created. It is an extra cost item (as not everyone needs it) that is not included with the switch (at least not when the switch was purchased directly from artsci).�
Aug 30, 2014
justaddsun Per artsci: You want two cables, as follows:
Cable, HSD, Liftgate, Camera 1006780-00-D ($23.12)*
Cable, HSD, Body Left, Camera 1006781-00-D ($25.68)
The first cable is short, the second long. *You need the first to connect the long cable to the front camera (a gender issue). *Then you use one of the short Chinese cables on the other end of the long *cable to connect it to the PCB).�
Aug 30, 2014
RodF Got it. Will contact the SC on Tuesday. Thanks!
- - - Updated - - -
I believe the bracket will be necessary with this license mount:
http://www.teslamotorsclub.com/showthread.php/35042-Torquelift-Central-s-The-LAW-No-Drill-License-plate-bracket-install-review-A
I didn't see it on OpenEV. Artsci, is this something that you still have available for sale?�
Aug 31, 2014
artsci These are the Tesla OEM cables, which are a proven alternative to the long Chinese cable. But you still need the short Chinese cables for the necessary gender change for connecting the front and rear camera to the PCB.
- - - Updated - - -
The bracket was designed to mount the camera under Tesla's OEM plate frame. It may or may not work with other plate frames. If you have a low mount plate frame the camera can be mounted on the grille to look over the top of the plate frame.�
Aug 31, 2014
RodF Thanks for the info, Artsci. I know you are traveling and appreciate that you took the time to answer the questions. I understand that the Chinese cables are not available right now. I think I am going to cancel my order with OpenEV until I am sure I will be able to procure the right cables, and figure out how to attach the camera to the bottom of the license plate frame, as Torklift's "The Law" frame does block the grill right below the nosecone.�
Aug 31, 2014
artsci Just took a look at the Torklift design. Regrettably, the could not have done a better job of making it extremely difficult to place the front camera. If it's not too late I'd use a front plate frame from another manufacturer.�
Sep 3, 2014
dsmith2189 I bought a "the Law" license plate bracket and have "dry fit" it with my camera. it looks like everything fits. I currently have another lower mount license plate bracket solution so I won't say I am 100% certain, but it looks good and its adjustable.
in addition to "the Law" bracket I am also using the camera mount that you can purchase from Artsci when you order the kit. the tabs with the screw holes are a bit short but I think I have figured that out...
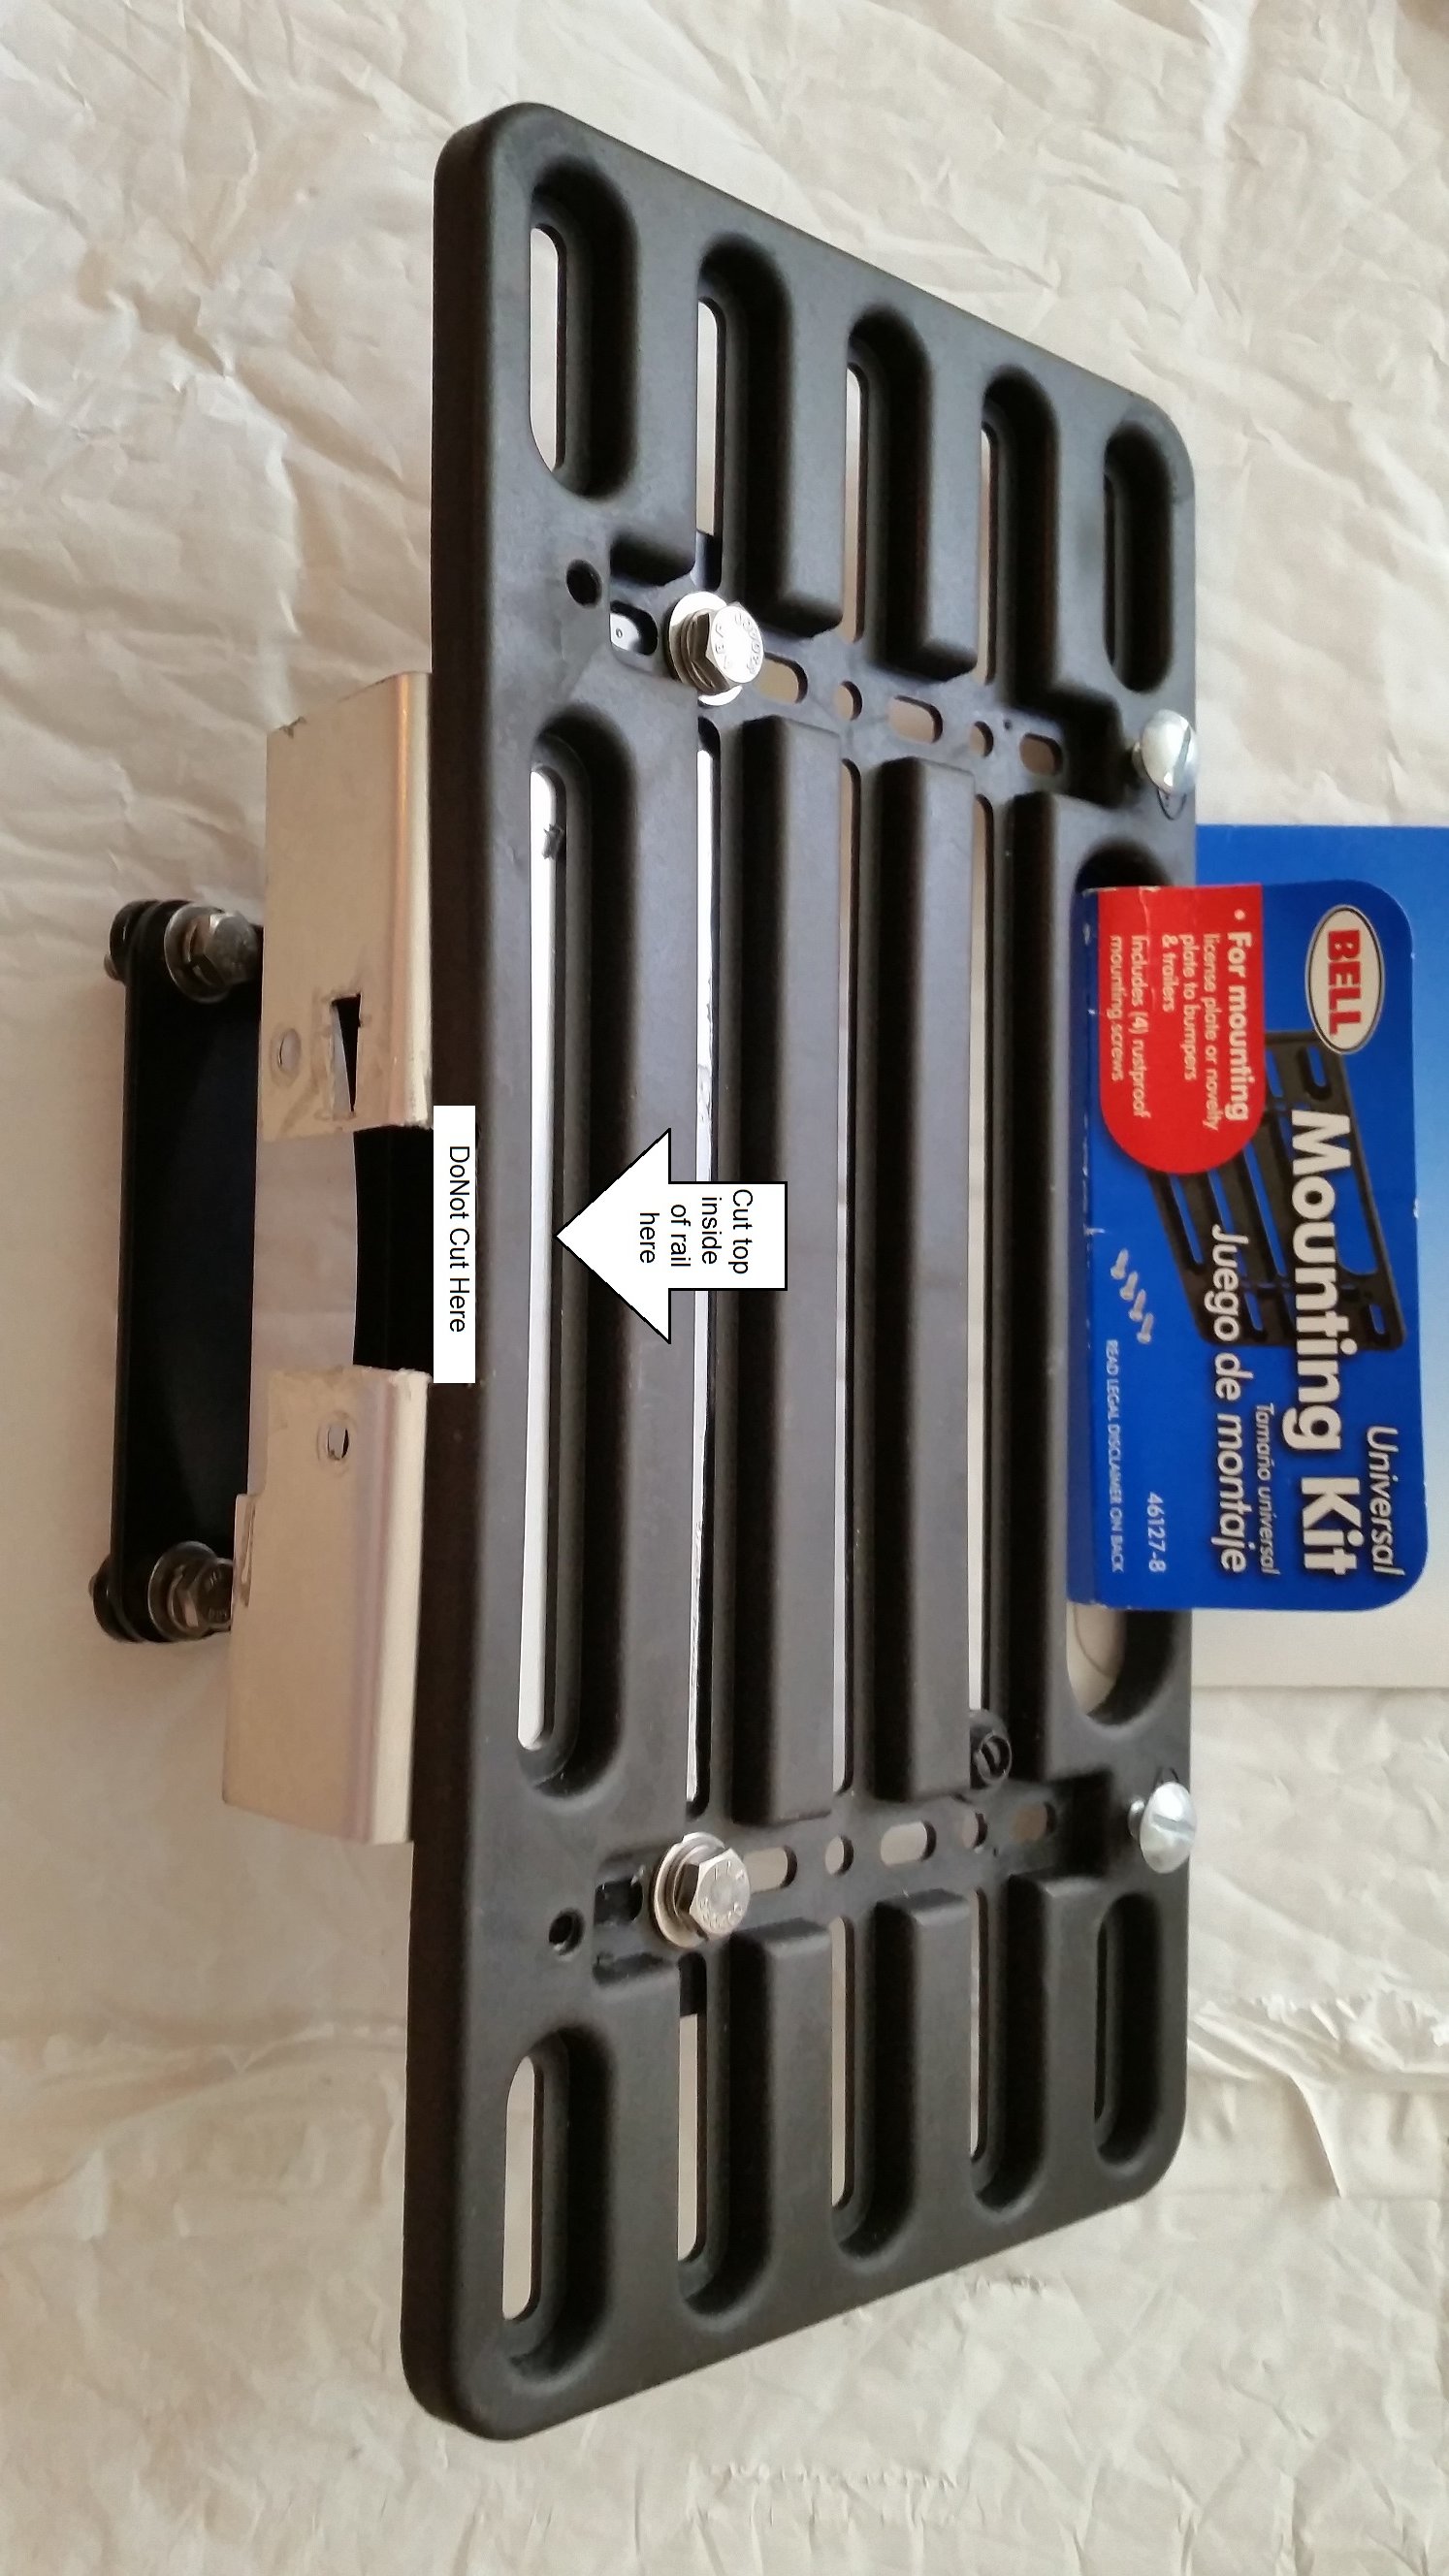
I bought a "Bell Universal license plate Mounting Kit, part# 46127-8) and cut a slot in the bottom "long flat oval opening" not the very outside part of the mount (hard to really explain exactly) to fit the tabs. put a flat piece of plastic to fit the oval opening and drill holes to match the location of the tabs on the camera bracket. screw or rivet the bracket, license plate mount and the flat piece of plastic together (sandwich them together)
Sorry No pictures, I took everything apart last weekend to do my camera install but didn't finish the install (ie mounting the camera, etc...)
----Update ---
I was able to find an old picture that may help. (disregard the camera bracket in this picture, this is not Artci's camera bracket, his is much nicer:biggrin")
you can see a picture of Artsci's camera bracket in pilotSteves post
this is a picture of the Universal mounting kit (license plate mount) on "the Law" bracket showing roughly where you need to put the slot for artsci's camera bracket.
Note: you may want to get some shorter license plate screws. the ones that come with the kit are long and pointed. ouch!
 �
�
Sep 4, 2014
yobigd20 I haven't read all 600 and some posts, but I am curious - was anyone able to use any aftermarket camera with this or did everyone buy the camera part from Tesla? If only the Tesla camera works, I am just wondering what the restrictions were here that forced that decision. I would just think they aren't in the business of manufacturing custom cameras and I would think that any COTS camera should work as long as the interface remains the same. That being said, does anyone know what the interface is? Analog? Digital? Protocols? Etc.... (I had some ideas for a project im rolling around in my head so just very curious here).�
Sep 4, 2014
swegman The issue is that the 17 inch screen only communicates with the Tesla camera. No other camera is compatible with the touchscreen. Any other camera connected to the touchscreen results in an error message being displayed on the touchscreen. The output of the camera is LVDS (I believe).�
Sep 5, 2014
artsci
The camera is manufactured for Tesla to Tesla's specs. Any COTS camera doesn't work. WhiteP85, who designed the camera switch circuit, said it was one of the most sophisticated designs he'd seen, and any variance in the signal from the camera to the touchscreen results in the "Camera unavailable" error message on the touchscreen. This is why just a cable without high quality and consistent twisted pairs and adequate shielding results in failure.�
Sep 11, 2014
EBill Does anyone have details on a source and part number for the gender change cables, either from rfsupplier.com or another vendor.
The Chinese cable manufacturer has apparently taken the Tesla cable assembly off their website. When I either click on the links on this thread or search for Tesla at the rfsupplier I get no results.�
Sep 11, 2014
artsci We're arranging to supply Tesla's OEM cables to people who have bought the kit and have problems with the long Chinese cable (it's a loser but the short ones, which are needed even with the OEM cables, work fine). RF will be making the short cables available again presently.
The Tesla OEM cables needed are these:
Cable, HSD, Liftgate, Camera 1006780-00-D (this cable attaches to the front camera and makes the necessary gender change) $23.12
Cable, HSD, Body Left, Camera 1006781-00-D (this cable goes between the cable above and the PCB) $25.68�
Sep 11, 2014
Gizmotoy Any suggestions for someone who hasn't had time to install yet? Just buy the Tesla cables and not worry about it, or risk a bad Chinese cable?�
Sep 11, 2014
artsci I would suggest spending the $50 or so on the Telsa cables. That way you'll know it will work. The Chinese long cable is unpredictable and it's no less expensive than the OEM.
I would ask RF Supplier for a refund although I doubt they'd issue it.
Here's how to order the Telsa cables:
This is what you need:
Cable, HSD, Liftgate, Camera 1006780-00-D (this cable attaches to the front camera and makes the necessary gender change)
$23.12
Cable, HSD, Body Left, Camera 1006781-00-D (this cable goes between the cable above and the PCB)
$25.68
The total for the two cables is $48.80. S&H will bring the total to $55.00.
If you�d like to order these Tesla OEM cables please PayPal $55.00 to [email�protected]. Be sure to include your full name and shipping address. I�ll confirm receipt.
You may also want to check with your SC to see if they are in stock, as that will save you some time.
You will still need the two short Chinese cables to make the gender change for plugging the front and rear Tesla camera cables into the PCB. If you don�t have these cables they can be ordered at RF Supplier (they may not be available on the web site now but they should be very soon � do a search for Tesla camera cable kit). Do not under any circumstances buy the long cable from RF any other source on the Internet (if you do a search you will find the full cable kit available at a number of sources in China � these are all supplied by RF and include two short and one long cables for over $50. The odds are high that the long cable will not work)
I expect to have the cables in 1-2 weeks and will ship them immediately when received.�
Sep 11, 2014
HankLloydRight Just a quick question -- if we already have the Chinese cable kit with two of the working short cables, do we need to order a third one, or just the long cable? How much for just the long cable, plus shipping?
thanks.�
Sep 12, 2014
artsci You need both Tesla cables and the two short Chinese cables. The latter make the gender change for the front and rear long cables. The Tesla cables are one shorter and one longer. The shorter one links the camera to the long cable and makes the gender change. The long one leads to the PCB through the one of the short Chinese cables. The two Tesla cables are the same ones used to connect the rear camera -- we're just using them for the front, like the camera itself.�
Sep 21, 2014
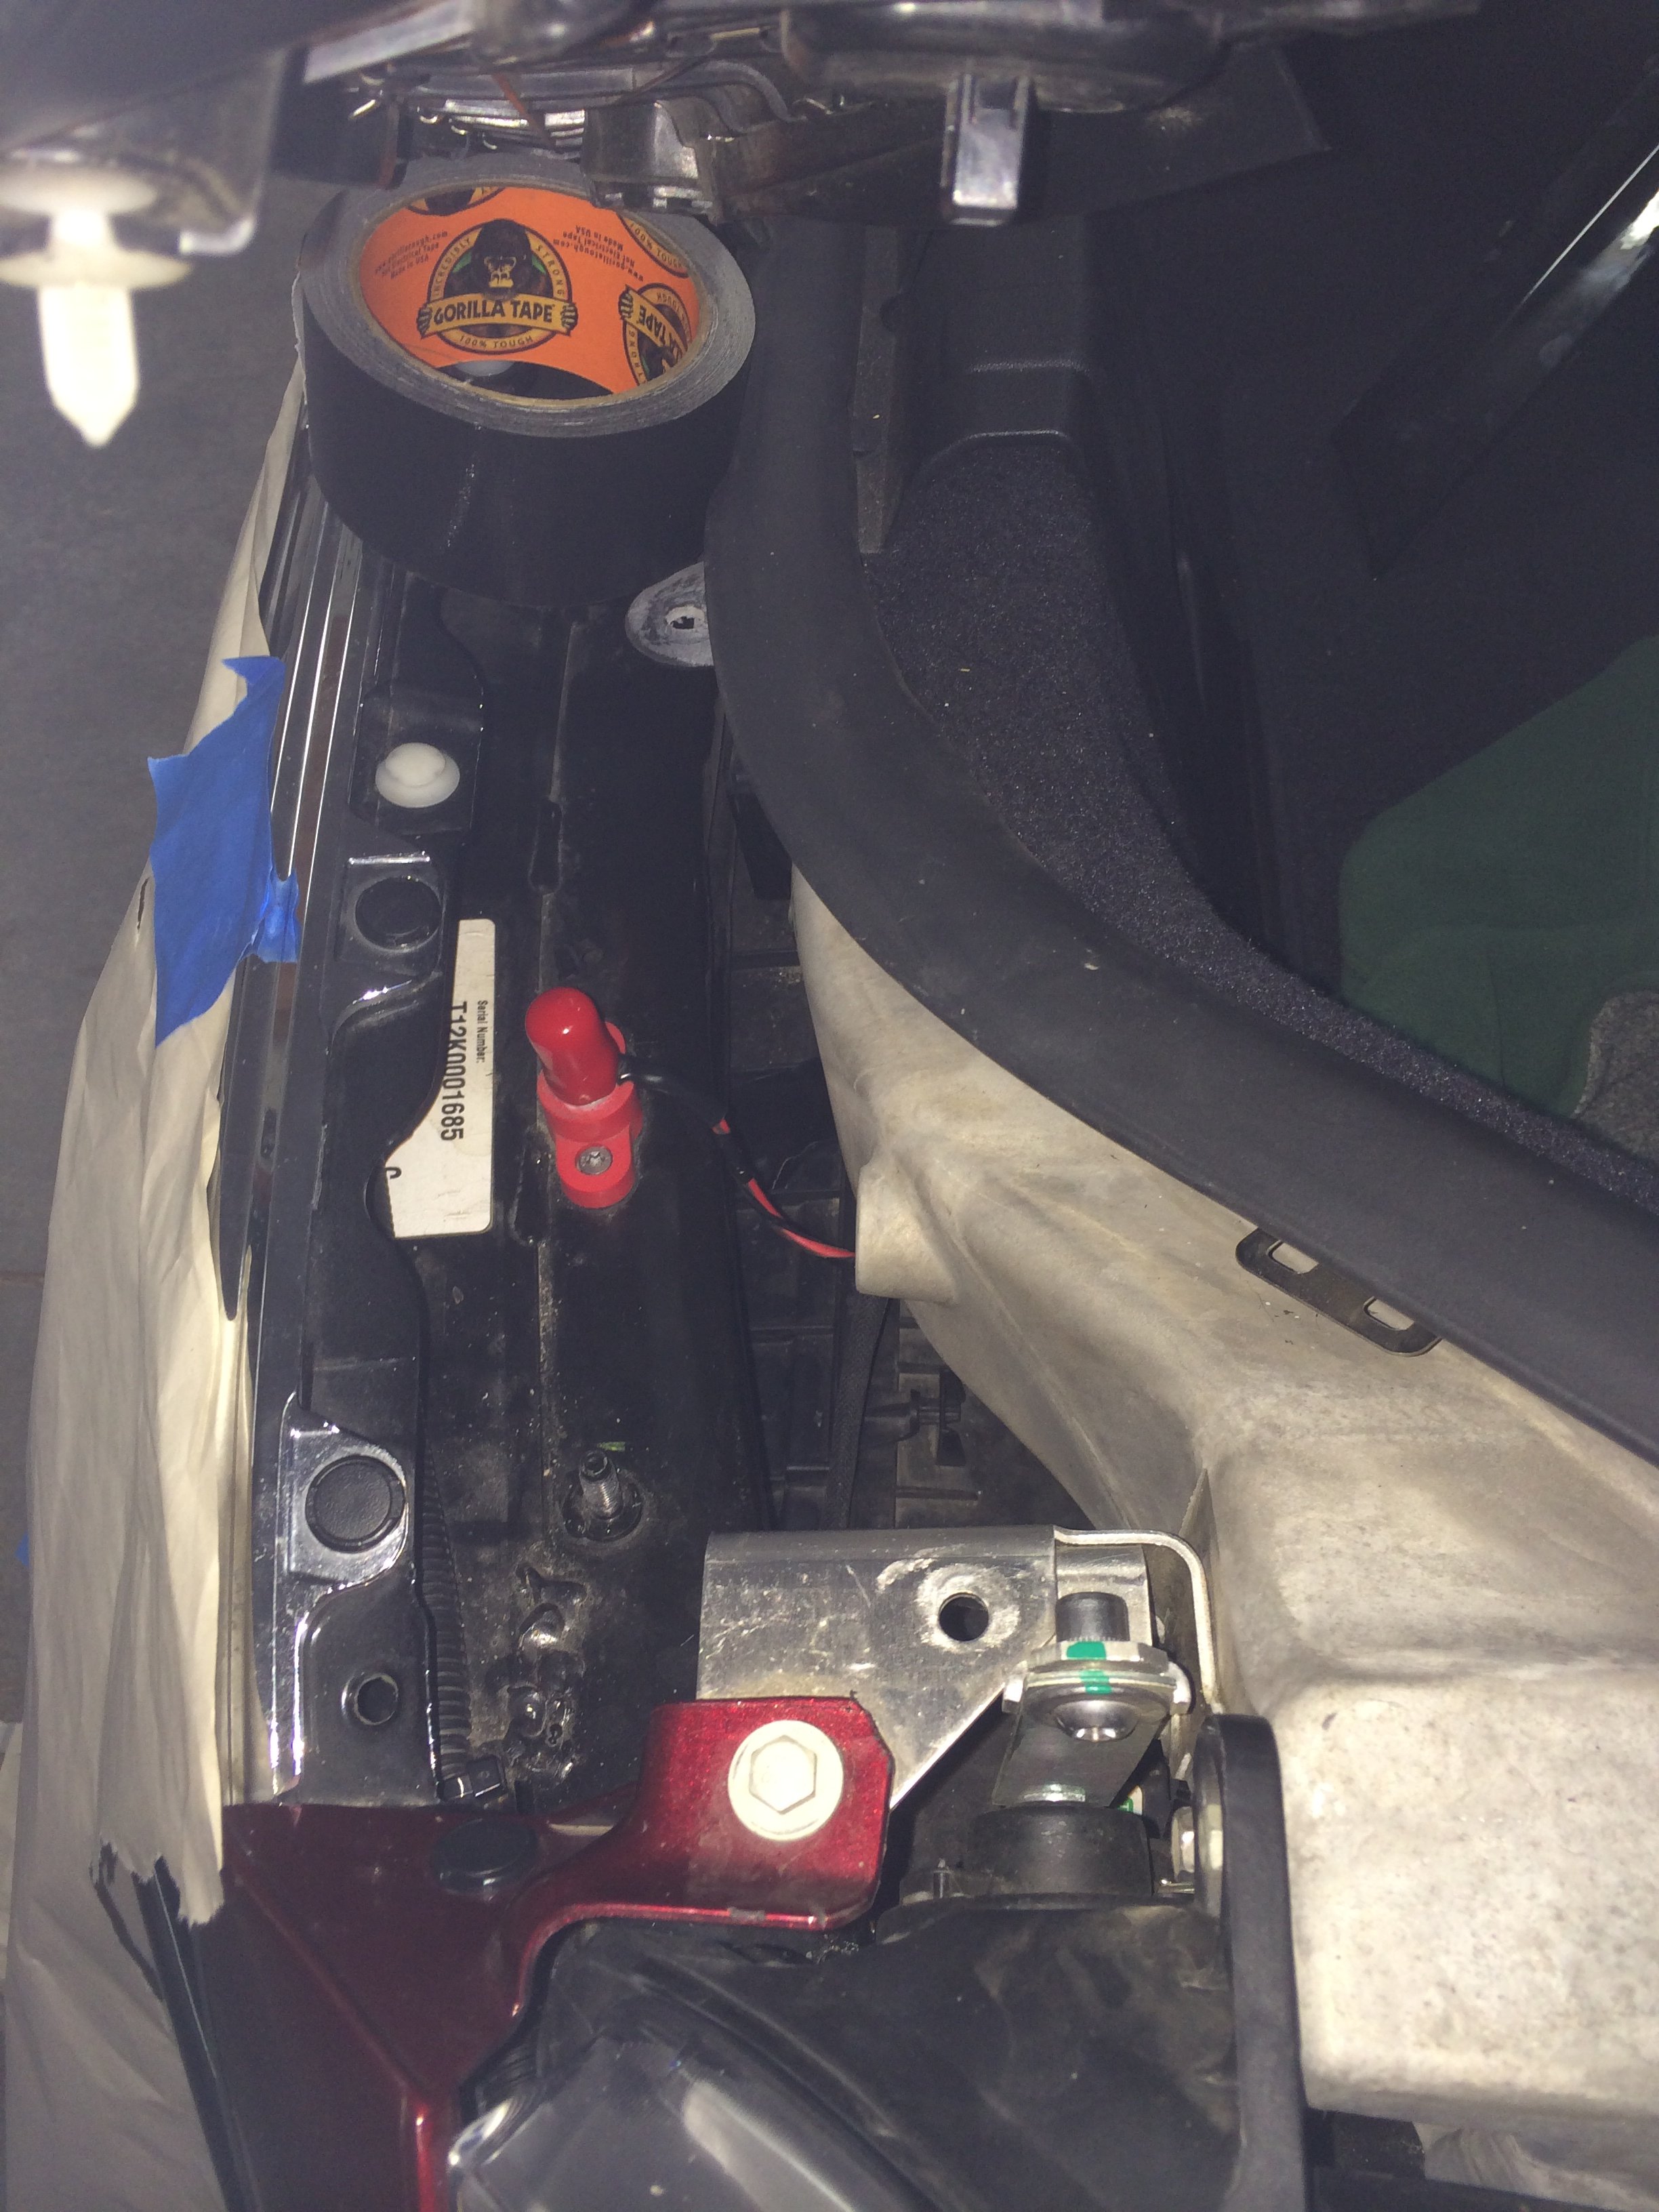
rbergquist I was working on my own so I had some problems exactly replicating your work, but here is what I did:
(a) remove the grill panel that accesses the 12V battery terminals and the frunk driver side panel. AND I also pried up the right-hand side of the center section which allowed me access to the middle section which was above the grill area.
(b-d) I saw from above that a couple of inches to the left of the Positive battery terminal, I could use a 12" long x 1/2" drill bit and go through the plastic cover and drop into the space behind the grill.
(e) dropped electrical wire thru the opening and worked it along the front radiator (behind the grill) until it was in the grill middle.
(f) used another piece of wire to grab the dropped wire and bring it out the grill.
(h) cut away a small section of the front grill to allow the cable's connector to pass thru the grill. (only had to cut off one side of a grill cell)
(i) attach video cable to the electrical wire with tape, carefully pull thru grill.
(j) closed up hole I drilled through with silicon caulk & covered with Gorilla tape.
Thanks for sharing your method -- It let me knew I was close.
Two pics attached: 1) Center section pried up.2) Looking down from drivers side into the gap where I drilled through the plastic cover into the area behind the grill and in front of the radiator.
 �
�
Sep 21, 2014
rbergquist I have Torklift's "The Law" plate installed on my car. I always liked it that it did not obstruct the lines of the nose.
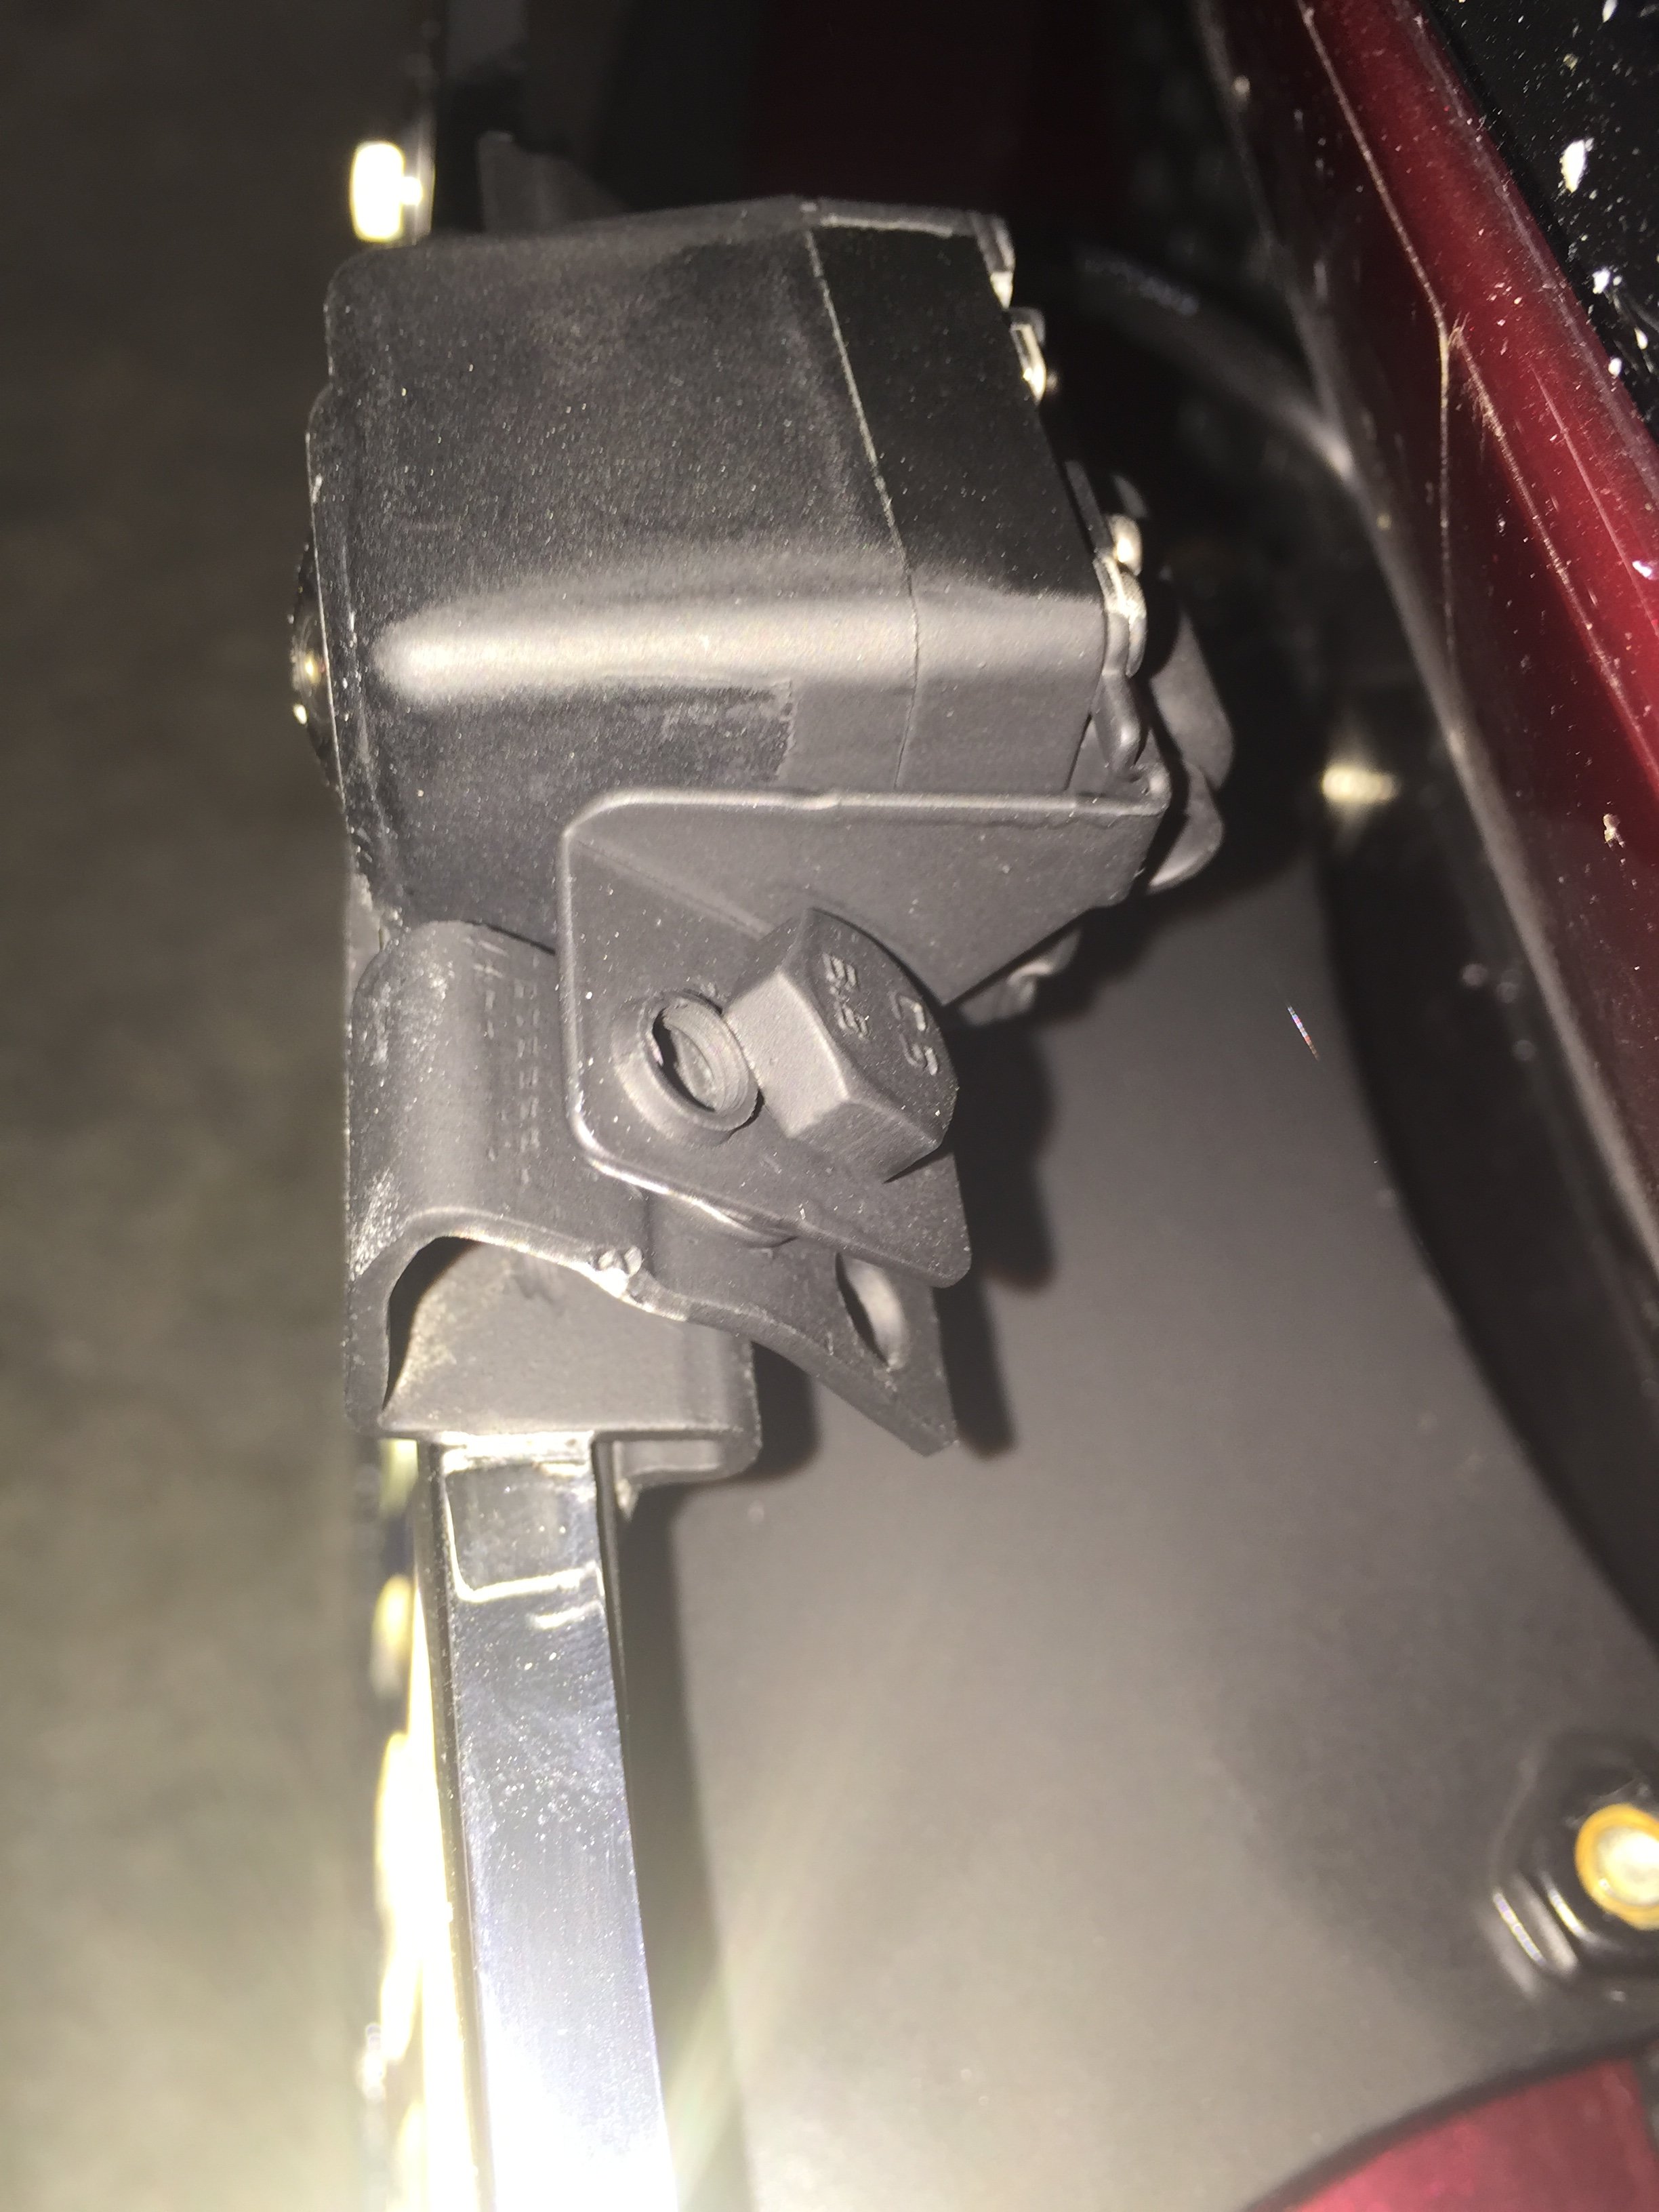
I used the using the camera mount that you can purchase from Artsci. It is meant for bottom installation and I flipped it to be mounted on the top of the license plate and it screws into the same plate of the law you screw the plate into. This required that I bend the bracket attachment for the camera. I roughly bent it to the same orientation from horizontal as the original. I then had to drill new holes through the camera bracket and the mounting bracket and used bolts with nuts and some spacing washers to get it all aligned OK. Spray painted unit black. With this setup, when I see a wall in front of the car at the bottom of the video screen, I'm about 9-12" from the wall. I'm sure you could bend the bracket if you wanted a different spacing.
Three pics of this:
Camera & Mount Side View - You can see a gap between the camera mount & the mounting bracket - washers are used to maintain this space & this gives the camera the necessary clearances.
Camera Front View - Shows the camera mounted at the top of the plate.
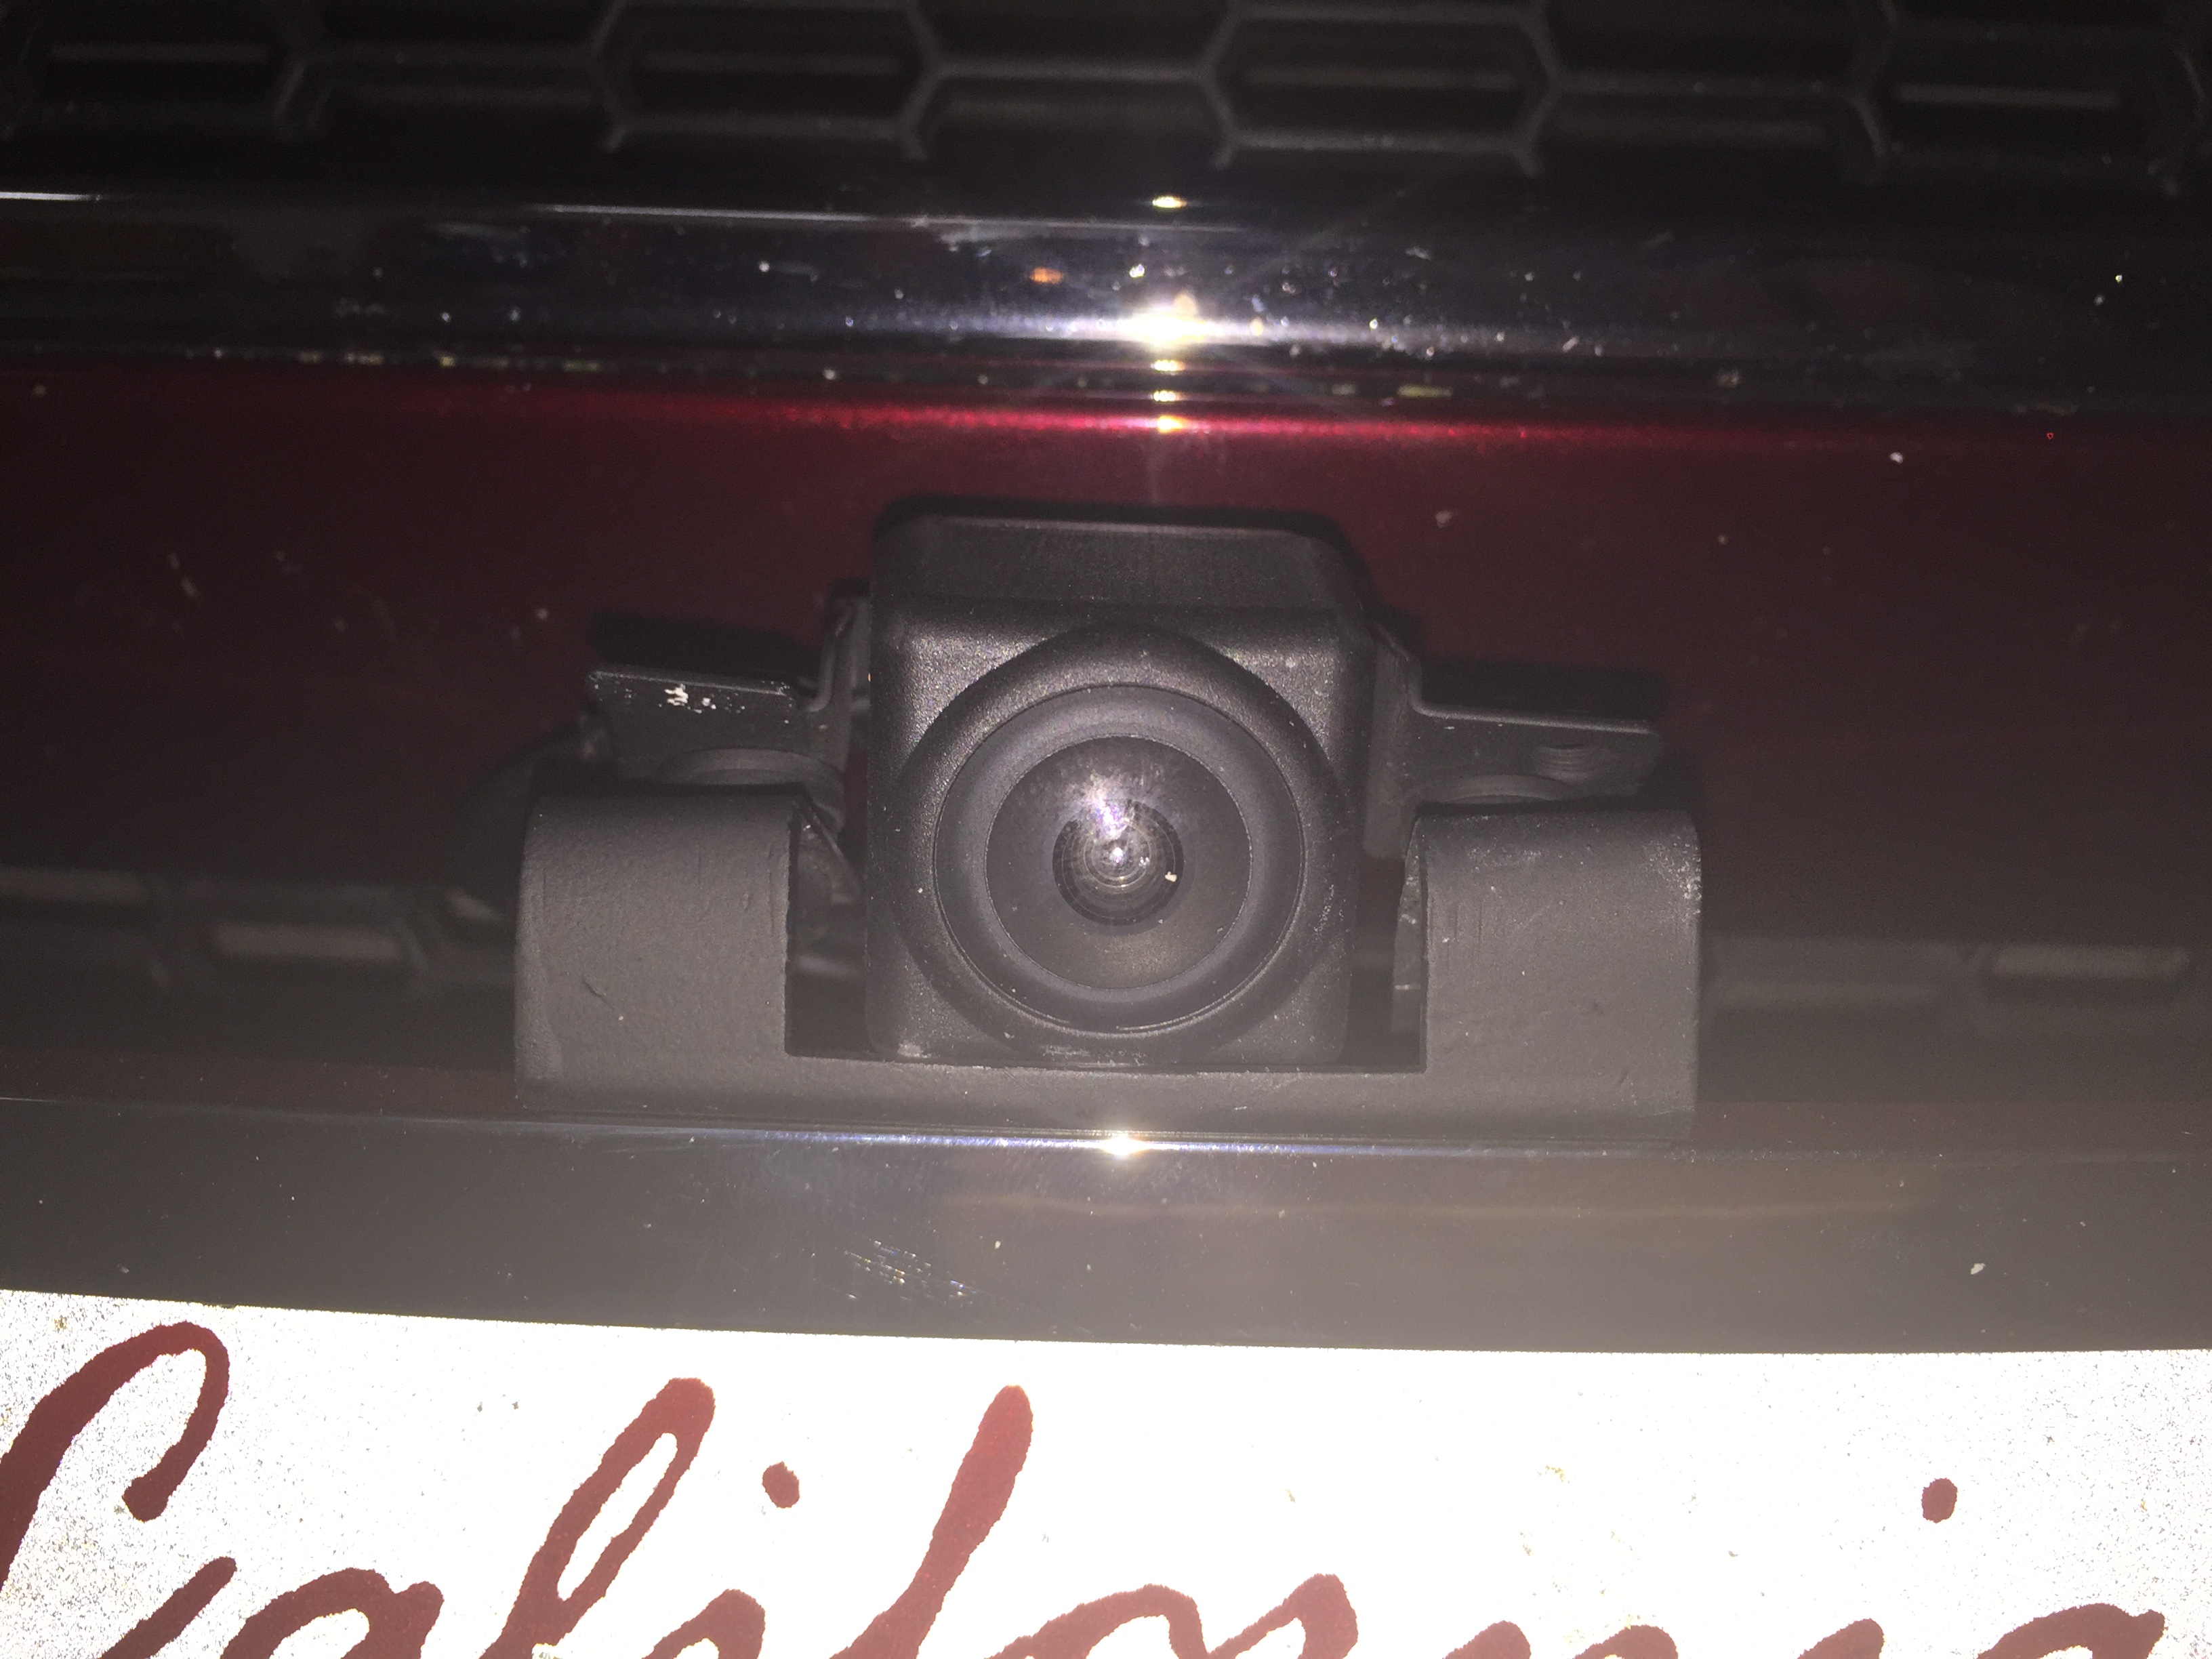
Installed Front View - I find the camera has just disappeared and the nose cone lines are not affected.
I used to have problems with the plate hitting parking bumpers. The Front Camera has solved this�
Sep 21, 2014
RodF Thanks DSmith and rberg for taking the time to document this!�
Oct 26, 2014
EBill Help needed on locating #3 terminal for reverse signal.
I�m installing the front camera kit on my RHD car here in HK. Interestingly enough the wiring harnesses are in the same location on RHD drive cars as LHD cars. I was expecting them to be reversed. As expected the colors on some of the wires are different.
I am having a lots of difficulty finding the reverse wire and terminal. After spending literally hours, often upside down, I still cannot locate the #3 terminal. The local SC confirmed that terminal #3 is for reverse on RHD cars so that shouldn�t be the problem. They also confirmed that the wire color differs from batch to batch.
On page 5 of the instructions is a picture of the connector with a probe showing the location of terminal #3. I cannot read the labeling since the type is too small. It appears that terminal #3 is the second terminal in on the third row from the inside of the connector. What is unclear is which side of the connector block is facing the front of the car and which side is the rear?
Grateful for any assistance to locating the reverse wire and terminal #3.
I also noticed when using the probe to check the wires there are lots of warning messages that come up on the display. Fortunately they all go away when the test probe is removed and the screen rebooted.�
Oct 27, 2014
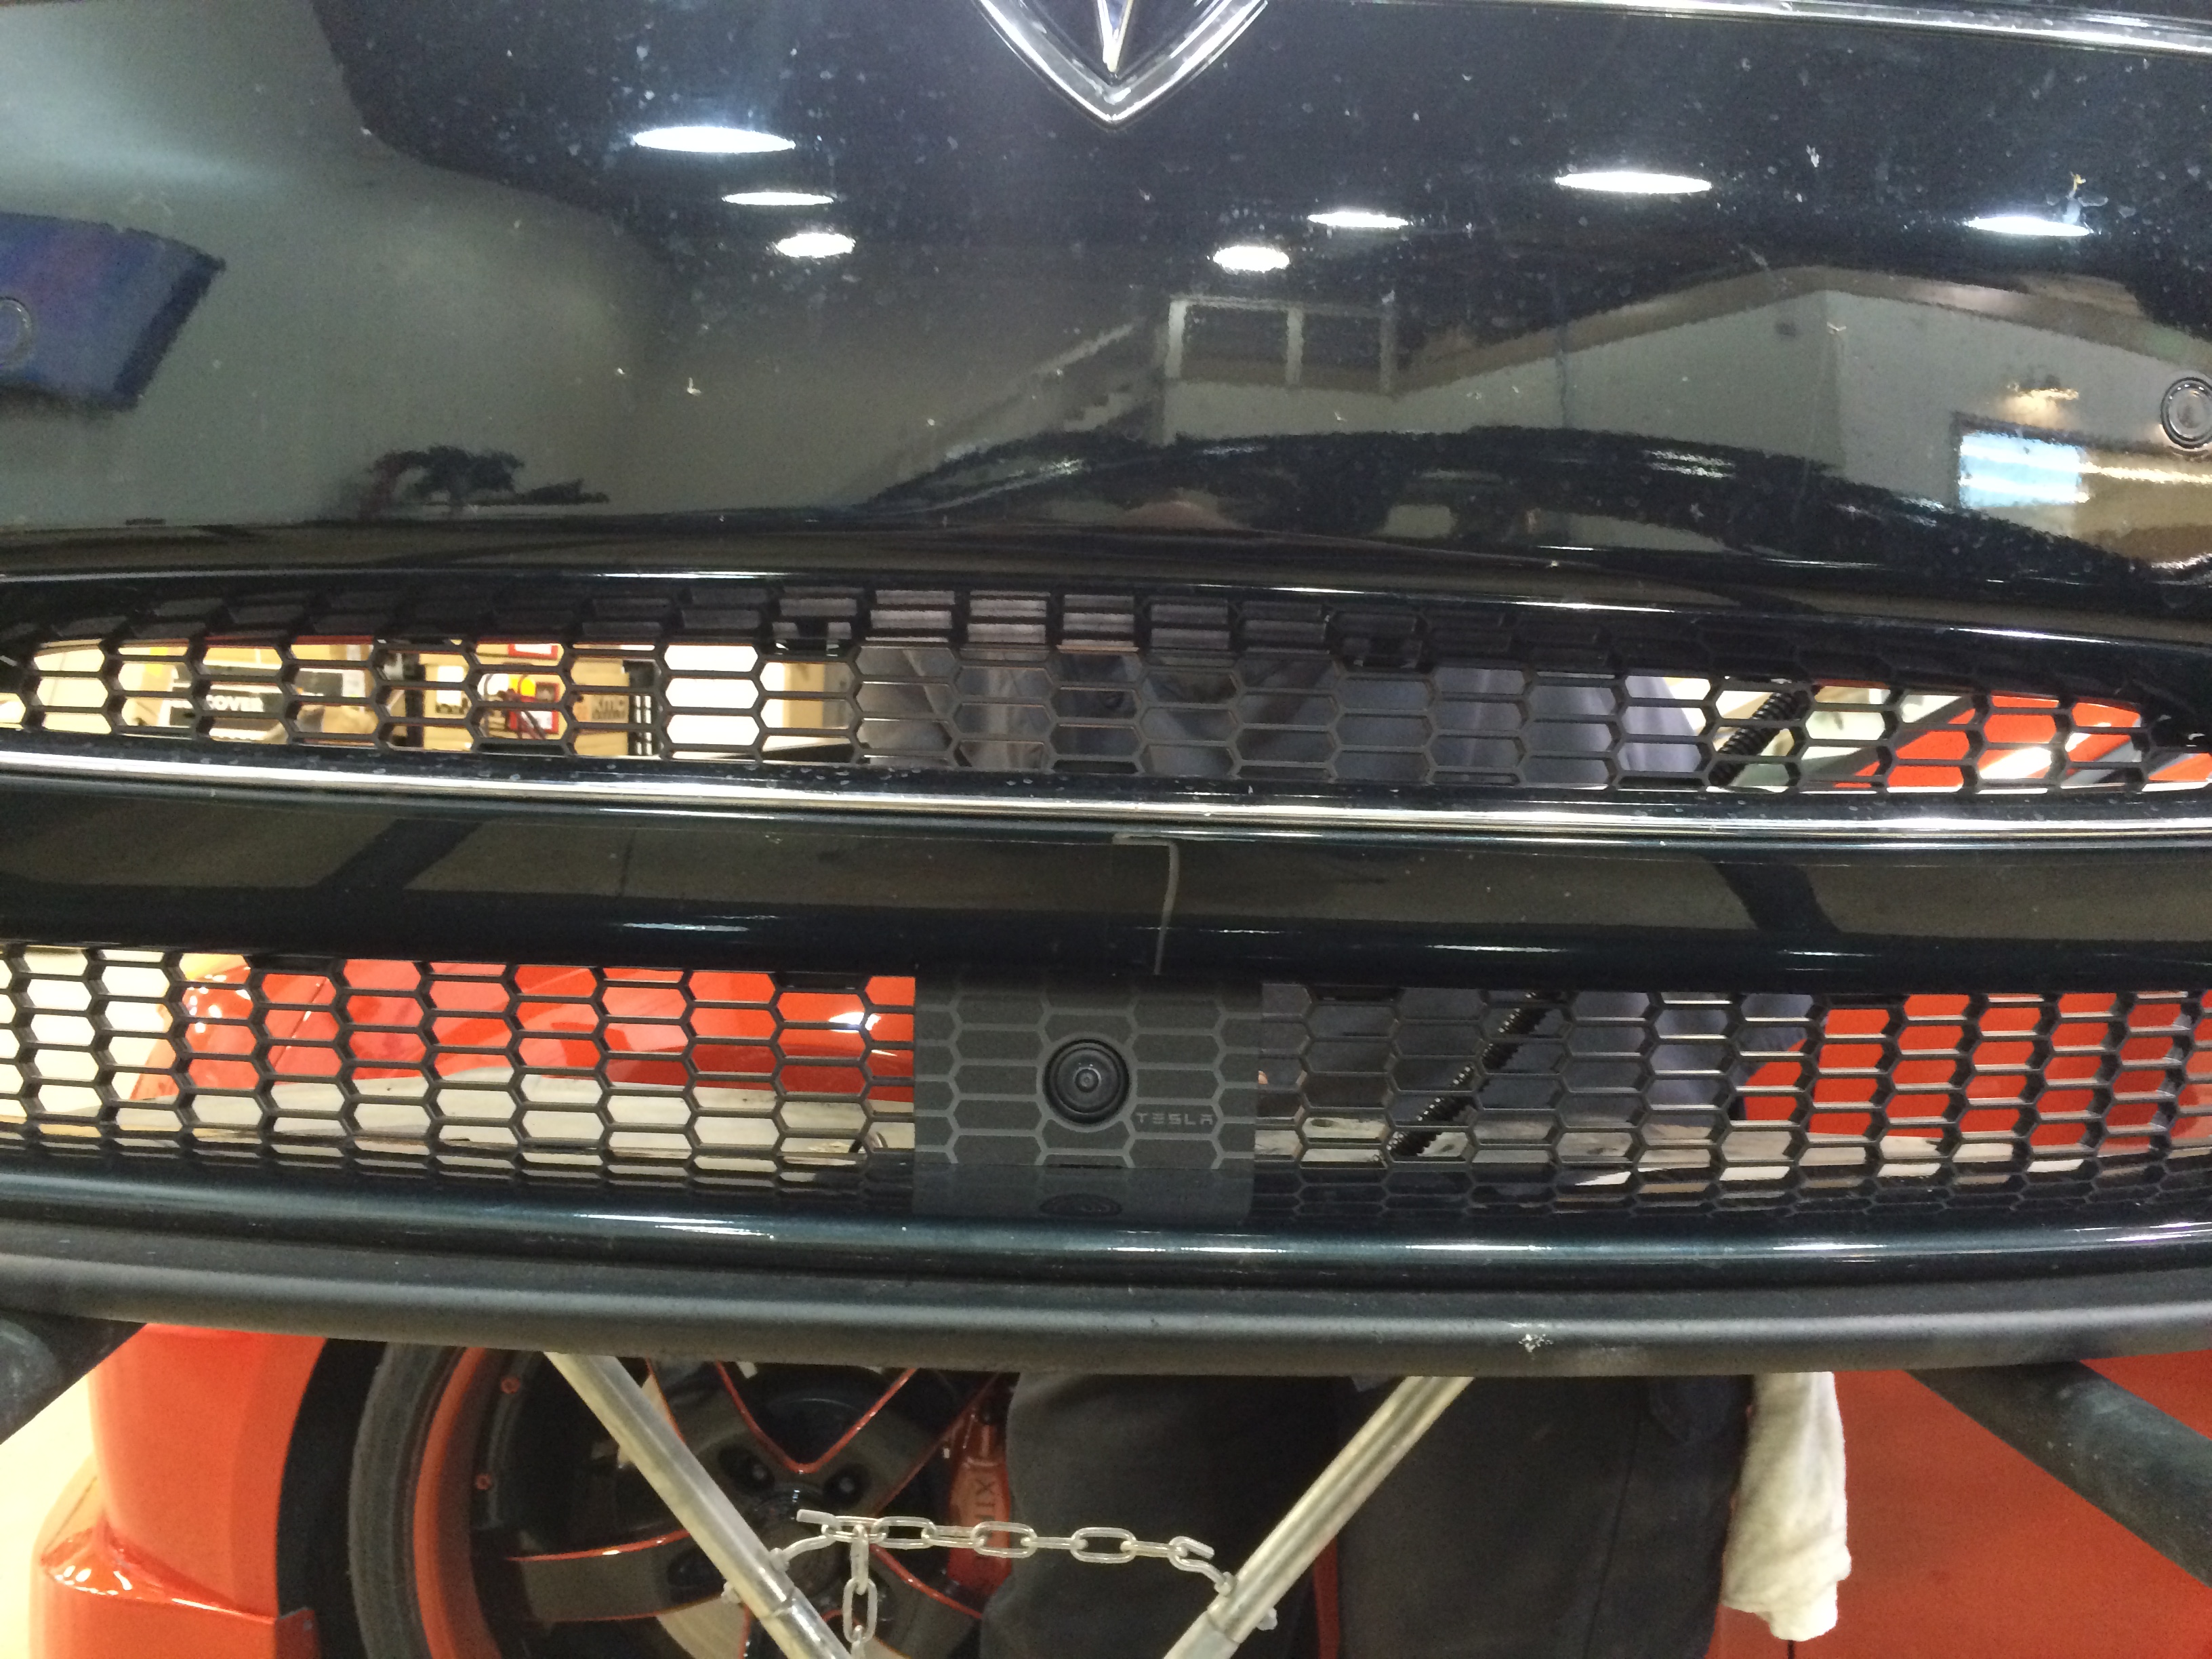
teslasguy I just had the front camera installation done. Used the Tesla cables. Had it done at Perzan Auto Sound of Philadelphia. Beautiful job!! They notched the bottom of the nose cone to let the camera slip in there and mount to the cone. Looks just like the installation looks in the rear and the view is perfect. Can see shoe tips of person standing in front of car when about 4" front the person.�
Oct 27, 2014
Klaus Can you post a picture or two please? I've been thinking to do the same - using the nose cone.�
Oct 27, 2014
teslasguy Yep. Tomorrow I'll take a few pics and post them.�
Oct 28, 2014
teslasguy Ok here are a few pic of front camera install and short video.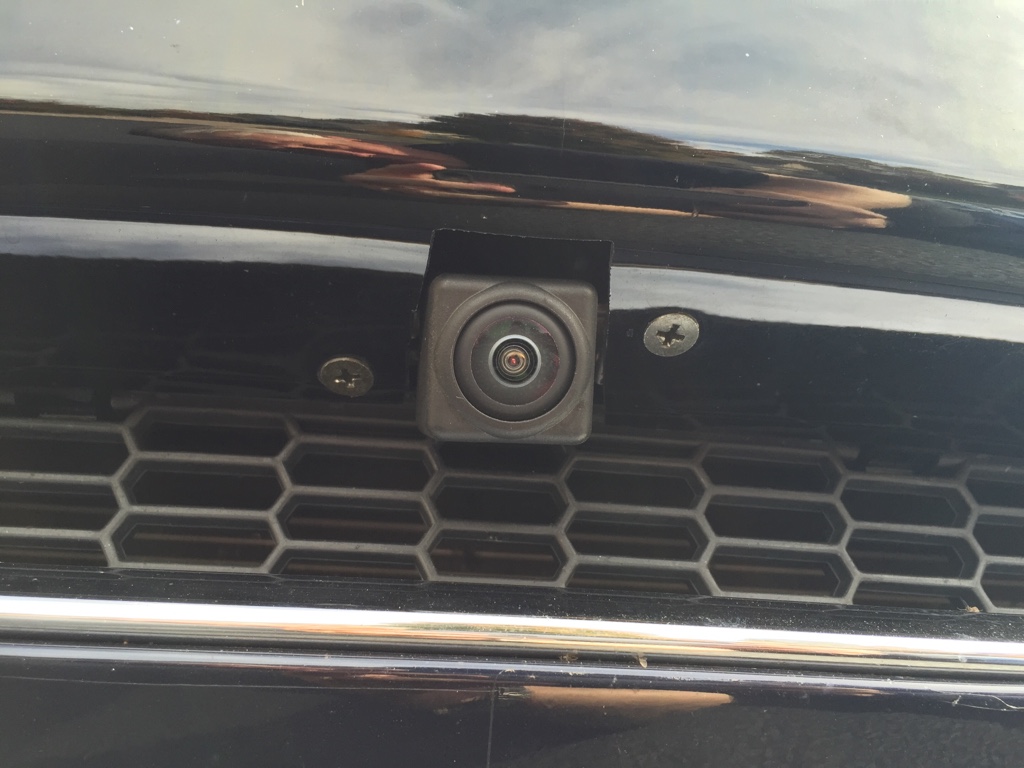
https://vimeo.com/110315918
�
Oct 28, 2014
teslasguy Few more pics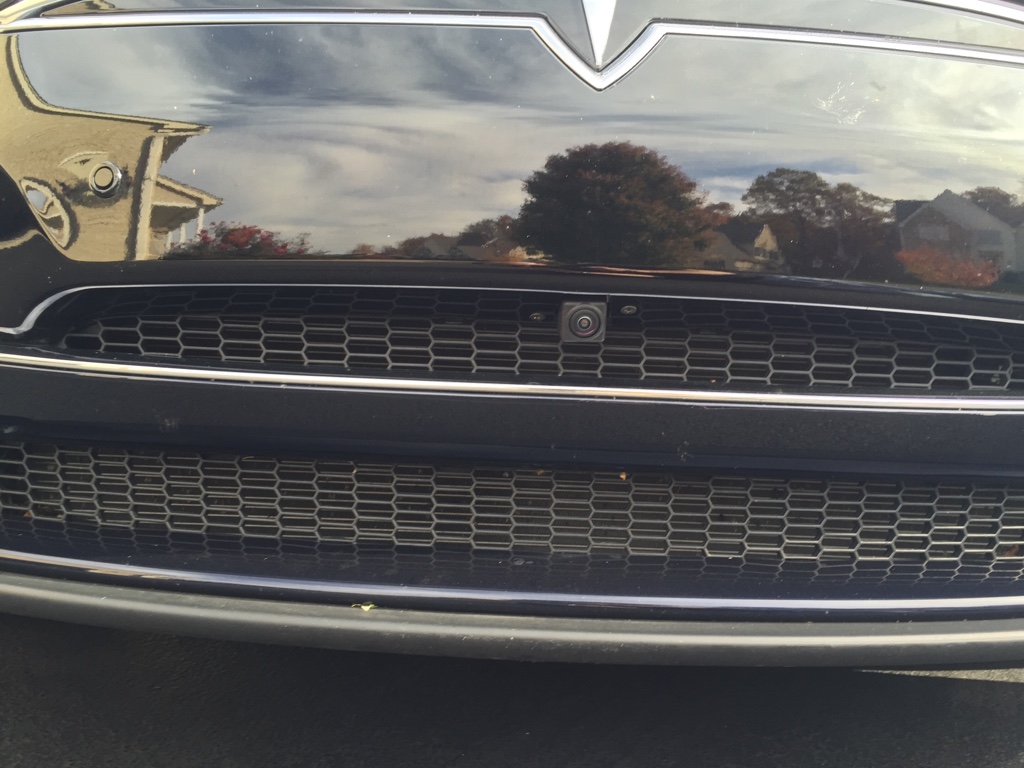
 �
�
Dec 1, 2014
Chris1howell Cyber Monday is almost over so how about "Tesla Tuesday". All Tesla Products in the OpenEV store are 20% off with the discount code "teslatuesday". The code is active now through tomorrow.
The OpenEV Store has just 7 front camera kits remaining. Right now there is not enough demand for another run so this could be the last chance to add an front camera. The remaining kits include the switch, 2 remotes, long TESLA OEM cables, short cables from RF supplier and a license plate mount. All that is required is an OEM Tesla rear-view camera and installation.�
Jan 14, 2015
EBill Do the white lines for the rear camera on version 6.1 show up on the front camera display?�
Jan 15, 2015
artsci No, but the overhead image of the car and the distance from obtacles does.�
Jan 15, 2015
Gizmotoy Interesting. Any idea how it knows which camera is the actual rear, and only apply the lines to that one?�
Jan 15, 2015
artsci Beats me. Maybe it has something to do with the reverse signal.�
Jan 15, 2015
HankLloydRight Is that only if you have parking sensors? What about cars that don't have parking sensors?�
Jan 15, 2015
artsci I assume that the overhead view and barrier distances don't show at all if you don't have the parking sensors. Just the front and rear camera images.�
Jan 15, 2015
pilotSteve If indeed Tesla engineering implemented parking lines enabled by REVERSE rather than camera-visible that would explain it. Good, correct, robust engineering..... and maybe some Tesla folks are forum readers and know about your cool camera switch artsci. Nice they didn't break it for us.�
Jan 15, 2015
Klaus This implementation only makes sense. Even if you only have the standard rear view camera, you don't want backup lines over the image if you use it to look behind the car while driving forward. So the lines need to be activated in reverse only ...
--- Edit:
This was confirmed before in the Firmware 6.1 thread:
�
Jan 15, 2015
artsci Tesla knows about it for sure. For a while they were wondering about all the demand for rear cameras�
Jan 23, 2015
cgiGuy In my car (2013, non-sensor) the white lines do show up on the front camera, but only while in reverse. I don't have mine set up to automatically switch to rear camera when I put it into reverse. So, short answer--it doesn't know what camera is being used. I also tried switching from front to rear and back while in reverse, and the screen goes black (as we're used to) and the lines go away between cameras, but it comes right back up with image and guidelines with no problem. Interestingly, the "camera not found" text doesn't show when switching between cams while in reverse.�
Jan 23, 2015
artsci Interesting. True that the system can't differentiate between the cameras which is why it works. The white lines must be triggered by the reverse signal.�
Feb 12, 2015
Kraken I can second the fact that for those of us who don't have the camera triggered to switch when going into reverse, the white lines show up when in reverse and the front camera on... it looks like it expects your about to launch into space, but I think that's just because I need to tilt my front camera down a bit.�
Feb 12, 2015
llavalle Couple of questions :
1-Do you ship to Canada?
2-Do you have a picture of the front camera mounting bracket? We don't have front plates here..
3-Does the mounting bracket work with the Autopilot equipped cars?
Thanks�
Feb 12, 2015
artsci
OpenEVSE is the place to buy the camera switch PCB, bracket, and other parts. But you shouldn't wait as I don't think they have many left.
We originally made 100 sets, and once 75 were sold OpenEVSE bought the remainder. Likely these will never be made again.
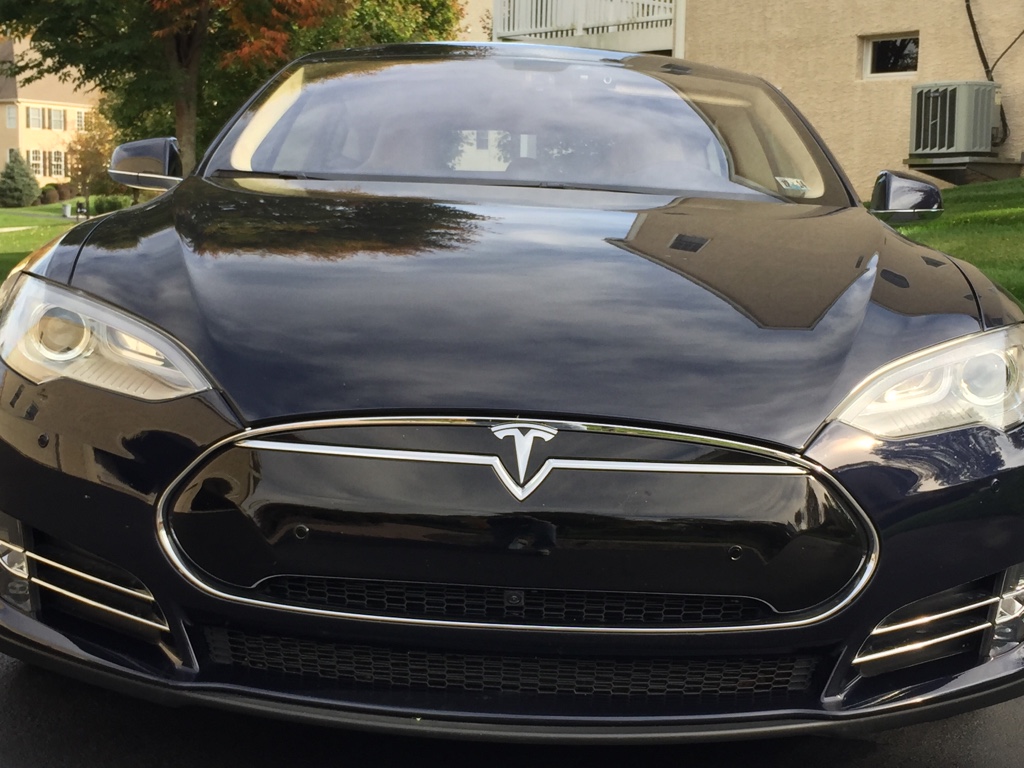
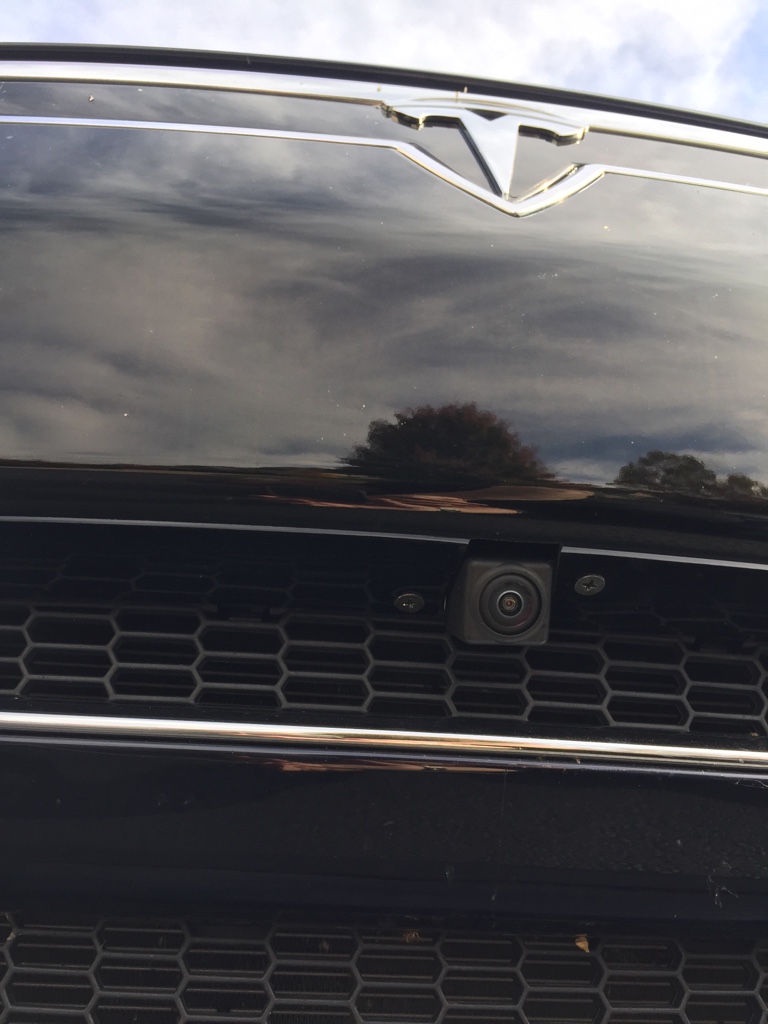
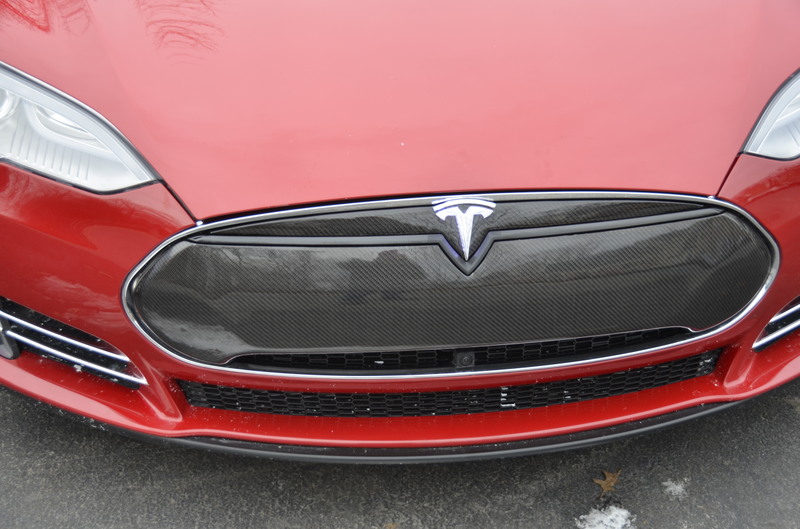
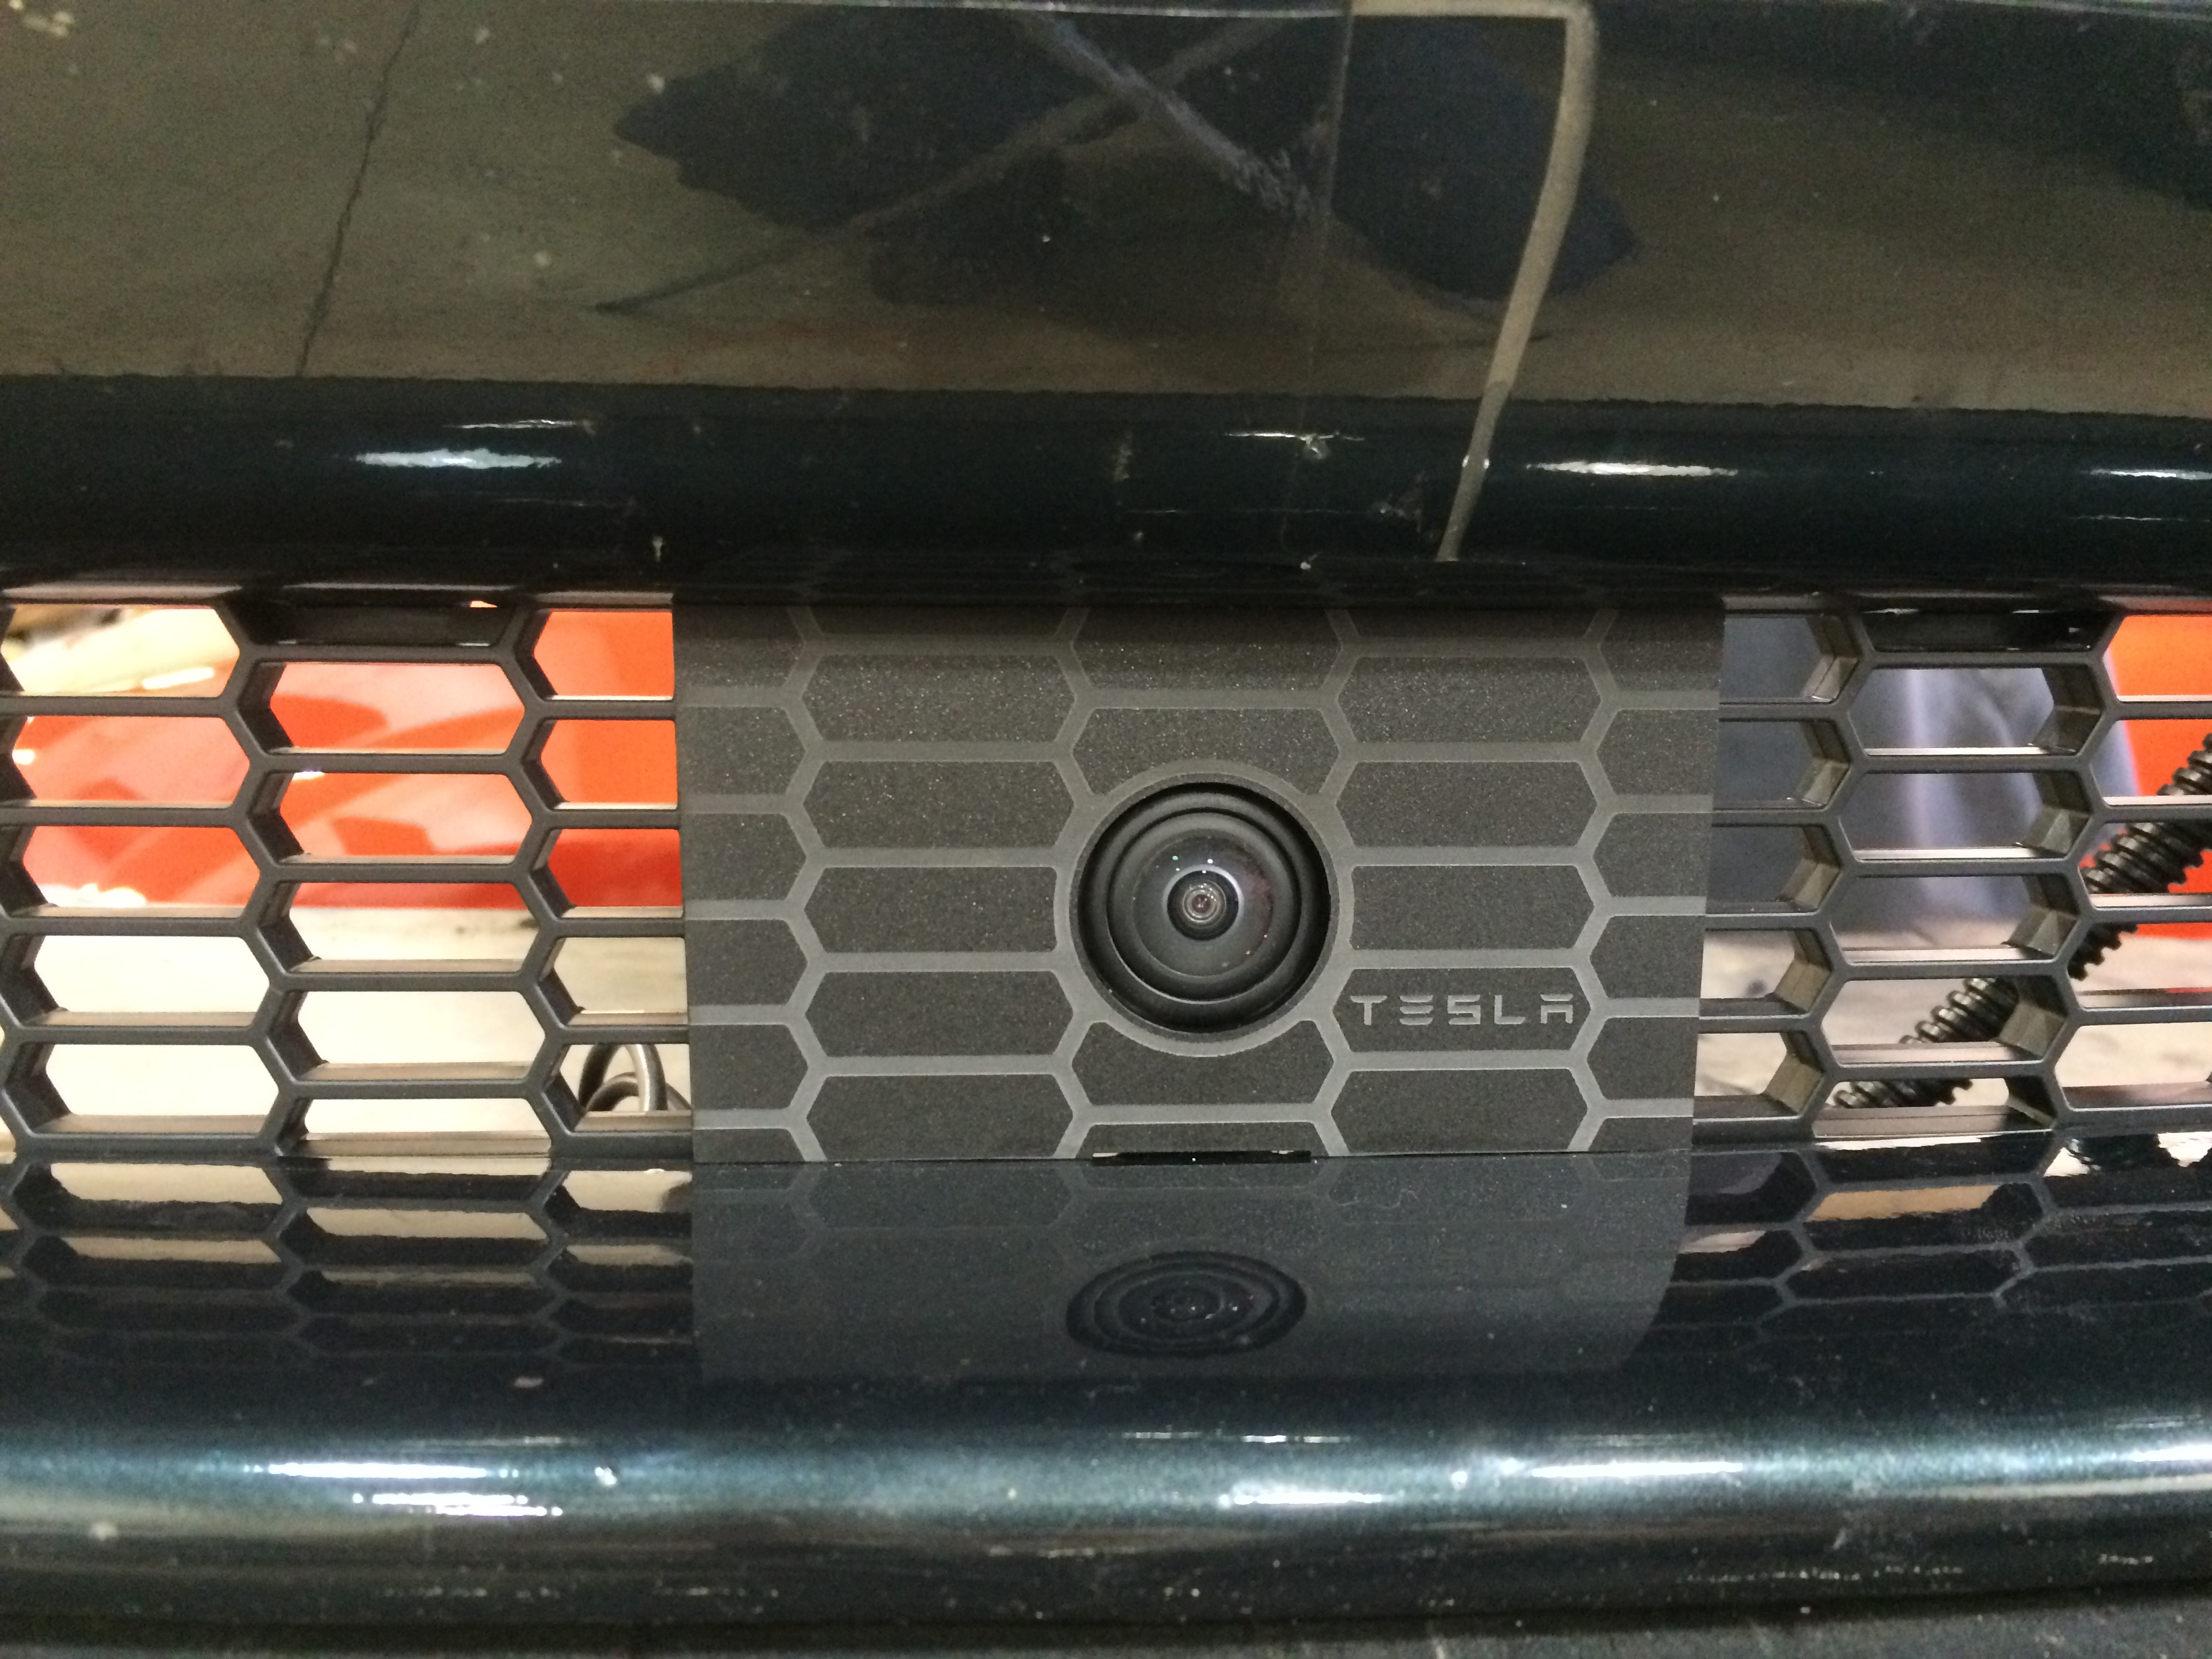
If you don't have a front license plate you don't need the bracket, The front camera just mounts on the upper grille under the nose cone as in the photo below.
 �
�
Feb 13, 2015
Andyw2100 I may have purchased the last available unit early this morning. The link above, which I used at the time, now returns a 404 page not found error.
I watched this video on the unit's operation: Tesla Model S front-rear camera switch demo - YouTube
Thanks to all of you who were involved in this, and especially to you, Rich, for everything you did to make it happen!
I do have a quick question or two about the unit's operation that aren't answered in the video.
If I haven't manually accessed the video icon, and just put the car in reverse, will the reverse camera view still pop up on its own as it does now? If so, will the "No Camera Available" delay be present or not?
I understand the "No Camera Available" delay occurs any time I switch between camera views. I'm just wondering how, if at all, having this system in place changes the behavior of what happens when there is no camera view on the display and the car is then put in reverse.
Thanks.�
Feb 13, 2015
llavalle Yeah, looks like it. I wanted to order this morning but they are out of stock now :S meh.�
Feb 13, 2015
artsci If the unit is properly wired up it always reverts to the rear camera when the car is placed in reverse. But if the default is set for the front camera (which I recommend) there will be a slight delay and a brief appearance of "No Camera Available" as it makes the switch to the rear camera. On the other hand if the rear camera is set for the default, the message does not appear, but you'll always have to use the remote or homelink command to switch to the front camera.
I suppose if there's sufficient demand we could alway make these again but to make it economical the minimum needs to be 100.�
Feb 13, 2015
Andyw2100 Thanks, Rich.
So just so that I am crystal clear on this, I'm going to restate this, as I now understand it:
All of the following assume correct installation (which I'm going to have done by professionals.)
--If set up with the rear camera as the default view (the mode you do not recommend) everything will function exactly as it does for me now, with no change, no delay, and I would never see that "No Camera Available" message when simply shifting into reverse. But in this mode, if I want access to the front camera, I would switch to the front camera using the remote or a programmed Homelink button to make the switch. So while parallel parking, I would have to use the remote or the Homelink button every time I wanted to change the view on the display from back to front, as the view would never change on its own simply because I was shifting between reverse and drive. Also, when I do want to simply see the front camera, I'll have to press the camera icon on the screen, but then will still need to use either the remote or the Homelink button, so utilizing the front camera becomes a two-step process instead of a one-step process.
--If the default view is set to front, when I put the car in reverse I will still get the back camera, but there will be that slight delay, and I will briefly see the "No Camera Available" indication on the screen. When parallel parking, the displays will automatically switch from the back display to the front display, as I shift from drive to reverse, each time with the slight delay and the "No Camera Available" message. When I just want to use the front camera to park, I'll only need to access the camera button on the screen, and the front camera will be immediately visible, with no delay or message. In this mode, the only reason I'd use the remote or the Homelink setting would be if I wanted to view the back camera while in drive.
Is the above a complete and accurate description?
And then one final question? Is this setup of which view I prefer as the default view a decision I need to make before installation, because the wiring is dependent upon it, or can I change the default view via the remote or some other way at any time?
Edit: I just looked at the manual which seems to make reference to buttons A and B on the remote, but in the video you talk about button D. It sounds like the button D in your video is functioning like the button A in the manual. Is that correct?�
Feb 13, 2015
HankLloydRight If you're concerned about the small delay and the "No Camera Available" message, it's really not a big deal. It's very brief.
Having the rear camera as the default seems like a lot more hassle than the "No Camera Available" message and slight delay.
IMHO.
Either way, it's a great addition to "classic" Model Ss.�
Feb 13, 2015
Andyw2100 Thanks.
I'm just trying to figure out which way I'd prefer to use it, as I rarely parallel park, and do, of course, put the car into reverse all the time. Even so, I'll probably go with the recommended setup.�
Feb 13, 2015
santana338 Any chance the kit would be updated to use the newer forward looking camera if there was enough interest to get close to 100 new orders?�
Feb 13, 2015
DavidB If I read your question correctly, yes, that is an accurate description.
You do not need to decide which view you prefer prior to setup. You can change the default view via the remote or Homelink at any time.
I do not know the answer to your last question.�
Feb 13, 2015
RodF I leave the default to rear camera. At those rare times that I parallel park, I switch it to front. At that point it will still automatically go to the rear camera when the car is put in reverse.�
Feb 14, 2015
swegman If I understand your question, you are referring to the front camera in the rear view mirror that is used for the autopilot functions. If that is correct, the answer is likely no, as that camera provides no video signal that is viewable on the touchscreen.�
Feb 15, 2015
artsci If I'm not mistaken the new forward looking camera sees over the hood and does not see obstacles down low. Correct me if I'm wrong.
If we got close to 100 solid orders (deposits) a new run could be done.�
Feb 15, 2015
santana338 I was thinking about using an extra forward looking camera instead of the rear looking camera for this kit. I assume the cameras would be compatible?�
Feb 15, 2015
Andyw2100
swegman told you very clearly that the forward looking camera would not be compatible and why. The forward looking camera does not provide a video signal that would be viewable on the touchscreen. (I have no knowledge of this. I'm just restating what swegman posted. See above and upthread.)�
Feb 15, 2015
santana338 I missed swegmans post earlier. Thanks for pointing it out.
I think swegman was thinking I meant to use the forward video camera in place. This is not what I am suggesting.
The existing kit uses a spare backup camera and puts it on the front of the car. The backup camera was the only camera available when the kit was developed. The downside of using the backup camera as a forward facing camera is the left-right reversal on the screen. If a new forward looking camera was used in place of the backup camera in the existing kit setup, I think this would solve the left-right reversal issue.
Even if the current front camera is not viewable on the main screen, I can't imagine the video signal for the forward camera would be any different from the rear camera.�
Feb 15, 2015
Andyw2100 I think swegman understood exactly what you intended to do.
I think the front facing camera has no capability to output to the 17 inch display because Tesla apparently made that some really specific, proprietary format, which is why the only camera that can work to output a signal to the display is the rear-view camera. If there was currently any output from the front-facing camera to the display, you might be right that it could be used. But swegman has a lot of expertise when it comes to video stuff, so if he says it can't be used, I believe him. It makes sense since right now there is nothing that camera does that involves video being output to the 17 inch screen. In fact that camera doesn't output video anywhere.�
Feb 15, 2015
santana338 I'd love for swegman to chime and rule out the front facing camera with personal knowledge that it is not compatible. The Omnivision press release from 2012 hints that this camera would be ideal for all of Tesla's needs including back-up and autopilot functions:
Press Release from 2012
�Driven by both anticipated legal/regulatory requirements and consumer demand, rear-view cameras and other vision- and sensing-based driver assist systems are experiencing high adoption rates in next-generation vehicle designs around the world,� said Inayat Khajasha, senior product marketing manager at OmniVision. �The OV10630 is our flagship sensor, designed to meet the stringent requirements of this rapidly growing market. We believe that the selection of this sensor by a leading-edge manufacturer like Tesla Motors underscores our leadership role in shaping the future of automotive imaging.��
Feb 15, 2015
HankLloydRight Even if the front facing autopilot camera is accessible and/or compatible, what good does it do for anyone? It's high up on the windscreen, and it can't see the road directly in front of the car or any obstructions that you need to see when parking.
The only extra purpose it could serve is to act like a dashcam, but that's not in scope of this project/thread.�
Feb 15, 2015
Andyw2100
Perhaps swegman will weigh in. But I'm not sure what part of what he said is confusing to you. I know you said you missed his post the first time, and you still seem to be having trouble understanding it. Here it is again:
That seems pretty crystal clear to me. But perhaps he will indulge you and say it again.
As for the press release you quoted, what's your point? That's a press release about the backup camera. No one is questioning the backup camera's ability to display video on the 17-inch display.
santana338 is talking about buying extra front cameras instead of extra backup cameras, to solve the problem of the image being flipped. He wasn't talking about trying to use the existing one mounted where it is. The problem, however, is that as per swegman, it won't work, because the front camera can't ouput video to the 17-inch display.�
Feb 15, 2015
swegman The Tesla backup camera is capable of displaying a non-reversed image by programming a bit in a specific register. The problem is Omnivision will not disclose to anyone how to reprogram the register unless they are a customer and sign an NDA. I found the specific register that selects whether or not the image is reversed, but neither me or anyone else has been successful to find out how to program it and with what equipment. It is also not clear from the limited materials we found whether this register needs to be set only once, or whether the register is set by the touchscreen each time the camera is powered up.
No other camera has been able to provide an image on the 17 inch touchscreen. Artsci even purchased an adapter that converts the signal from a conventional camera to the signal type required by the 17 inch touchscreen, but it did not work with the Tesla touchscreen. We may purchase a touchscreen to attempt to reverse engineer the camera input thereon (there most likely is a unique handshake between the screen and camera signal) in order to enable the use of a non-reversing camera, and/or to provide an input for, for example a dvd player, and maybe an output to enable recording the images from the front and rear cameras (and maybe side cameras) (i.e., think dash cam).
As others have noted, the camera in the rear view mirror is mounted too high to see obstructions when parking. Further, it is unlikely that you could purchase (from Tesla) the camera in the rear view mirror without purchasing the entire mirror assembly.
BTW, pictures of the Tesla touchscreen that have been posted on TMC shows it has two video inputs on its back panel. It would not surprise me if when a second compatible camera is connected to the second video input that the touchscreen pops up a window to select video 1 or video 2 to display. If we get a touchscreen (or someone wants to volunteer to pull their touchscreen out of the dash so that a cable can be connected to the input of video 2), we will look into this possibility.�
Feb 15, 2015
artsci Swegman is completely right. No other camera than the Tesla camera will work and currently there's no interface that will work either. Remember, the switch is exactly that. As it's seeing the same signal, the touchscreen thinks the front camera is the rear camera.
The company I've contacted about creating the interface seemed to get cold feet when I sent them a number of photos of all of the connections and cables for the touchscreen. I haven't heard from them since (but I was out of the country for a week and will pursue them again now that I'm back). In the meantime I've put off buying the spare touchscreen until they confirm that they want to do the work.�
Feb 15, 2015
LittoDevil Got a question
I know I connect the reverse light signal to "Rear" aka "Sw1" but.. what is Frnt or Sw2 for? Is it for anything? Just curious.. hehe..
Artsci & WhiteP85 Thanks for designing the kit!
Larry�
Feb 16, 2015
santana338 I have not been following this topic for a while so I apologize for not having the latest info.
I didn't realize the forward looking mirror was built into the rearview mirror. I was thinking last night that even if the forward facing camera was compatible, it would not be a good fit anyway because it is meant to be inside the car and not on the outside like the rear camera with its lens exposed to the elements. It would likely not survive long on a front license plate bracket.
Thanks for clearing that up for me swegman.�
Feb 16, 2015
artsci Front/SW2 is for nothing.�
Feb 16, 2015
HankLloydRight Also, as artsci has mentioned way way up thread, the left/right reversal for the front camera is really no big deal.. when you're trying to not hit a parking barrier or other obstacles, it almost doesn't matter. And the wide angle lens is so wide angle, anything more than a few feet away is almost not even visible in any usable way.�
Feb 16, 2015
Andyw2100 For those of you that have already installed this: roughly how long would you say it took? If you used a professional installer, do you happen to know how long it took them? Would you say this is a more complicated installation than a typical dashcam or radar detector installation?
I'm definitely not going to attempt this myself. I'm just trying to figure out who can do it for me.
Thanks!�
Feb 16, 2015
swegman About 2 hours. The hardest part is the lifting of the floor carpet in the passenger seat area and finding the correct wire to connect to so that the cameras switch between the front and rear cameras based upon the car being in reverse or drive. Its a fairly easy install.�
Feb 17, 2015
Andyw2100 Thanks, swegman.
Anyone else care to weigh in with how long it took you, or how long it took your installer if you know?
I have a potential installer whom I definitely trust who works on high-end cars. I know they do excellent work. They regularly install stereo systems, dashcams, radar detectors, etc. I thought this would be right up their alley. Their main installer looked at some of the information briefly and expressed some concerns. He's going to look at it more thoroughly and get back to me. That's the reason I'm trying to find out if this is actually a very difficult installation, or if it should be relatively easy for a professional.
(I'd also be using the license plate mounting bracket, which I would think would make the installation at least a little easier than if I wanted to install the camera behind the grill.)
Also, am I correct that there is no soldering involved in the installation if I want to have the unit use switched power, so that it powers on and off when the Model S does? From reading the installation manual, that was my take on it, but I could be mistaken.
Thanks for the help and advice.�
Feb 17, 2015
DavidB FYI: I'm working on a mounting plate for the front camera. I haven't installed the prototype yet, but it looks very good. I'll post photos in a few days.�
Feb 17, 2015
Andyw2100 Great! Thanks!�
Feb 17, 2015
marcsegal I'm in. Add me to the list�
Feb 17, 2015
HankLloydRight I would call this a simple install for a professional.
At first, I took the kit to a local professional, who looked at it, and balked at running the camera cable up the side through the door, and instead, wanted to run it through the firewall and do it "his way". Well, I balked at that and just did it myself. I've done lots of radar and audio and other car electronics installs in the past, so this was really no big deal. As mentioned, the hardest part is getting under the pax footwell and finding the one wire in the connector to signal reverse.. and even that wasn't all that hard. And the new method of running that one wire in the hollow metal tube to the other side of the car is so simple. You probably don't need to solder anything, but you might have to strip and crimp a few connectors on some wires.
The instructions are very detailed and make it look like running the camera cable from the grill is somewhat complicated... but it's really easy! I also sent Rick the following suggestion on running the cable from the frunk to the cabin:
Also, for power, I used the OBDII port, but instead of soldering the OBD connector included with the kit, I got one of these: Amazon.com: Oem OBD-II OBD2 16Pin Male to Female Extension Cable Diagnostic Extender 100cm: Automotive and hacked off one end, found the two wires that were + and -, and used that for power. Real easy. (note: the wires inside the cable are very thin, so you or your installer might need to beef them up with some larger wire before connecting to the camera module).�
Feb 17, 2015
Andyw2100 Thanks for the detailed response. I'll definitely male sure to pass along your suggestion regarding the A-pillar routing to whomever winds up doing the install for me.
I'm wondering why you chose to go with the OBD connection for power. With that connection drawing power all the time, isn't that a negative? What were the benefits that outweighed the negative?�
Feb 17, 2015
HankLloydRight It's a very small amount of power, a few miliwatts maybe? Artsci might be able to chime in, I think it's mentioned in this thread somewhere. I am also pulling power from the same source for my dashcam with parking mode/motion sensor so it was easier to tap into that harness I created than switched power from the fusebox or tapping into a different power wire in the MS harness. It's also easier to remove the entire setup -- camera module, dashcam, OBDII plug, etc without leaving a trace or cutting or resplicing anything.
I don't think the drain on the batter amounts to enough to worry about. Also, it's being pulled from the 12v battery anyway and not the traction pack. Sure, the 12V might need to be recharged slightly more often, but again, it's such a small draw, it can't really account for all that much. Though I did install a switch in the OBDII port area in case I need to shut them both down for some extended period of time or in the rare case I might need to limit vampire drain, but I really can't think of any. It's not like I leave my car parked at the airport for extended periods of time (I take my ICE to the airport for that).�
Feb 17, 2015
artsci We're talking about milliamps here, not enough to even give a thought. Plus in the final install instructions we're tapping into switched power that's only on when one's butt is in the driver's seat.�
Feb 17, 2015
Andyw2100 Thanks.
I had read somewhere in this thread that someone had a problem with the camera overheating when left out in the sun all day, and it turned out it was also powered on, because they were powering from the OBD port. I think I also saw after that that ArtSci actually changed his recommendation from using either installation method, to just recommending the switched power. But obviously if you're not having any issues, that's not a concern.
- - - Updated - - -
I had downloaded a PDF file from the OPENEV Store site where I purchased the unit, but seeing the above, I'm thinking that must not be the final instructions, as that version still talked about soldering a connection to the OBD port as an option. Where would I find a link to the final install instructions? I'd like to send that to the possible installer who is considering taking on the job, so he can better evaluate what needs to be done.
Thanks!�
Feb 17, 2015
HankLloydRight That probably has more to do with being in the sun all day then being on unswitched power.�
Feb 17, 2015
cgiGuy Can confirm. I haven't had any issues since Fall of last year and I'm still plugged into ODBE port. During summer it would not work for the first 10 minutes of my drive everyday after work. I need to try to figure something out before it gets hot here again.�
Feb 18, 2015
Shakattk I got the switch and the camera, but didn't realize cables were extra and apparently there are reliability issues:
Amazon.com: Superbat The Tesla Front Camera cable kit sets Fakra female straight 4pole high quanlity Dacar 535 cable: Computers Accessories
Does anyone have a source for reliable cables, both the long ones and the short ones? Thanks�
Feb 18, 2015
DavidB The bumper is removed in these photos (I'm doing other work as well), but here is the front camera & mounting plate:
This is a view looking almost straight into the lower grill, which few would ever do. That is why the etching doesn't align with the grill work.
This shot is looking downward at the camera, and the etched work lines up with the grill.
I will make several variations of this mounting plate available (price not determined yet) for either the top or lower grill, and either the center or offset to make room for a license plate.
And yes, in these close up shots, the clear bra looks ugly. One of my upcoming projects will be to get my car color corrected & re-coated.�
Feb 18, 2015
Andyw2100 Does anyone have the final version of the installation manual?
ArtSci no longer has it, but would like to have it again, and I said that if I managed to obtain one, of course I'd make sure to get a copy to him. The .PDF file that was most recently on the OpenEV Store site is not the most recent version.
ArtSci says of the most recent version: "A key change was the threading of the camera cable into the cockpit, which in the latest version was through the gap between the driver's side fender and the windshield frame (with photos). Another was the threading of the reverse signal connection from the passenger side behind the dashboard. In the latest version the wire is threaded through the long hollow tube that runs the entire length of the dashboard."
Please let me know either by posting here or by private message if you prefer if you have a copy of this version.
Thanks!�
Feb 18, 2015
artsci Yes, please, if anyone saved a copy, let Andyw2100 know. I saved it to Dropbox and lost it all when I was trying to clean out old files. Regrettably I did not save it to another place.�
Feb 18, 2015
Klaus Here are the two most recent files I have: One was the 21 July 2014 version with reduced file size (compressed graphics) dated 28 Jul 2014, 17:38, a second an update that describes the easier cable routing from the frunk to the cabin via the gap in the fender trim, dated 2 Aug 2014, 16:18 (these are the PDF metadata, not the download dates.) The update still references the Chinese cables that proved to be problematic. The OEM cables from Tesla that Rick bought for us work fine, so those are the one's to get.
https://www.dropbox.com/s/xlkz3la1rjbdm8w/Camera%20kit%20instructions%2C%20smaller%20file.pdf?dl=1
https://www.dropbox.com/s/2lpcfyxa27zu52u/Urgent%20camera%20swith%20install%20update.pdf?dl=1�
Feb 18, 2015
artsci Thanks so much Klaus. Those two files are ones I didn't have and they provide some valuable updates. I think there was an even later version of the full instructions that addressed threading of the reverse signal wire through the tube behind the dash.�
Feb 18, 2015
Andyw2100 Well, that was fast!
Thanks, very, very much! That definitely appears to be a later version than the one I had. ArtSci--can you confirm that this is, in fact, the "last" version that you were in search of?
Thanks again, Klaus!
Edit: Whoops! I guess I should have refreshed before posting.
- - - Updated - - -
Looks interesting.
What is the plate made out of? Will one of your variations include a smaller plate, or does it need to be that large to hold the camera securely in place?�
Feb 18, 2015
DavidB The plate is made out of a black plastic--I'll get back to you with the specific type. The size of the plate is designed to fit over the hole in Tesla's new grill (re-purposing what is intended for the autopilot's forward radar). If you want to use the older grill, or use a different location with the newer grill, the plate can be smaller but a hole will have to be cut in the grill to fit the camera behind the plate. I would like some feedback about preferred placement; for those wanting it offset because they have the license plate in the center, how far to one side do you need it?
Steps for mounting this plate:
1) Remove bumper, taking care to detach wiring
2) Remove grill from bumper
3a) If you use Tesla's new grill (as shown in the pictures), the grill does not need any modification. This option is not feasible if you have the autopilot package.
3b) If you use the old grill or for all other placements, cut a hole in the grill to fit both the camera & the included bracket. Dimensions for the hole & a cardboard guide will be included. Note that the exact location of the plate must be predetermined: The grill is curved and the dimensions for the plate are different for every location.
4) Notch bumper to make room for the plate
5) Remove existing mounting bracket on the camera
6) Install camera onto the plate with the included bracket & fit the plate onto the grill
7) Reattach grill onto the bumper. This step will lock the plate in place.
8) Make sure all wires are attached and reinstall the bumper
Note that the camera fits almost flush with the grill, and that a license plate might severely limit the camera's field of view.�
Feb 18, 2015
kirkp Artsci might be referring to this version, dated 8/8/2014. https://db.tt/bkxykVic�
Feb 18, 2015
Andyw2100 I appreciate the info. I'm definitely going to go with a simpler approach, though. I'm sure there are plenty of people that will appreciate what you're doing!
- - - Updated - - -
That has got to be it! It has the part about the hollow tube behind the dash that ArtSci mentioned.
Thanks very much!�
Feb 18, 2015
DavidB That is fine--what I've done is a labor of love, and I do not expect enough volume to pay for my expenses, much less make a profit.
However, I do want to point out that none of the steps are difficult. The bumper is surprisingly light weight and can be handled by one person. Because of the bulky size, it helps to have one person hold the bumper and another person disconnect/connect wires and bolt the bumper in place.�
Feb 18, 2015
Klaus I found this version also on my iPad to use it during the installation, it hadn't made it to my Mac. Thanks for finding it.�
Feb 19, 2015
cgiGuy Nice work! Does this mount require the original mounting points on the camera (as many of us have cut them off)?
Also, can you post a shot of the bracket with the bumper back on the car. Seems that it will look much different when the grill is on and it's dark behind it. Should blend in quite well.
Is there any way to point the camera down more? It seems like this would result in it being difficult to gauge how close you are. I have mine pointed slightly down and when the curb is at the bottom of my screen I know I'm about 8" away.�
Feb 19, 2015
DavidB PM sent.�
Mar 4, 2015
Shakattk just got my front camera installed at audio symphony in san francisco. they did a great job and it's working well. if other owners need any upgrades, they are a good installer.�
Mar 4, 2015
Andyw2100 Did they encounter any difficulties? Do you know about how long it took them?
Thanks!�
May 14, 2015
Edison Auto Symphony is a good shop, IMHO�
Jun 26, 2015
hiphenry So I hear from artsci that there won't be any more orders. Is there anyone who didn't complete their installation and would like to sell theirs to me?�
Jun 26, 2015
dpodoll Sent you a PM�
Jun 26, 2015
HankLloydRight Has anyone else seen their front camera going blank due to rain?
Twice now I've had my front camera blank out for a day or two after a rain storm. In both cases, it eventually returned to normal.
I assumed these cameras were waterproof, but either they aren't, or I have a defective camera.
What would people suggest as a good way to waterproof the front camera without affecting the image?�
Jun 26, 2015
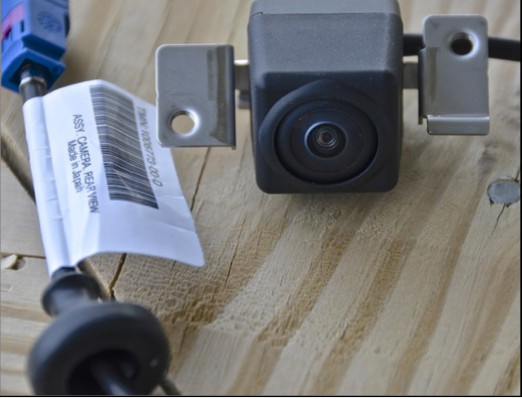
DavidB Unfortunately, the cameras aren't sealed as well as one would hope. The camera is housed by two molded pieces, a front & a back, held together by screws on the back, and sealed by a very small gasket:
I have experienced water intrusion in both the original camera and in the camera I installed in the front. I've found that adding a very fine bead of sealant, in addition to the gasket, works far better than the just the gasket alone.�
Jun 26, 2015
HankLloydRight So a bead of silicone around the seam where the two halves meet?�
Jun 26, 2015
DavidB Yes, that's what worked for me! A very small bead of silicone. I actually used a syringe to get the tiny bead.�
Jun 26, 2015
HankLloydRight I don't have a syringe handy, so I think I'm just going to use my finger and slather on the silicone around the thing.
�
Jul 21, 2015
Andyw2100 I just noticed today that when switching between the front and rear camera, the screen no longer displays the "Camera Unavailable" message. Instead there is a short pause while the screen is black, and then the correct view just comes up on the display. I made a short (low resolution) video to demonstrate this:
I currently have firmware version 6.2.2.4.250 on my P85D. While it's possible that this behavior started with an earlier version of the firmware, my best guess is that it did not.
I'm wondering both how and why this behavior changed.
Anyone think this could be an indication that Model X is going to use both front and rear cameras?
In any case, I'm pretty happy with this change, as I never cared much for the "Camera Unavailable" screen.�
Jul 21, 2015
HankLloydRight I've actually noticed both behaviors.. sometimes it says "Camera Unavailable" and sometimes it's just blank. No rhyme or reason why it's on or the other.
Also, if the MX has a front parking camera, I suspect they'll use a switching device that's more instantaneous that this kit, so there wouldn't be a blank pause between cameras.�
Aug 9, 2015
Thumper I finally got my front camera kit installed today. (It's a long story) Anyway, it works great but the key fob only works with button "D". Is this normal? It would be more convenient if it worked with one of the larger buttons.�
Aug 9, 2015
Andyw2100 It's most convenient to program the button into Homelink. Then you don't need the remote at all. I actually had three things already programmed into Homelink, but decided that having the front camera switch in Homelink was more important to me than having the third one.
Edit: And to directly answer your question, I actually don't remember, since I don't use it, but I think yes, it probably is normal.�
Sep 12, 2015
sgiambastiani Hi Art
Fully interested in obtaining a couple of front camera kits. Are these still available? I have a friend who has your camera in his Model S and love it!
Thank you�
Sep 12, 2015
artsci The kits are no longer available but some buyers never installed theirs. I'd post something to see if you can get one. If you do let me know and I'll send you the install instructions.�
Sep 12, 2015
HankLloydRight The front camera kit is the best mod I've done to my car by far!!
That's why I jumped on the Appliqu� project because you never know how many more are going to be made.
Thanks Artsci, Danal, WhiteP85 and anyone else involved in these awesome projects.�
Sep 12, 2015
cgiGuy I agree with Hank--this mod was terrific. I still use it regularly, 2 years later. How many orders would you need to get again to make it worth another run?�
Sep 12, 2015
DriverOne I have a never-installed kit. The white box & remotes, plus the separately ordered cable from China. The installation process was not for me. PM me an offer!�
Sep 13, 2015
dpodoll I have complete kit - never installed. PM with offer.�
Sep 16, 2015
Andyw2100 Apparently the installer that installed my front camera switch for me tapped into the main wiring harness. I discovered this just now when I received a call from the service center manager where my car is having it's first annual service performed. I had asked them to check into a water leakage issue, which turns out to be due to how the installer ran the cables.
I'm looking at perhaps $2000 or more in parts and labor to take care of this, as there is already corrosion of the wiring harness. Because the wiring harness should never have been tapped into in the first place, if I don't replace it, Tesla would void the warranty on the 12V system components.
I am livid.
I know the installer is not going to "make this right", and I'm going to have to sue him in small claims court, which is going to be a royal pain, since he is a couple of hours away.
And after it's all said and done, the front camera switch won't be installed, as Tesla can't install it, since it's third party.�
Sep 16, 2015
Gizmotoy That's a shame. That's one of the reasons my switch is sitting on a shelf, still. I haven't had time to install it, and I don't know anyone trustworthy enough to do it.
I thought Rick's instructions were pretty straightforward. Where did your installer tap the harness and how did it lead to water intrusion? Might be helpful information for anyone yet to install one of these.�
If you have any more details or pics on how you did the cable routing and hole placement I would find that very useful. Thanks.Melbourne Alarm Systems Installed
Trả lờiXóa