Jun 15, 2013
artsci As I�m working on developing a lighted Tesla T I thought I�d start a new thread to report progress and information on how it�s done. The thread that inspired me to begin this project is here.
To start, it�s important to know that the stock T is made of two plated plastic pieces, each about 3mm thick, one for the T itself and the second for the thin arch over the top of the T. Both pieces have 3M tape on the back and stick to indented spaces on the nose cone.
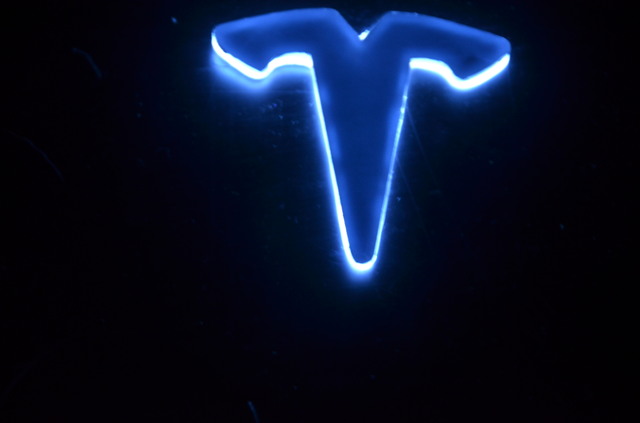
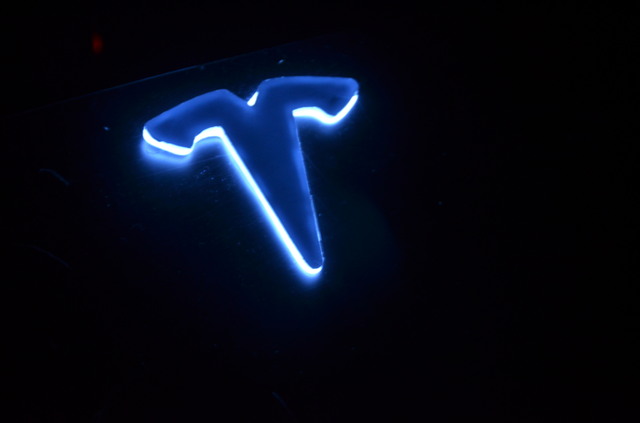
First, I developed a prototype for testing various concepts for lighting the T. The pieces are laser cut out of Plexiglas. My goal for this prototype was to test EL wire. It works pretty well from a conceptual point of view, but it�s way too complicated to do given the way the T is attached to the nose cone. A thin groove for the wire has to be cut into the back corners of the T, which takes a lot of machine time and makes it cost prohibitive ($150 of machine time just for the first one). The light given by the EL also beings to dull and eventually dies over time. Also, it�s very tough to make the wire confirm precisely to the sharp bends required to make it fit the T precisely.
Posted below are some photos of the results. The T is too big and is not precisely cut, so the prototype is a bit crude. But the lighting effect is what I was hoping for, except for the blue cast of the EL wire (I bought what was billed as pure white, but really does have a strong blue cast, another reason to rule it out). However, the effect looks much better in person than in the photos.
As a much better effect can be achieved with LEDs, the next prototype will use them. I�ll have Plexiglas pieces that will match the stock T perfectly. To make the light emanate from the sides of the pieces, the edges have to be sandblasted or otherwise roughed up, a much simpler and less expensive process than laser cutting a channel for EL wire. The LEDS will be attached via small holes in the back of the Plexiglas pieces. To match the stock T the front surfaces of both pieces will be covered with .0295 polished stainless steel sheet, laser cut to perfectly match.
I hope to have the LED prototype ready by next weekend or so. If it works I�ll install it on my own car and post photos (but only if the results are of the high quality I'm seeking).�
Jun 15, 2013
Grendal What you've got so far looks good.
Good luck.�
Jun 16, 2013
aaron.s Amazing work so far!!!
Aaron�
Jun 16, 2013
PhilBa You probably already know this but it's worth saying. One thing to consider with LEDs is they are directional. The game the manufacturers play is to put a lens on them that concentrates the light and gives a nice high lumen spec. Essentially you will be building a light pipe. So, it's a good idea to orient the LEDs so the maximum light will spill out the sides of the clear layer.�
Jun 16, 2013
artsci I'm very aware of that and will this experiment with placement of the LEDs so get the best results.�
Jun 16, 2013
aviators99 Put me on the signature list!�
Jun 16, 2013
Chas F Teach a man to fish.....:smile:�
Jun 16, 2013
efusco I'm so in when this is ready for prime time!
Evan, Via Tapatalk�
Jun 16, 2013
SCW-Greg Not true of all LED designs. Some of the very first LEDs were very omni-directional.
These would work, but I do wonder about the lumen output.
DIY How to Install and Wire LED Lights | Hack N Mod�
Jun 17, 2013
olanmills Just tagging this thread so that I can find it later.�
Jun 17, 2013
Martini This is rather off topic, but a cool application of LED lights you might be interested in.
Revolights�
Jun 17, 2013
Bobfitz1 I have some experience with what 5 years or more ago were called super bright LEDs. There are ones available now that are bluish white, which is ideal for lighted nose cone Tesla T. You can find them now for a buck or two apiece. They are bright, you don't want to be looking for long at one with it firing straight at you. They only consume 20 - 25 milli amps. You may want to experiment with various ways of directing the light into the plexiglass but I'd think ideal may be to alight the lens of the blue LED so it is firing into the plexiglass edge at the base of the T. Roughing the edges of the T around the outside perimeter should then give a reasonably uniform blue glow emerging from all around the T. Good luck! It will be another 8 or 9 months before I'm ready to order my MS, but I'll definitely want one of these. They are going to look awesomely cool at night.�
Jun 17, 2013
PhilBa Some have a wider field of view. A lot were created as indicators and have a narrow FOV. Many lighting products using LEDs use a number of things to widen the FOV - reflectors, diffusers, multiple angle placement and so on. You can get wider FOV but need to select carefully. You can get them without lenses with a fairly wide FOV but those are mostly surface mount. Not terribly hard to work with if you have a PCB for them but a bit of trouble for this design.�
Jun 17, 2013
Man_Utd I don't have a bike, but I'd buy one one just to use this. Pretty cool!�
Jun 20, 2013
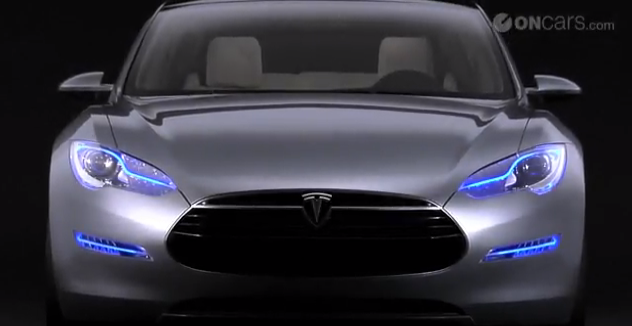
Soflason @artsci - very cool, excited to see how it looks once complete w/ some photos of the car... was this look inspired by the prototype version of Model S that had the blue lights embedded into the lights surrounding the grille (see below)?

 �
�
Jun 21, 2013
artsci The blue effect on my first experiment was really accidental. But now that you mention the prototype....�
Jun 21, 2013
brianman I'd like those lights (from the proto) but in red.�
Jun 21, 2013
SuperCoug This is a very interesting concept and I hope it works outs well. I'll be following your progress for sure.�
Jun 22, 2013
artsci Hope to debut the final version at TESLIVE.�
Jun 22, 2013
Dborn Hope this helps. I have had two illuminated signs for my boat. 1 failed miserably in short order because of water penetration. The other perfect! The edges of the acrylic need to be frosted - sandblasted or simply fine sanded. Rout the forward facing face to accept your chosen led. I believe for this size object a single led would suffice for each part of the T. Place reasonably central. Bring the wires out the rear facing surface. Fill all voids with clear silicone. Mount polished stainless steel sheet over the routed surface with silicone. Do this as a separate step to ensure water tightness of the led. Use neutral cure silicone. Do use a DC TO DC converter to ensure constant current power supply or fluctuations in voltage or current will kill your LEDs. By the way, the routed trench should not breach the periphery anywhere. I repeat check for water tightness everywhere before placing the stainless lid.
Good luck!�
Aug 5, 2013
4SUPER9 Great. I hope you will be offering it as a kit soon. Can't wait for the beta testers to post their experiences.�
Aug 5, 2013
The Fury Great!!�
Aug 5, 2013
zax123 Hey Rick!
The video looks awesome, I can't wait to install it. I think 10 LEDs will be plenty. In the video, anyway, the 18 LEDs look super bright. I'm pretty sure the brightness is amplified by the camera.
Now that you've had a chance to play with the new controller, I was wondering if you were able to test something... I know the unit has a memory feature whereby it goes back into the mode it was last in when turned on from the remote, but can you make it automatically TURN ON and go back to the last setting when 12V is applied to the power wires?
I'm wondering because I want to not have to physically press a button on the remote control whenever I turn on the car...
Thanks!
Rob�
Aug 5, 2013
artsci I'm not sure but I'll bench test it with an LED strip. Doing it now.
- - - Updated - - -
Just tested it. I'm happy to report that it works. This means, for example, that if the controller interface is wired to the headlight switch, it will always turn on to the setting is was on when the headlights were turned off. No need to push any buttons on the controller.�
Aug 5, 2013
nkohlimd Wiring to the headlight switch/circuit would be one option. another would be to wire it to constant power, select the mode you want but attach a photosensitive cell to the circuit so it goes on in the dark. Trying to figure out the light circuit. Will run it by my installer who did the radar detector install and post as soon as I get some ideas.�
Aug 5, 2013
zax123 That's amazing news! Thank you! !�
Aug 5, 2013
NJ Rob Amazing. Absolutely amazing. Can't wait for the other beta testers to green light this, so the remaining jealous readers of this thread have a shot at ordering a kit.") �
�
Aug 5, 2013
rodricklitch Put me on the signature list!�
Aug 5, 2013
Lloyd Anyone prefer a fixed brightness that just comes on with the headlights? While cool, I'm not sure I want to fiddle with a remote everytime I want to use the front logo light. Don't get me wrong, I love what you are doing. It's really great.
Also, I had a thought, while you are in the car, you can't see what the logo is doing. Would it b e prudent to have a low intensity indicator light in the cockpit someplace?�
Aug 5, 2013
artsci This is what I'm hoping the testers will do -- make their own enhancements that will further the capabilities of the basic hardware.�
Aug 5, 2013
olanmills It would be cool if you could wire it so that it came on whenever the parking lights or headlights were on.�
Aug 6, 2013
zax123 That's actually what I'd like to do. In past cars, the parking lights were on whenever the headlights were on, so I just had to wire in to the parking lights. In the past, though, I had an electrical manual for the car... I wish one existed for the Tesla. I feel a bit blind poking around in there in a $100k+ car, and that's a tad unnerving.
I'll likely wire an automotive relay to a wire that goes high when the lights are on, to isolate the circuit from the LED controller. I know there's likely plenty enough of current on the lights circuit, but I'd rather isolate and use a tap-a-fuse.
That's the plan anyway, we'll see how it goes.
I love the idea of having an indicator inside the cockpit. The only place I'd be willing to "violate" would be either somewhere around the cubby, or where the USB ports are located. Otherwise, I'm scared to make any holes anywhere else...
We'll see!
Rob�
Aug 6, 2013
artsci The indicator would be very cool. I think it could be done with a single LED and its leads soldered to one of the led pads on the PCB and run back to the cockpit.�
Aug 6, 2013
Zextraterrestrial Depending on your dash material, it would be easy to do something to the left panel next to the steering wheel. That is where I plan on mounting a pedestrian horn button. I have lacewood and was thinking it would be easy enough to cut a bit it I needed to
probably not the best spot for a light indicator but for rockets/ oil slick / smokescreen buttons, maybe�
Aug 11, 2013
artsci Four test kits ship tomorrow, so soon others will have this modification.
nkohlimd found a source that may be able to mass produce a lighted T at a very reasonable price so he and I are looking into it and will keep everyone posted on what we find.�
Aug 19, 2013
artsci Haven't updated this thread in a while. The interactions with the testers has resulted in some major changes in plans for the lighted T, even though none have installed the old model yet, fortunately.
Here's where we stand. The revised approach will involve 3D printing of a hollow T and arch that will have space for miniature LED strips. This will make possible much more even and even brighter illumination, will make installation far easier, and will make mass production possible. The new design will also make installation much easier. 3D printing of the first prototype may begin as soon as the end of this week. The first will be for the testers and based on their experiences appropriate enhancements will be made. I'll be working with the testers on this over the next month or so and I hope that we can scale this up in October.�
Aug 20, 2013
ccbldg artsci, thank you for your time & effort on this & your other MS projects!�
Aug 20, 2013
Panacea +1 :biggrin:
Yes, many thanks for your efforts!�
Sep 14, 2013
artsci 3D printing of the Ts won't be completed until next week and as I'll be in China from then until early October we won't have anything to show until then. But I will say that I've found a way to control lighting of the T from the touchscreen. At the very least we'll be able to turn it on and off and likely control the brightness and mode from the touchscreen.�
Oct 30, 2013
RandyY Any update on this sir?�
Nov 1, 2013
artsci I picked up two of the Ts today -- regretably the rest for the 6 testers won't be finished until Wednesday. So I'm going to complete one this weekend and post photos of the results. This way I can get all of the installation steps finalized. The biggest challenge is folding the LED strip into the hollowed out part of the T without damaging the circuit.�
Nov 1, 2013
bhuwan Hope this comes our well. Would lone to do this!�
Nov 1, 2013
nkohlimd Rick
Good luck with the install. Look forward to seeing pics. Would be great if I could get my T by next weekend as I am scheduled for front and rear parking install on the 11th and it may be best to do it at the same time since the full front of the car will be removed. no pressure
PS-wish your front camera mod was ready...timing is everything! Have a great weeeknd�
Nov 1, 2013
artsci You'll have it by next weekend if I have to FedEx it to you.
As for the front camera, now just waiting on the corrected cables to arrive. Everything else is ready.�
Nov 3, 2013
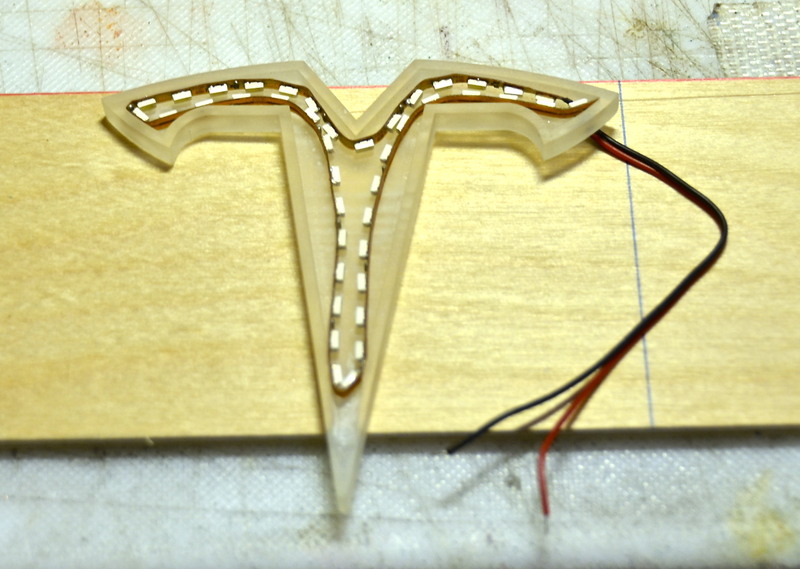
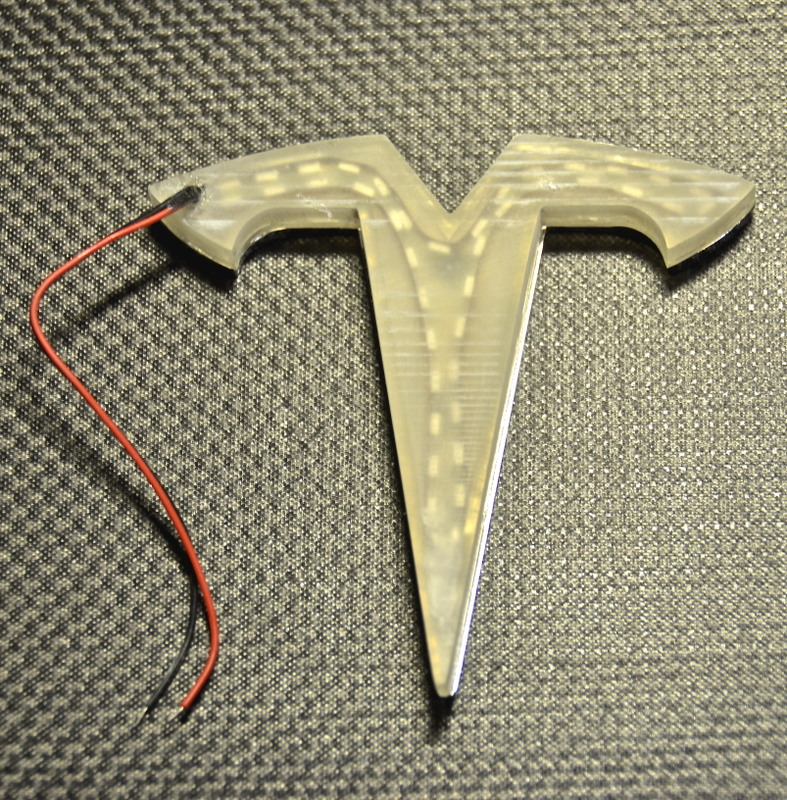
artsci I've finished assembling and testing the new lighted T, which is made with a 3D printed shell and very narrow LED strips from Oznium.com. I'm very pleased with the results -- it's a big improvement over the previous version with a PCB board and the need to cut out part of the nose cone frame. All of that is not necessary with the new version. Two 5/64's holes in the nose cone is the only need for alterations to the car. The light is much more even and brighter. I'll post some photos this evening.
The 6 beta testers will be shipped kits on Wednesday or Thursday. They'll be assembling them and installing them on their own cars and offering suggestions so we can make a kit for everyone interested in this mod.
Now I'm on to lighting the T on the rear lift gate. Already have one on order from Tesla and now that I know the tricks, this should be piece of cake. This will require two 5/64s hole in the lift gate sheet metal to connect the wiring to power. There's no way to avoid that.�
Nov 3, 2013
rekoh i assume the rear would be lit red ..... sounds awesome count me in on both. i would like the to be wired to the parking or daytime lights. it would be cool if the rear got brighter when braking! THANK YOU FOR WORKING ON ALL OF THESE AWESOME MODS!!�
Nov 3, 2013
efusco This sounds like great news and great progress. Thanks for all your effort on this project. I'm really hopeful this is available widely for a reasonable price soon.�
Nov 3, 2013
Mark Petersen For the reare have you considered trying one of thes wireless charging for mobile phones
They may work throug the body panel
And you would avoid cutting holes�
Nov 3, 2013
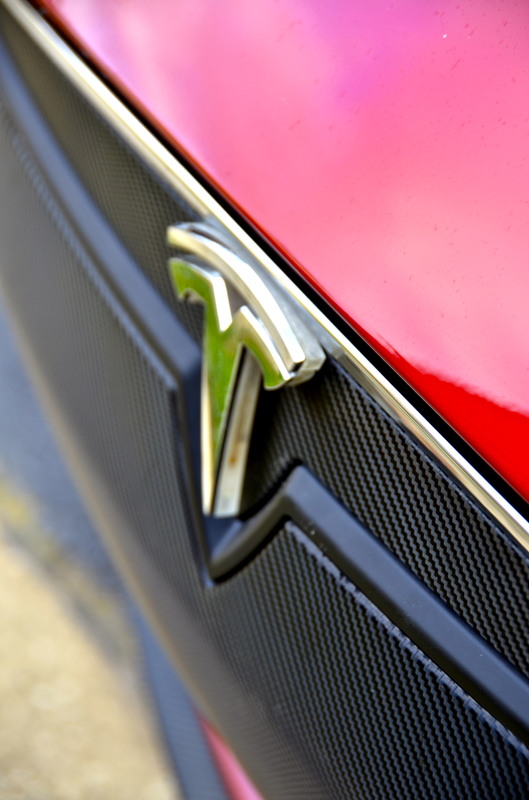
artsci Here are some photos of the new lighted T installed on my car. The photos do not do it justice: the camera captures much more of the reflection on the V below the T than the eye actually notices.


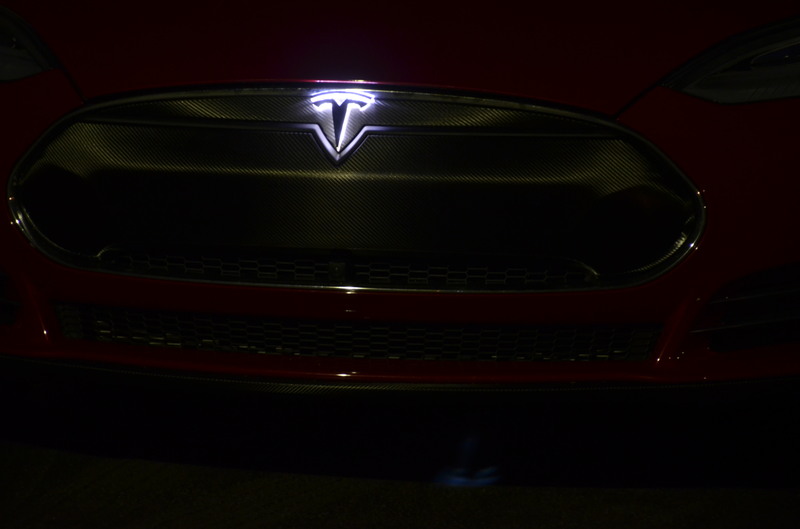
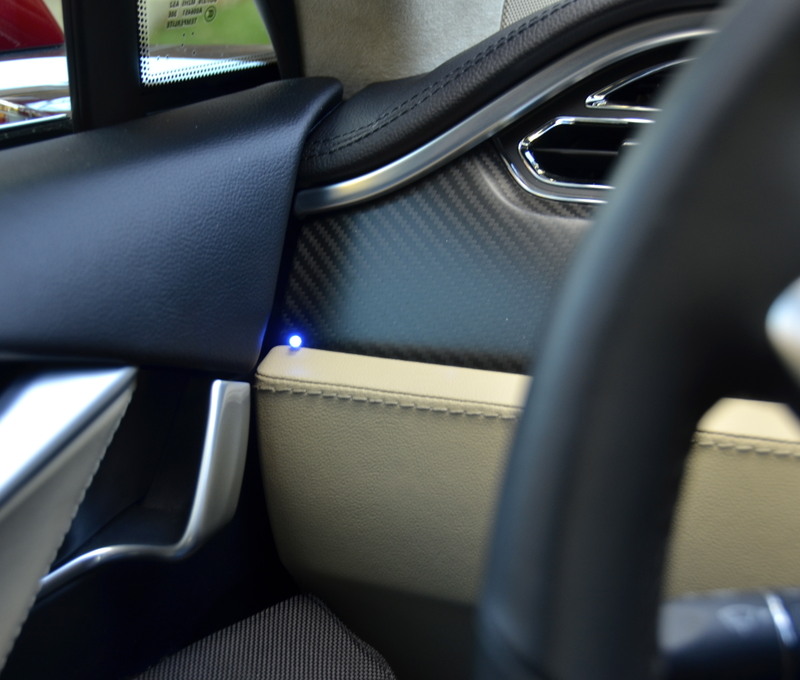
This photo shows a small LED mounted on the dash that indicates that the lighted T is on.
We should have a kit available in about one month, when the 6 testers have finished installation and testing. Don't know price yet as the makers of the 3d T and arch have not yet billed me or even given me any indication of cost.�
Nov 3, 2013
pgiralt Great news that you have discovered a solution that doesn't require cutting the nose cone frame! I had backed out as a beta tester because I didn't want to cause permanent damage to the car. This is looking very promising.�
Nov 3, 2013
artsci Right, just two 5/64s holes in the nose cone. That's it.�
Nov 3, 2013
Odenator My wife just saw these pictures and she indicated that if we do not end up on some list to buy these, then my expected life span will be much reduced.�
Nov 3, 2013
dsmith2189 Or change from white to red when braking.�
Nov 3, 2013
artsci Possible but difficult unless we can find a similar very thin LED strip in red. A lot to fit in a very small space. But worth a try.�
Nov 3, 2013
rekoh I would be concerned about laws that might restrict white lights on the rear of a vehicle (other than illuminating the license plate). I think red on the rear would look sweet.. brighter when braking. white for the front. connect the front to daylight running light circuit, connect the rear to the license plate lighting (or to the tail/brake if going with the brighter when braking option). Just some thoughts. This is a very fun/unique mod!�
Nov 4, 2013
aaron.s Rick
AMAZING results! The light is so much more even then before and looks so good.....!
Excited you are now tackling the rear "T" logo.... But I have a challenge for you
I think it would be SO COOL to have the embossed Tesla lettering on the rear chrome strip to light up at night so you can read "Tesla" in the dark. Of course, that would require cutting out the raised part of the lettering and putting some sort of thin flat lighting material (thin flat OLED white light or Electroluminescent Tape) to be placed behind the chrome strip.
EL Tape:
http://www.ebay.com/itm/like/121177931957?lpid=82
Do you think that is at all possible? And don't worry - I *know* I'm crazy!
Aaron�
Nov 4, 2013
artsci It's very possible and I've been thinking about since you suggested this months ago. EL tape is probably it, although side lighting a thin plexi strip might also work. I'll turn to this after the rear T.�
Nov 4, 2013
zax123 I love how even the light looks coming out of the plexi. Super nice job!!
Can't wait to play with this and looking forward to a rear kit as well. I hope there's a switched +12V source in the trunk lid.�
Nov 4, 2013
artsci This version is not Plexi -- the T's are 3D printed with whatever material is used for that. Plastics to be sure but not Plexi. That helps with the light diffusion.�
Nov 4, 2013
alexhamilton71 Very awesome! I don't even have my car yet and I can't wait to make this mod
P85+ Metallic Grey/Black Perf Seats/Carbon Fiber�
Nov 4, 2013
carrerascott What will be involved in installing this? If pretty simple, I'm interested.�
Nov 4, 2013
Frankrb What does it look like in day light? Will it be on all the time or only at night?�
Nov 4, 2013
artsci Until the 6 beta testers finish their assembly and testing I'm not sure. For now the Oznium diamond LED strips have to be threaded into the 3d T and arch, mounted on the nose cone, and wired to a 12v power source controlled with a remote that syncs with Homelink. So it's a project for an advanced DYI type. But we may find a way to supply the T and arch already set up for mounting so any beginning DYI type or car mod shop can do it.
- - - Updated - - -
In my current set up light is not bright enough in daylight to be clearly seen. If it was it would be blinding at night and you'd never see the T -- it would just be a ball of light. It's really designed for night time use or overcast days. But further experimentation may change that. At full brightness, the Oznium strips are very bright but also heat up to nearly 200 degrees. In an enclosed space like the 3D T, that's not good for the longevity of the LEDs. We're using a resistor to lower the heat to appropriate levels, but that also lowers the brightness. So compromises have to be made.�
Nov 4, 2013
efusco I think he's (like me) wondering what the new T looks like in daylight (unlit)...Does it look pretty normal or is it an obviously modded T?�
Nov 4, 2013
artsci Looks pretty much the same as the plain version. On close inspection the well-informed would see a difference but not John Q. Public. It's raised 9/32s" and the lighted area under the chrome T and arch are a kind of milky white. I'll take some photos tomorrow.�
Nov 5, 2013
youlikeadajuice Cool project Artsci! I know it's late in the game for this, but had you considered using Electroluminescent wire to provide the light? I've used this on a few projects, it runs very cool but not sure if it would provide the brightness you're looking for.
CooLight Electroluminescent Wire�
Nov 5, 2013
zax123 Oops, I knew that. I guess I didn't have a good name for it since it's the raw material for the 3D printer.
- - - Updated - - -
Hi Aaron,
I just ordered that chrome strip from my local service center. I'll order a short length of EL tape (hopefully it's available in lengths less than a foot (which is all we need). Then I'll dremel out the letters and see if there's a neat way of passing a wire there (the back of the strip will tell me where the clips/holes are, etc).
I'll keep you all posted on progress. Maybe I should start a new thread once I get things going.
Edit: Does anyone know if EL tape can be cut basically anywhere along its length? It looks like the conductors run along its length which leads me to believe that it *is* possible...�
Nov 5, 2013
artsci Here are some photos of the T in daylight, unlighted.


 �
�
Nov 5, 2013
AnOutsider ditto here. excited to see what comes!�
Nov 5, 2013
artsci Tried that out at the very beginning of this experiment. Decided not to go with it for several good reasons:
Light is not bright enough
Has a bluish cast even in the "white" EL
Degrades over time�
Nov 5, 2013
aaron.s Zax
Keep us posted!
The only problem I foresee is the plastic behind the chrome piece is attached to. It seems solid and not hollow and the end of the EL tape has that bulkier connector that needs to be tucked somewhere... Also make sure you get an EL strip that is taller than the lettering! The link I gave - the white glowing part is only .31" tall... the lettering is 11/16" (almost 3/4") tall.
I'm so excited though - REALLY looking forward to this mod too!
Aaron�
Nov 5, 2013
umuhk EL material is basically a capacitor, so it's constructed as a "sandwich" of layers: the power conductors are the top and bottom layers (well, inside the protective layers), so it can usually be cut into arbitrary shapes. BUT...
- charges can accumulate at corners, so complex shapes won't be evenly bright
- the conductive layers have some resistance, so brightness can vary over large areas and long lengths (this is likely why there are wire conductors down the length of the tape)
- the material between the conductors is very sensitive to moisture, and will quickly degrade in the presence of water vapour; if you do cut it, be sure to seal the edge carefully to keep it waterproof
- changing the area of EL material will change its electrical characteristics; make sure the driver circuit can adjust appropriately
�
Nov 5, 2013
artsci This why I think we need to use thin plexi side-lit with LEDs. None of those problems.�
Nov 5, 2013
Klaus Can't wait ... Must have ...�
Nov 6, 2013
artsci 6 3D Ts and arches shipped to the 6 beta testers today. We should being seeing installation results early next week. In the meantime mine is running fine.
If all goes well I'm guessing the kits will be available in less than 30 days. After the testers have completed their installations and I have their feedback, I'll post detailed installation instructions so that everyone can make a judgment about whether he or she wants to do this as a DIY project or use an installer.�
Nov 6, 2013
RandyY I'm super jealous! We don't need to get on 'the list' with you at this point if we want to get in on this right?�
Nov 6, 2013
artsci No need to get on a list. The 3d Ts and arches can be made pretty quickly. When we'er ready I'll post all the parts needed. The Oznium diamond LED strips are the key part.�
Nov 6, 2013
rekoh Any idea on cost?�
Nov 6, 2013
nkohlimd Looking forward to receiving the beta kit-to the other beta testers, please let me know if you have figured out a way to wire it to the headlights. Would ideally like it on at all ties with the headight but wire a switch to turn off if needed. Would rather not have it on during the daylight or have to keep turning it on or off. Another option would be to wire it in with a photosensor so it automatically goes on at a preadjusted darkness level. That may be the easiest option. Will do some research......please share your suggestions/ideas as well......appreciate the expertise and experience this forum has to offer.....thanks
- - - Updated - - -
Something like this - small sensor giving multiple install options
http://www.amazon.com/Amico-Photoelectric-Switch-Sensor-50mmx25mm/dp/B00BLZ93T2�
Nov 6, 2013
artsci Not yet but it will be reasonable. I want to see if I can cut a deal with Oznium for bulk purchase of the diamond LED strips.�
Nov 7, 2013
NJ Rob Any chance of getting a copy of the 3D printer file? I have the MakerBot Replicator 2X and would love to try printing a few out in different colors.�
Nov 7, 2013
npiwovar It's Alive!!! I had Rick's Lighted T installed on my S today.The T is not very noticeable until the lights are turned on.The light behind the T is bright enough even with the resistor hooked up.The Oracle programmer works well also (I was worried about that before the installation).I'm still learning the program sequence with the remote.I don't have homelink and have been using the remote control of the programmer.My personal favorite is the breathing mode.
My installer asked me if I wanted the T to go on when the headlights go on and i said yes...so that's the way it is hooked up.
My nosecone has been covered in carbon fiber vinyl...T also..no chrome shows on my car...and my installer left my T that way and the light just comes out of the sides.No glare from the light at all...No, I haven't taken any pictures yet but I will post some photos in the next day or so.�
Nov 8, 2013
artsci Very good news for those who want to install a kit once they are available. i've been talking to Oznium and they've agreed to develop a custom diamond LED form factor in a thin, flat PCB for this application. It will fit perfectly in the T and arch channels and use side emitting diamond LEDS. It will also be waterproofed. There will be no bending and cutting of LED strips. Oznium will be make them exclusively for this purpose and they will not be available online or on a retail basis. A number of LED color options will be available: white, blue, green, and amber.
This will make installation of a kit much, much easier as the Oznium LED PCB will be installed in the T and arch ready for mounting on the nose cone. I FedExed today a T and arch off to their factory in Hong Kong for the development work to begin.�
Nov 8, 2013
ggbjr Amazing news! Thanks for your efforts.�
Nov 8, 2013
efusco Outstanding!�
Nov 8, 2013
rekoh Very cool -- would b appropriate for them to do red for the rear to comply with local laws if people want to mod the rear T too
Awesome news though!!�
Nov 8, 2013
artsci The rear T will be next after we produce the front T kit. Now that I have a relationship with Oznium the suggestion that the rear T switches from white to red when the brakes are applied is a reality -- working with Oznium we can get it done.�
Nov 8, 2013
tomanik Nice work artsci, look forward to getting a kit one day!�
Nov 10, 2013
aaron.s WOW!
Aaron�
Nov 10, 2013
Discoducky Maybe retrofits will be available at TESLIVE? My car will be there!�
Nov 10, 2013
artsci That's a very reasonable goal and probably what I want to do. I'll be there for sure, as I was last year with my demo of the T. I suppose I could set up a stall of some kind and do installations on the spot. I've done it so many times it's become second nature.
In about 2 weeks or so I will post kit options and prices, then make them available on the Tesla Parts for Sale section of this site. We'll probably take pre-production orders for the kits at that time.
BTW, I've totally given up on the Oracle remotes. I had a third one fail last night, this time the 4 channel. It just stopped switching on the T. That's three failures out of 4 Oracle remotes purchased. I've concluded that they're making junk (made in China, of course) and have no quality control. If a company is having stuff made in China without adequate quality control, junk is what they'll get. Oznium, on the other hand, makes a very reliable remote with all of the special effects. That's what I'll be including in the kits.�
Nov 10, 2013
Discoducky Cool, very interested in this as well as the other items you've got up your sleeve�
Nov 10, 2013
Klaus Amazing progress!
Thanks, Rick!�
Nov 10, 2013
artsci We've been through all of that to get where we are. Walked away from Plexi an iteration ago. The ozniums fire on three sides so they are ideal.�
Nov 10, 2013
NJ Plugin Sounds great.
Where any pictures posted? Or did I miss them.�
Nov 11, 2013
artsci Here are a few photos of the install and results.

 �
�
Nov 11, 2013
ggbjr My goodness, that looks great. Can't wait for a kit!�
Nov 11, 2013
elecblue The lighted nosecone T is the bomb!
Please let me know how to get on a waiting list for the kit.
Thanks for developing this!�
Nov 11, 2013
artsci There won't be a waiting list as we'll be able to produce these in volume once we're ready. Timing depends almost wholly on development of the Oznium LED pcb that will light the Ts.
Here's my current thinking about kits. Two probably will be offered.
One will have everything needed to do the install: 3D T and arch, sealed with the Oznium Diamond waterproof LED PCB installed and tested, Oracle multifunction controller, wires, tap-a-fuse, crimp connectors, resistor, and detailed installation instructions. This is likely to cost about $275.00. Installation can be done easily by a reasonably skilled DYIer or by a professional installer.
The second will include only the 3D T and arch sealed with the Oznium Diamond waterproof LED PCB installed and tested. Everything else will have to be purchased separately at each buyer�s option. That kit is likely to cost about $175.00.
A warrantee for at least two years on the functioning of the T and arch will also be provided.
I�ll post when these are available, in about a 6-8 weeks I�m guessing. They�ll be offered, appropriately, in the Tesla Parts for Sale on this site. Purchases will be made through PayPal.
Tomorrow I'll receive from Tesla the rear T and arch. So work will begin presently on lighting that as well. Development of that kit, based on what I've learned with the nosecone T, will go much faster. The plan, as with the front T, is to use a 3D printed T and arch and to have Oznium produce a PCB LED array for that as well�
Nov 11, 2013
NJ Plugin Artsci, thanks for the pictures, it looks fantastic. Can't wait to order my kit.�
Nov 12, 2013
SUPRKAR I completed my install last evening. It looks wonderful. It was a little time consuming, wanted to make sure I did not break anything. If I had to do another it would be a lot quicker. The kit that artsci is making should be a snap to install by anyone with basic mechanic skills. I just connected to my parking light wire so the T will be on with parking lights and headlights. I left extra wire so I could change the connection should I wish to do so in the future and add the remote control feature.
THANKS artsci for taking this on and coming up with such a professional result this looks factory.�
Nov 12, 2013
efusco Did you happen to take photos of exactly which wire you spliced into? Will be helpful for those of us hoping to DIY this mod in a few weeks.�
Nov 12, 2013
yobigd20 ohhh boy you can bet I'm going to get this when they're available. sign me up!�
Nov 12, 2013
nkohlimd Still waiting
Sadly, I have the light already to go but the car has been in the shop since last Thursday. Battery fault error and they can't still figure out what's going on. As soon as I get it back, will do the install. Most likely this weekend. I also want to tie the lighted nosecone into the headlights. Any specific details will be most appreciated.�
Nov 13, 2013
artsci The lift gate T and arch went to PCS Engineering today for scanning and 3D printing of the underlying pieces that will hold the LEDs. Then the 3D pieces will go to Oznium's Hong Kong factory for fabrication of a custom diamond LED PCB. It will be set up just like the front T but we're planning to rig it so the it lights in red and turns even brighter red when the brakes are applied. At least that's my plan. Any other opinions about colors, etc?�
Nov 13, 2013
yobigd20 I want a red LED through that center of the T to scan back and forth horizontally.
http://www.youtube.com/watch?v=Mo8Qls0HnWo�
Nov 13, 2013
artsci
You're kidding right? If not red lights on the front of the car are verboten. In any case, even on the rear the T's are so small that a scanning strip would hardly be noticed.�
Nov 13, 2013
ModelS1079 Aer sci, this is he stuff that makes this forum so much fun to read. Following since you were using plexiglas.
Can't wait. Looks awesome.�
Nov 16, 2013
aaron.s All -
Saw artsci today and he installed my lighted "T" - looks amazing!
Aaron�
Nov 16, 2013
zax123 SUPRKAR,
I'm a tester too, I was wondering how you found your parking/headlight wire. I'm thinking of doing the same, but not 100% sure. I'm planning on doing it this week (I just got the kit yesterday cuz I'm in Canada).
Thanks!
- - - Updated - - -
Looks great Aaron!
I'm curious, as the "true" Tesla road tripper, how much mileage do you have on your beast by now?�
Nov 16, 2013
SamGarber Great to meet you today Aaron! Looks awesome - was hard to see it in action during the day.�
Nov 16, 2013
aaron.s Zax123
After today's 200 mile r/t jaunt to the Philly area, that would be about 20,600 miles!
Aaron
- - - Updated - - -
Sam
Thanks for hosting us and thanks for the charge! So happy you had an HPWC and so happy I had the second charger installed on Monday!
Aaron�
Nov 17, 2013
SUPRKAR The parking light wire is located on either side of the car. I removed the plastic cover along the drivers side, you can see the headlight assembly and the plug. The parking light wire is the first wire on the bottom row of the connector as you are looking down at the connector facing the car. The color wire is red with white stripe. Hope this helps. If you get stuck PM me and I will send you a picture�
Nov 17, 2013
AmpedUpInPDX Now the cat eyes have a nose! Meow.
Looks super cool. Way to go!�
Nov 17, 2013
jerry33 Next project: Whiskers to feel for road debris.
Seriously, that is really cool!�
Nov 17, 2013
islandbayy Put me on the waiting list. MUST HAVE @_@�
Nov 17, 2013
efusco Thanks�
Nov 18, 2013
Caloncho Good project!
I want one too when is ready !!�
Nov 19, 2013
artsci See post #259 on this thread.�
Nov 19, 2013
efusco Post #259 Link�
Không có nhận xét nào:
Đăng nhận xét