Mar 23, 2014
4SUPER9 It could have been the posi-tap too. I've heard that sometimes it doesn't puncture exactly the way we want.�
Mar 26, 2014
artsci After delivery of the latest production batch we have inventory for immediate shipment.�
Mar 26, 2014
dsmith2189 That is what I was waiting for.:smile:
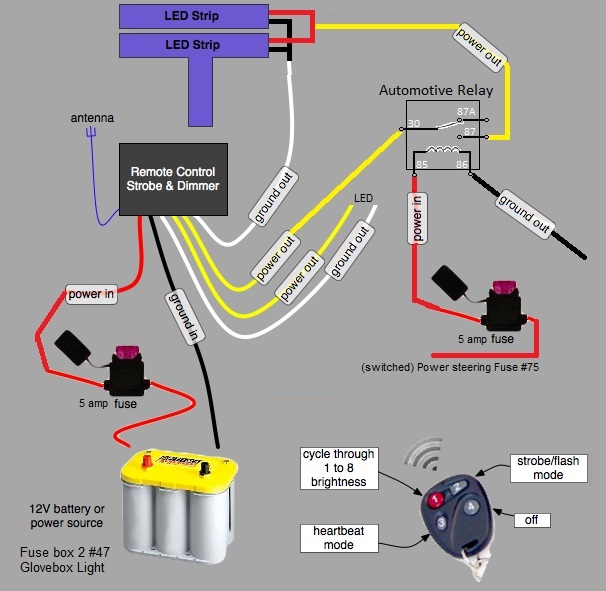
here are some images (hopefully correct:redfacethat show the two options I was considering.
One that comes on with the car using switched power from Fuse #75 (Power Steering) (fuse optional?) and the other with either the DRL or Headlight.
I am going to connect my Oznium controller to constant power Fuse #47 (Glove-box Light) so it will retain it's memory setting.
 �
�
Mar 30, 2014
artsci Thanks to fireLT, who shot the video, and cgiGuy, who edited it, we now have an installation video. This is for the Ozniun controller but the steps are basically the same for power from the headlights or DRL's expect for the 12 and ground connections to the T and arch. These are in the online instructions, link in my signature.�
Mar 30, 2014
efusco Thanks for getting that put up! Hopefully I will be able to find time to get this done as I'm sure the video will improve my confidence.
I had to fix the link to get to it: Lighted T Install on Vimeo�
Mar 30, 2014
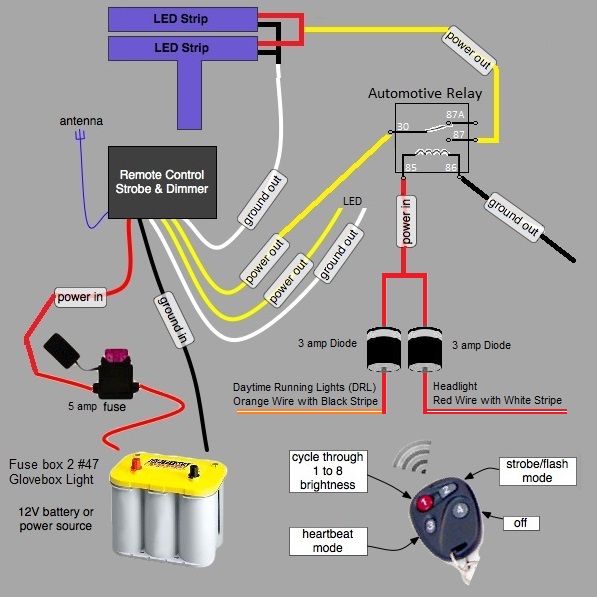
xhawk101 Got mine installed finally. Couldn't get orange wire w black stripe to work so switched to red w white stripe. Works with running lights which was my intention. Took a few more hours than it should have but happy with results.
�
Apr 1, 2014
artsci Here's a link to a short video on production of the lighted T. It's not the Tesla factory�
Apr 10, 2014
GasDoc I have installed the lighted T with remote control and today hooked up an automotive relay so my T comes on when headlights or DRL's are on.
I have the cockpit LED indicator wired out of the the second set of lead from the controller, so it's always flashing (car parked, controller is powered, but T is off).
I should be able to wire the LED indicator out of the automotive relay so it will truly mirror the state of the lighted T, right?�
Apr 10, 2014
cgiGuy Yes, in fact the original written instructions mention: "A LED is wired in parallel with the output of the Ozium controller, a resistor is added to the circuit..." Which means you should be able to wire in parallel right from your switch.
Would you mind sharing part # of the switch you used? And source? I think a lot of us are interested in having the Oznium controller and the "wired to the headlights/DRLs" solution to retain the state it was in.
Thanks!�
Apr 10, 2014
GasDoc It was a generic "4 Pin 30AMP 12 Volt Relay" from O'Reilly Auto Parts. Cost me $6.99
Per the receipt, it is a CTI 84601. I found it in the aisle near the fuses. It's a small black cube with 4 leads which are labelled to match the diagrams a few posts prior in this thread.
I think this part from Amazon will work as well, it's only $3.35 including shipping and is supposed to be waterproof.
I've wired it up to be activated by Headlights/DRL's and passed the output of the ozmium controller through it to simultaneously power the Tesla T and the cockpit LED indicator.
Works like a charm.�
Apr 10, 2014
RLA12194 Anyone know if the waterproof Oznium controller is available yet?�
Apr 10, 2014
artsci They've sent me the waterproof version to try out but it's not yet available on their web site. I'll post photos and info once I get it.
At the same time they have a new remote that seems to have replaced the previous version.
The second production run of the lighted T is almost sold out, so we'll begin another run soon.�
Apr 10, 2014
pgiralt artsci, I noticed something in your installation video that you might want to caution folks on. In the video, you show installing the tap a fuse and installing the fuse, then later stripping the other end of the wire and terminating it. I can see folks inadvertently shorting that end out to a ground and blowing the fuse accidentally. I'd recommend folks finish the install, then put the fuse in at the end just to be on the safe side. Worst-case you just blow a fuse and have to replace it, so no big deal, but still might cause some frustration if someone tries to start it up and it doesn't work because they accidentally blew the fuse and didn't notice.�
Apr 11, 2014
artsci Thanks! I'll change the install instructions. As you pointed out, blowing the fuse is no big deal but we don't won't people to be surprised when the T won't light when everything is connected�
Apr 16, 2014
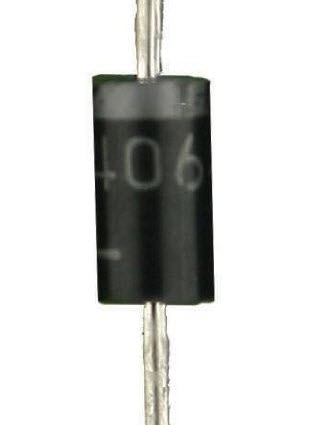
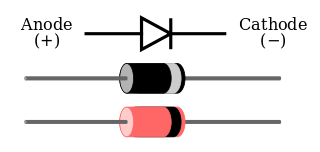
drtko147 Sorry to bother you on this but I thought that on the diode the side with the silver strip is the side the power flows from. From what you are saying here, it is the opposite way. The two leads coming off should be on the opposite end of the diode (the side without the silver strip). Is this correct:
 �
�
Apr 16, 2014
Klaus The ring indicates the cathode end of the diode. Current flows through the diode if the anode side is (+) and cathode is (-). Reverse polarity blocks the current. So for the LED application isolating multiple potential feeds, the anode side needs to be connected to the feeding wire, i.e. each lighting wire, and the cathodes of all diodes need to be connected together and feed the LED T (+) 12V lead.�
Apr 16, 2014
yobigd20 So to answer his question, yes he wired it right, correct?�
Apr 16, 2014
drtko147 Thank you. The silver band on the diode shows the positive sign, indicating the anode.
 �
�
Apr 16, 2014
Klaus This is the standard: File
(Sorry, the URL edit widget keeps messing this up, inserting a biggrin smiley whenever I try to imbed it correctly)
Maybe someone who is still doing EE can explain the weird designation in the picture above?�
 iode pinout en fr.svg - Wikipedia, the free encyclopedia
Apr 16, 2014
drtko147 Success! I was able to use the two diodes to hook up the lighted T to both the DRL and the headlights. Looks great.�
Apr 18, 2014
4SUPER9 Congrats! Sorry I could not respond to your earlier post. Was out of town on a wine tour. I hired a designated driver to take us around. He was pretty thrilled to be driving a Tesla!�
May 7, 2014
tennisman Can anybody recommend an installer in New Jersey for the "lighted t"? I'm getting my car on May 23rd and love the look of the lighted t, but would love to have it professionally installed.
Thanks�
May 7, 2014
xhawk101 Error�
May 7, 2014
artsci For any decent aftermarket install shop (stereos, parking sensors, etc) this would be a piece of cake.�
May 7, 2014
tennisman I was hoping that someone could recommend a shop that had already done it before - frankly, I didn't want my car to be the "test" car....�
May 7, 2014
4SUPER9 You definitely do not need to take this to such a person. It is a remarkably easy project. A beginner can do it in 45 minutes. The only thing a shop would need to know is how to remove the nose cone.�
May 8, 2014
3pod I did this myself as well and I'm not particularly adept at car electronics either. Just watch the online video a couple of times to get the hang of the steps involved. Also making sure you have the positaps and even a voltage meter is extremely helpful if it doesn't light up the first time you have everything connected. Using the diodes to make sure the t is lit with both drl and headlight is pretty straight forward too.�
May 14, 2014
tennisman I'm ready to order the "lighted T", but had one last question - when the "T" is lit, how close in color is it to the headlights and DRL lights?�
May 14, 2014
artsci A very good question. The color temperature of the headlights, DRLs, and side lamps varies more than I'd like. The HIDs are much warmer than the DRLs. The T is much closer to the DRL's and side lamps. It's a cool white.�
May 14, 2014
pgiralt I agree with artsci - the T is very close to the DRL's - might be just slightly cooler, but not much. You'll notice that the DRLs and headlights' color temperatures are quite different.�
May 14, 2014
3pod I love my lighted T but if I could change one thing, it would be to make the LED color a bit warmer. To me its a bit too blue/purple when compared to the DRL and especially the headlights. Not very noticeable when you have it on during the day time but very noticeable at night.�
May 20, 2014
robapodaca In reviewing this, I was wondering... Did someone finally come up with an installation that doesn't use the remote, but has the lighted T always on? I thought I read a post about how someone would go into his garage at night and the T was his nitelight allowing him to see to get around his garage.
I thought I read about how the "always on" was dim, and then the T would turn bright with DRL or Headlights.
Any help?�
May 20, 2014
4SUPER9 Fuse 75 has T always on when car is on. Always on, regardless of whether the car is on or off is another fuse, I believe the glovebox. Fuse number is listed in the instructions.�
May 20, 2014
artsci If the T is direct wired to that glovebox light fuse it will always be on. With a 500-600 ohm resistor wired to the circuit it would be dimmer in that state.
With another direct connection to the headlight circuit and no resistor in that connection, but with diodes in both 12v sources, when the headlights turn on it would be fully bright.�
Jun 25, 2014
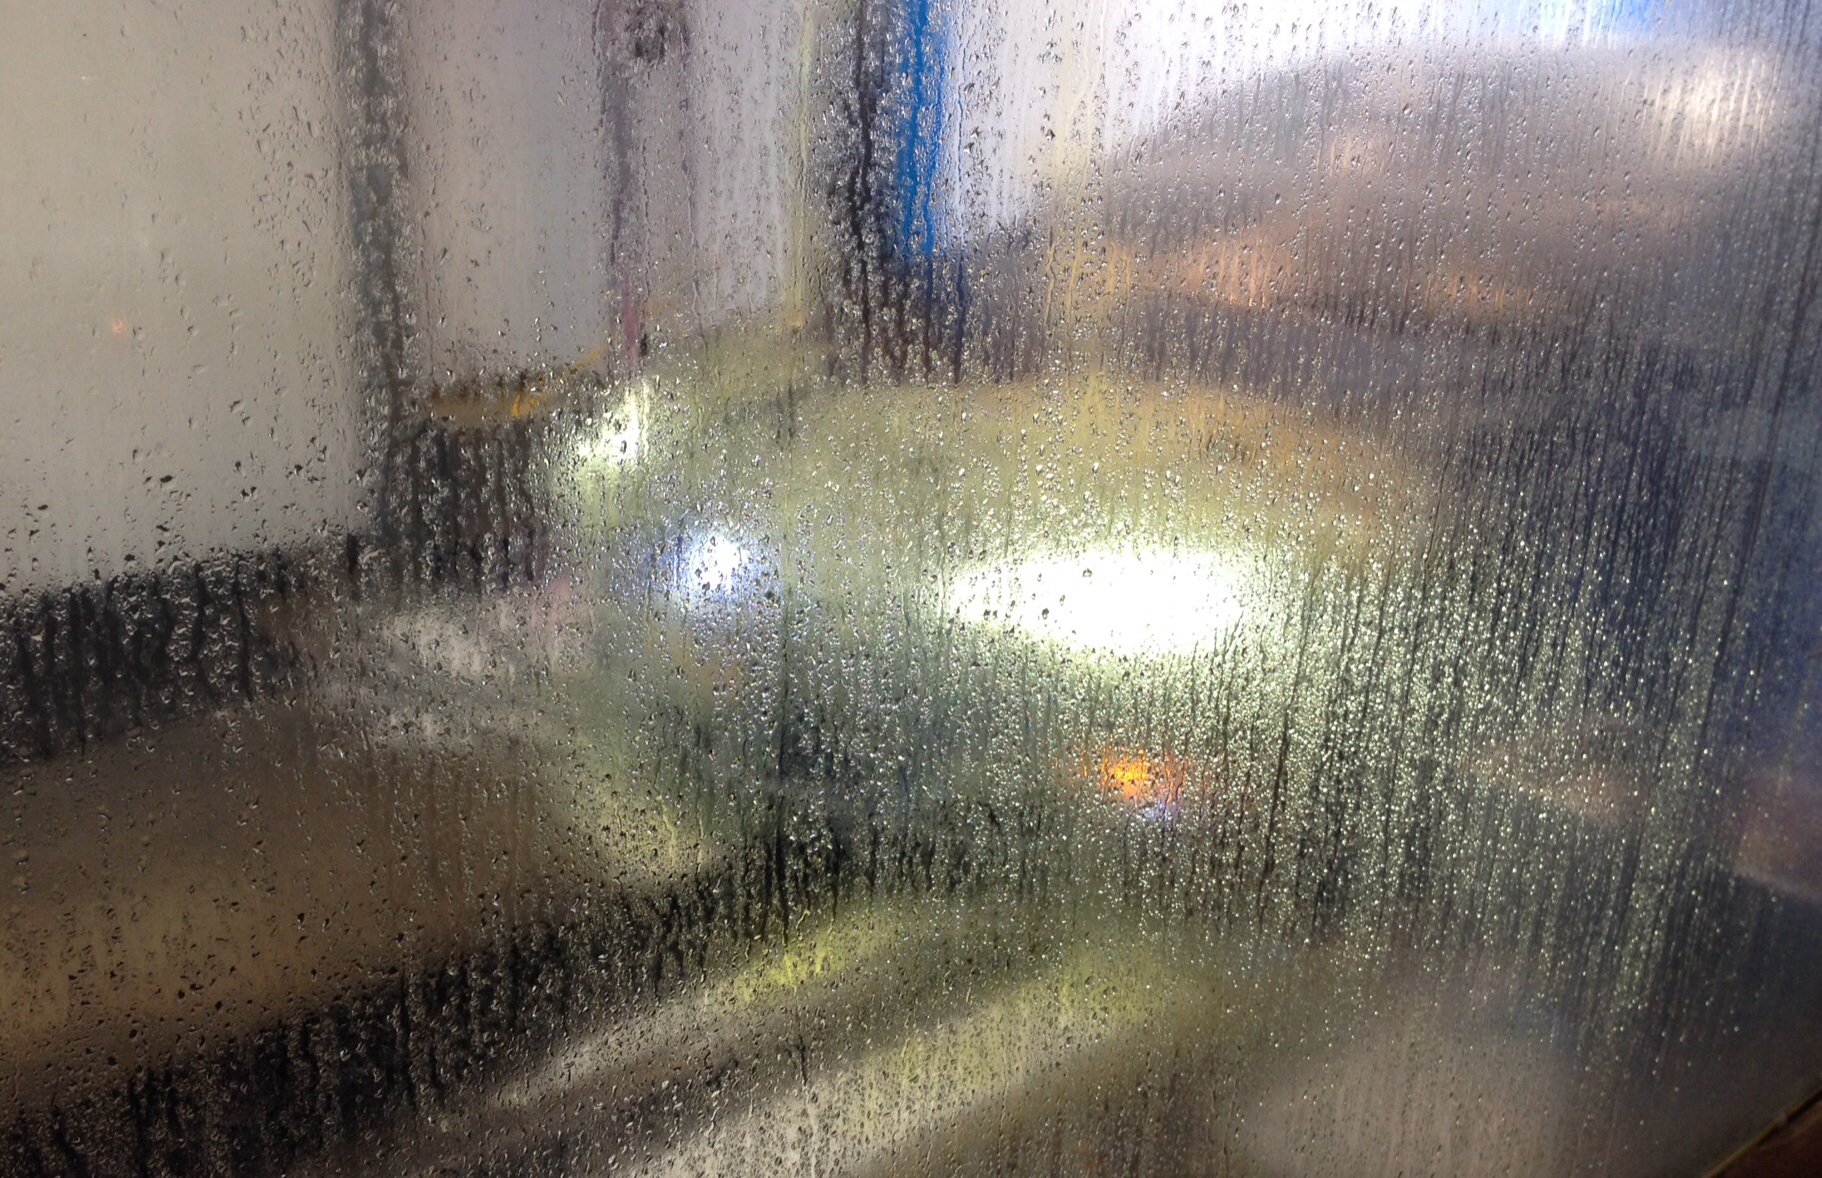
Caloncho @artsci, did you know the front lighted T can survive the car wash?
 �
�
Jun 26, 2014
artsci Proves that it's completely waterproof as it was designed. Great photo!�
Jun 26, 2014
brianman If you put a row of LEDs at the bottom edge of the nose cone, you'd have a front smilie face to go with the inverted one on the back.�
Jul 9, 2014
RubberToe Just curious since this is the first I have seen of this. Is there a back lighted T that comes on with the brake lights?
RT�
Jul 9, 2014
swegman Rear T is coming soon. Me and 2 others are waiting for beta units to test for artsci. Mine is due to arrive tomorrow.
The rear T lights up when the car's lights turn ON. Light output is designed to match brightness of rear lights. When brakes are applied, the rear T brightens to match light level of the rear brake lights.�
Jul 12, 2014
FLDarren Artsci, I have a small problem. I wired the single LED inside the car like the directions stated but when I use the remote, the T and the interior aren't synced. When the pulse shows on the interior, the strobe effect shows on the T. The on/off indicator is correct though. It's weird. Any advice on how to solve this?�
Jul 12, 2014
artsci This is weird. The solution is to wire both the lighted T and the interior LED on the same outputs of the remote.�
Jul 12, 2014
FLDarren This is the reason. I received 2 remotes with my controller. It's a new addition to the controller. Check out number 4 on the features.12V Remote Control LED Dimmer Switch & Strobe Controller - Plug & Play I'll play more with the remotes later to see exactly which buttons make the wig wag effect. I didn't have a lot of time to see exactly what mode the LED's were in because I was looking at the T's reflection in the back of an ICE at a traffic light. Still an awesome product artsci. I love it. Now that I've seen it lit at night I really can't wait for the rear T. Maybe it'll burn the T symbol into the memory of every person who sees it. :wink:�
Jul 12, 2014
artsci Glad they're shipping two remotes now. I complained about that to Oznium, as the earlier version shipped with 2. Sounds like they listened.
This is what Oznium indicates for the remote buttons:
Upper left button (A): Cycle through 7 different brightness levels (press and hold the button to cycle to the next brightness level)
Upper right button (B): Turn on Strobe / Flash mode
Lower left button (C): Automatically cycles from dim to bright to dim to bright (like a heartbeat)
Lower right button (D): On / Off�
Jul 12, 2014
FLDarren I have it figured out now. It just threw me off because I didn't know about the wig wag effect. I'm going to just clip the second pair of output wires from the controller and wire the T and interior LED through the first pair of output wires. It is a cool effect to be able to wig wag the two leads, just not in this case where you want the two lights to be identical.
Button A can make the T stay on while the interior is off and vis versa. It can also make the T strobe while interior is solid and vis versa. When you press and hold A, both lights cycle thru brightness levels.
Button B can make both lights strobe. It can make one light strobe while other is off. It can make one strobe while the other pulses.
Button C can make both lights pulse. It can make one pulse while other strobes. This is where I thought I had a problem.
Very confusing at first.�
Jul 12, 2014
artsci I didn't know about those capabilities and understand how it can be very confusing.�
Jul 16, 2014
Klaus I finally finished the wiring for the lighted T yesterday, after having been out of commission for such work for about six months ... Just a few points:
My original problem was that the Posi-tap connectors didn't make decent contact, despite having been lauded as the best way to splice automobile wiring. Inspecting the connections in bright daylight showed that the headlight wires had been displaced sideways instead of penetrated. Yesterday, re-doing the connections was simple, and I suspect that the temperature had something to do with it, yesterday it was upper 80s here, and my earlier attempt in January was in mid 50s weather, which made the insulation stiff and hard to penetrate - just my best guess.
After the discussion with the DRL turning off with the headlights on I had installed diodes to feed the T from the headlights and DRL, respectively. Because of the dimming of the left DRL with the left turn signal on I had planned on feeding with diodes from the left and right DRL. When I tested that last evening before finishing the connection I found that the T does not noticeably dim with the turn signal on, so I ended up skipping the right DRL diode circuit.
Seems to work great now, just in time for TMC Connect
Thanks for the great additions to our beautiful cars, artsci!
Just ordered the rear red T ...�
Aug 29, 2014
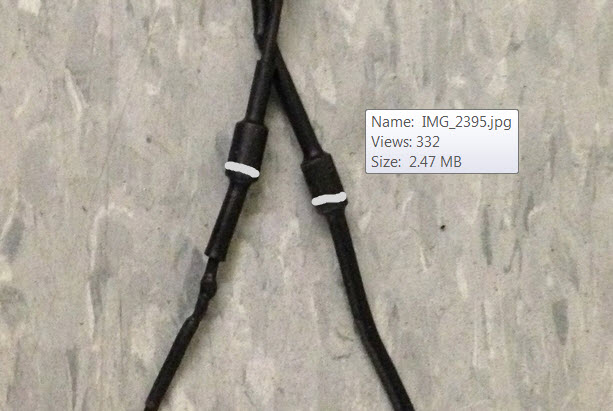
Barryfins Lighted T installation issue with new wiring harness colors
I'm having an issue installing the lighted T to my passenger side headlight hope some one can help me? The wiring harness shown in the instructions has a red wire with a white stripe that's the one I'm supposed to use but my 3 month old Models S dose not have that color wire and I don't know witch one to select. I've tried a multimeter and cants seam to find the correct one ( yes I'm dumb) just checking to see if anyone on this site has found the same issue and figured it out?
Or dose anyone know the slot number they all look to have numbers.
Here are the pictures of the current wiring harness.�
Aug 29, 2014
artsci I compared your photo to the one of my headlamp wiring.
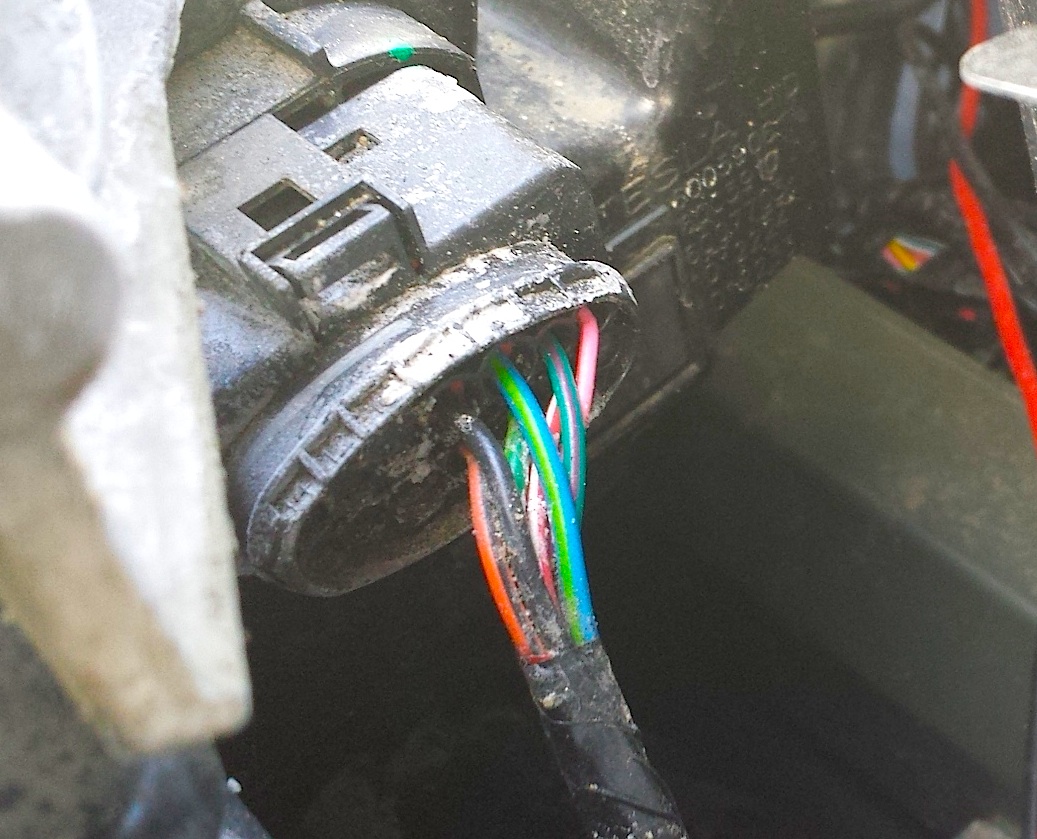
I think you want the blue with white stripe. Please let us know if that one works.�
Aug 30, 2014
Barryfins Blue and red stripe headlights
Orange and green DRL�
Oct 6, 2014
EBill I will be picking up my car this weekend and will be having it wrapped with Xpel right after delivery. I will also be installing the lighted "T"s front and rear, the front camera and a few other accessories at the shop where it is getting wrapped.
I am trying to figure out the order to put on the lighted "T"s and the Xpel. My apologies if this has been addressed elsewhere.
1. Do you put on the XPEL first as one piece and then attach the "T"s to the Xpel - so when you replace the Xpel you need to replace/remove the "T"s?
2. Do you cut out a place for the "T"s in the Xpel with a slight overlap so the "T"s cover the edges of the Xpel?
3. Other?
Will update this thread if the RHD versions have a different set of wires and different locations than LHD cars.�
Oct 6, 2014
artsci The colors changed at some point.
- - - Updated - - -
We discussed this via PM but to make it public I would install the T's over the Expel.�
Oct 12, 2014
EBill Currently stuck on power connections and looking for some fuse box descriptions.
I am using the Oznium controller with a relay for the installation. On LHD cars what is the description of Fuse 75 on the manual? On my RHD car fuse 75 is not used. Fuse 76 description is ABS and power steering logic. Is that the same description as Fuse 75 on LHD cars?
For the relay power I was going to connect to the glovebox fuse. However, I cannot find a fuse with that description. Can someone please share the description for the glovebox fuse in your LHD car.
Thank you.�
Oct 12, 2014
artsci Emailed you with fuse box sections from LHD manual.�
Mar 6, 2016
4SUPER9 To revive an old but favorite thread: I just installed another Ligthted-T in my MS that I picked up two days ago (so, build 2/2016). Evannex only gives instructions for always on (using a remote), but I wanted it the same install as last time, that is, running on both DRLs and Headlights and automated. I ran posi-taps to both connections using diodes as I did in a prior post.
The color scheme in the harness changed again:
- Headlights were changed to Blue with Red stripe (as mentioned above)
- DRLs are now solid Light Brown (NOT orange and green).
To keep things more accurate, I suggest we not go by color, but by wire position in the connecting harness:
- Headlights are in position 5
- DRLs are in position 9
(assuming the top positions above them are numbers 4 and 8 respectively, and the number of the positions underneath follow in succession)�
Không có nhận xét nào:
Đăng nhận xét